Easy Recipe of Strawberry Pie – Make Strawberry Pie At Home -Pro Tips
You might recall that my husband and I created a chocolate strawberry pie many moons ago that we ended up serving at our wedding (among others). Sadly, Josh had to make some drastic dietary changes about a year or so ago, one of which involves strictly limiting the amount of chocolate he consumes. Rather than swearing off our strawberry pie altogether, I decided this called for a new recipe. This one’s almost nothing like the old one, but it is equally delicious.
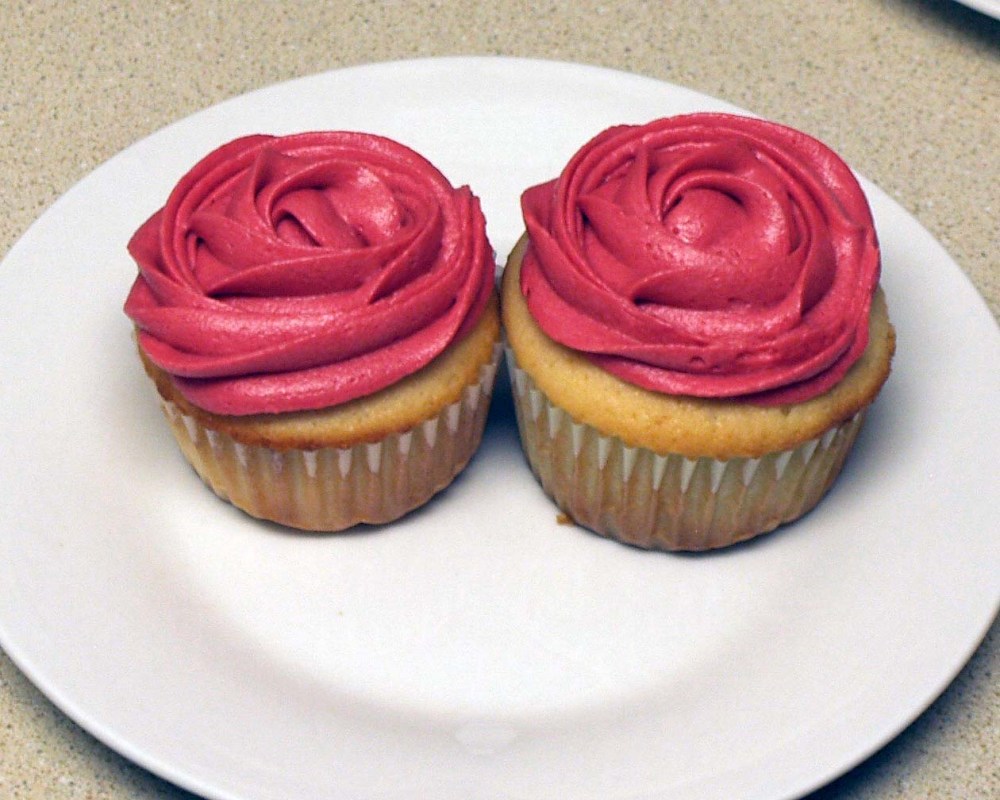
At it’s core, this pie is essentially a banana cream pie that had a major strawberry makeover. There are three layers of sliced strawberries, an impressive (and easy to make) flower decoration made out of strawberry slices on top, and even the custard is strawberry-flavored. Between the pie itself and my habit of snacking on my ingredients while baking, I went through about two pounds of fresh strawberries and one package of freeze-dried strawberries making this. You might be able to get away with one pound if you make your layers sparser and are less fussy with the sizes of your decorative pieces, but I’d recommend having an extra pound on hand just in case. After all, if you’re making this pie, chances are you like strawberries.
I based the recipe on the banana cream pie recipe in Joy of Cooking. To get from banana cream to strawberry, I added ground up, freeze-dried strawberries to the vanilla custard, used strawberry slices instead of banana slices (obviously), and opted to cover the top with strawberries instead of the usual whipped cream. You could add a whipped cream layer if you were so-inclined, but I felt the pie was just right without it. If you do try it with whipped cream, I’d recommend cutting the tops off some strawberries and standing them up in the whipped cream on their cut ends around the edge of the pie.
freeze dried strawberries (I bought these ones at Trader Joe’s)
For baking ambiance:
This is probably going to come out of nowhere, but this week’s recommendation is Judas Priest. They have absolutely nothing to do with strawberry pie, I’ve just been into them lately (and my cat’s theme song is “Breaking the Law” when she’s being bad, which is often of late).
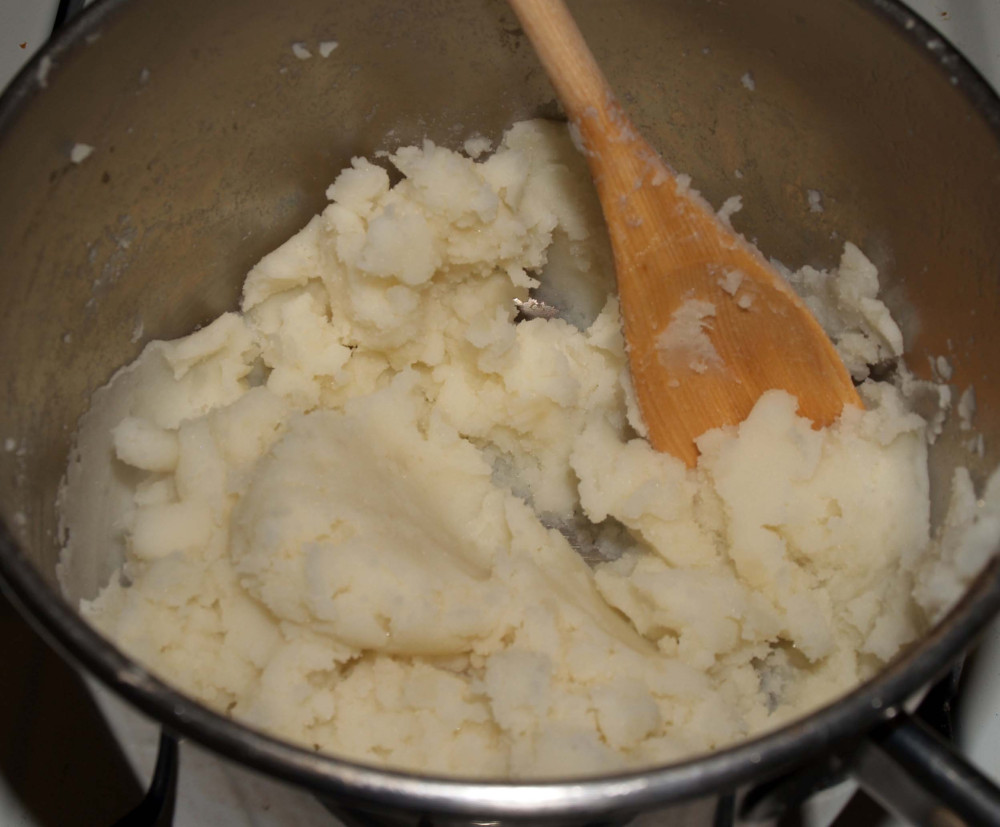
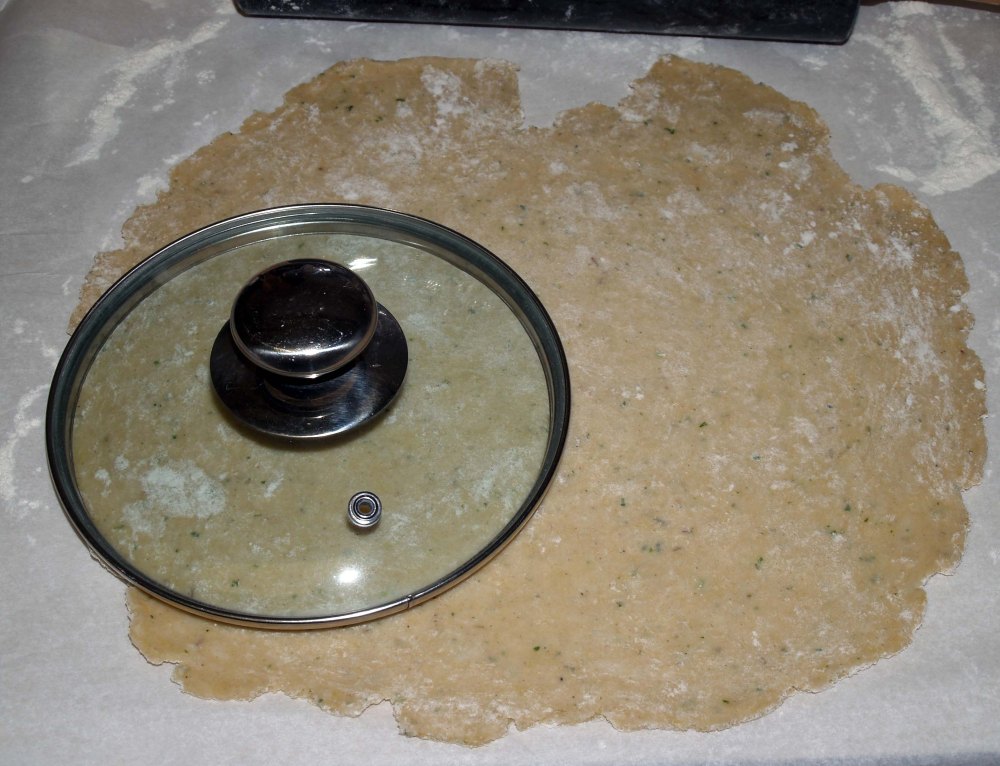
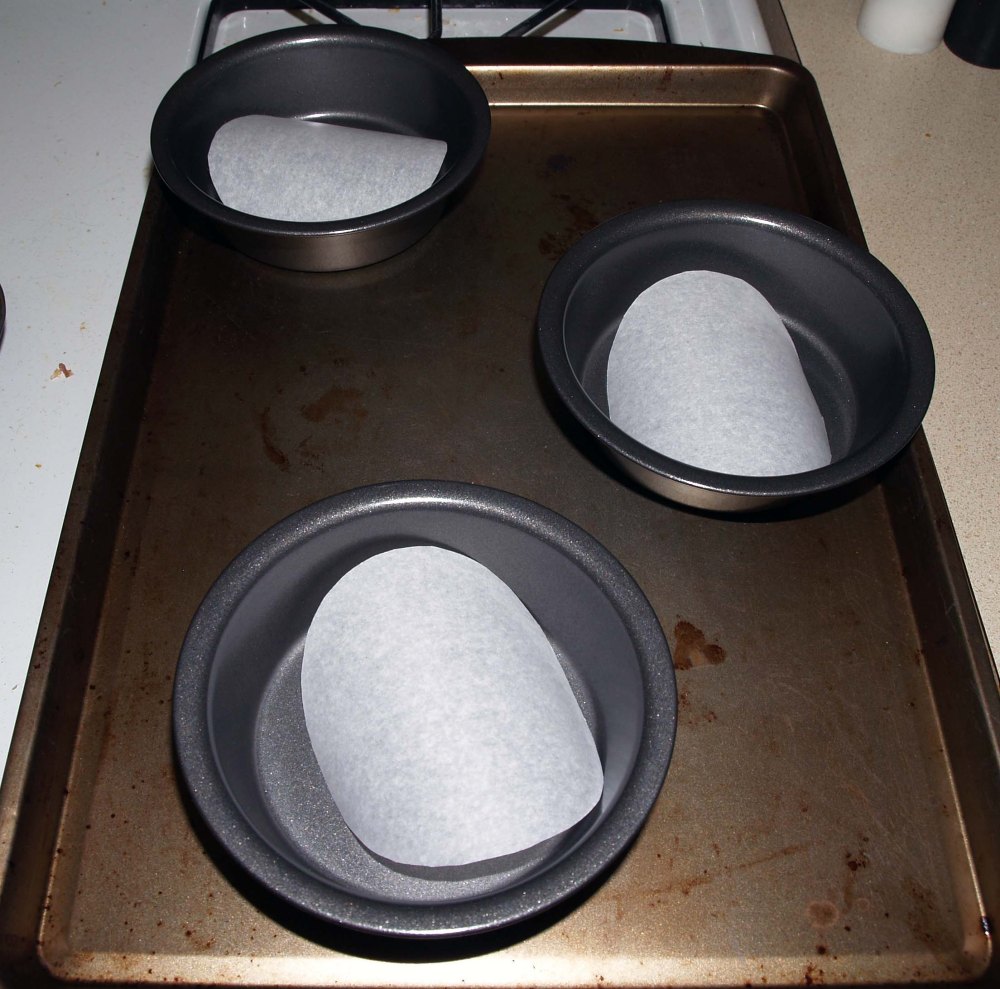
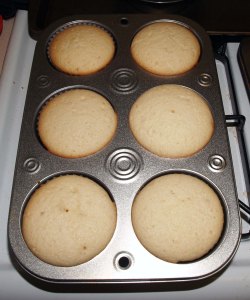
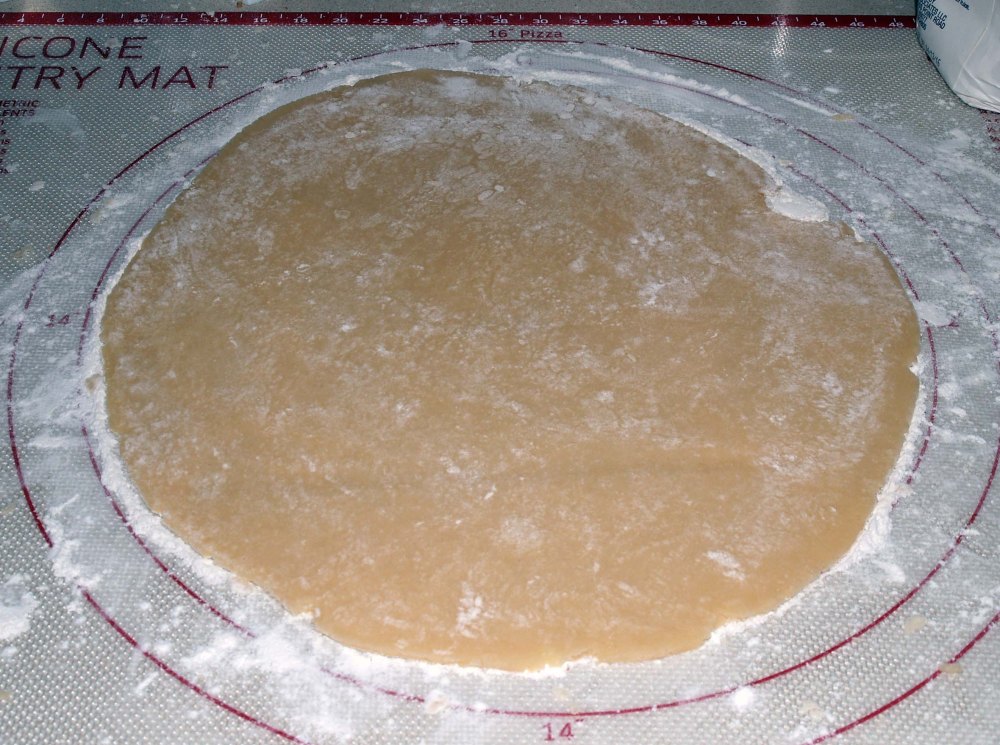
Step:1 First, prepare your crust, Turn off your oven and set the crust aside to cool completely.
Step:2
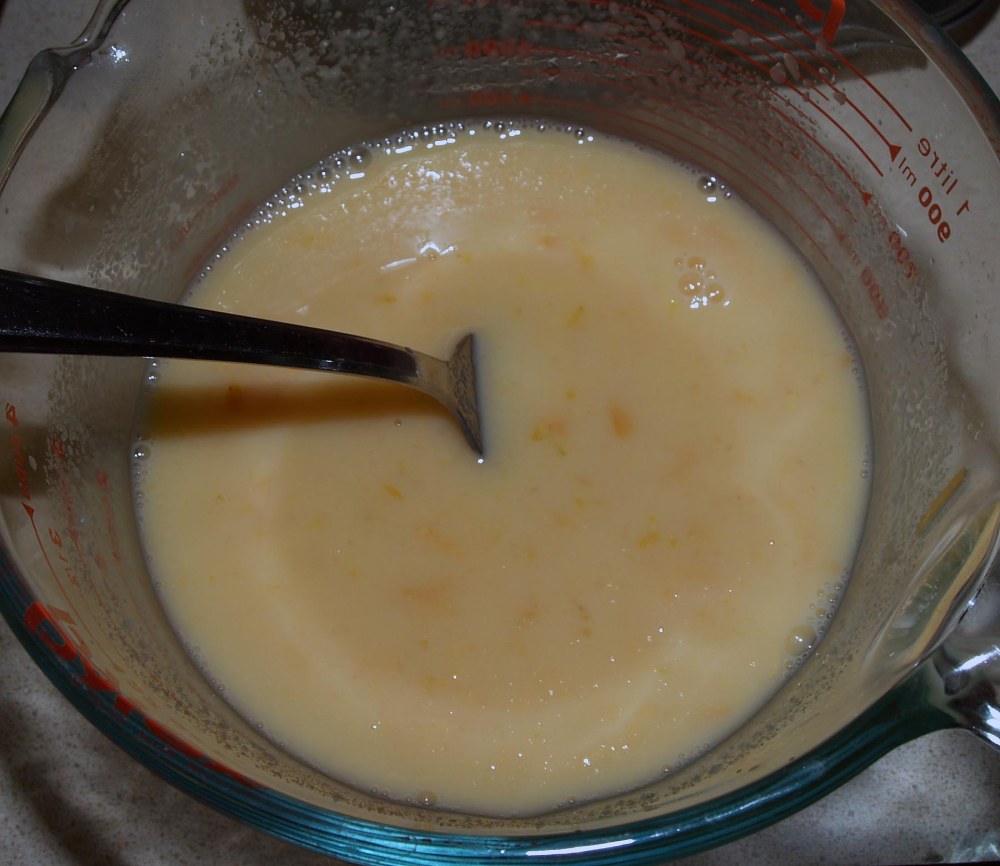
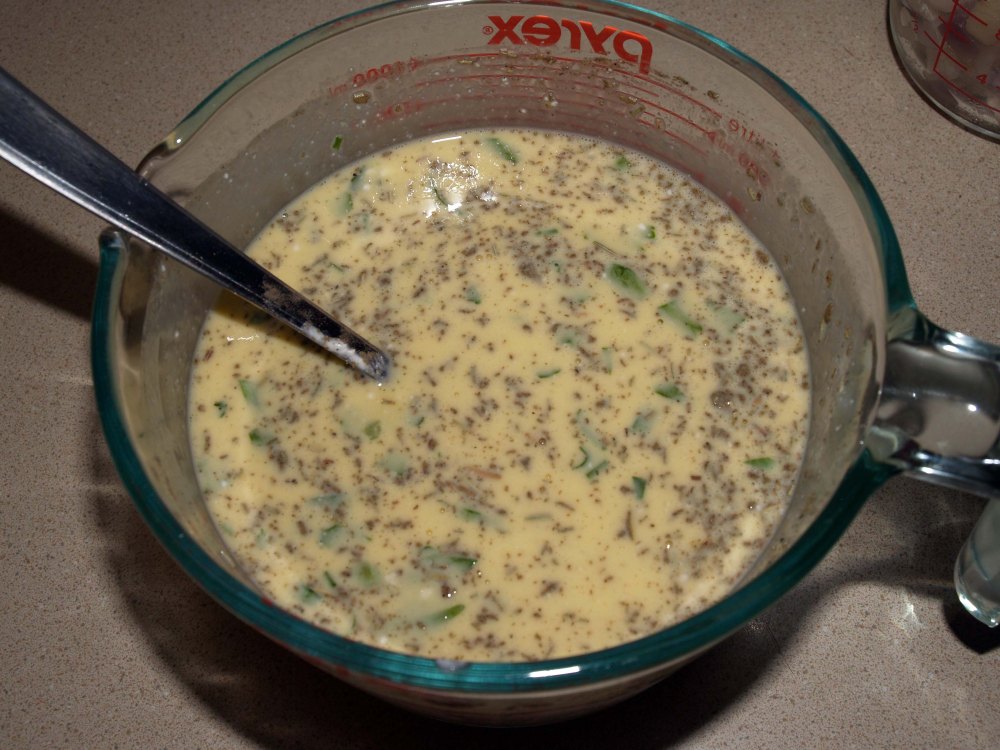
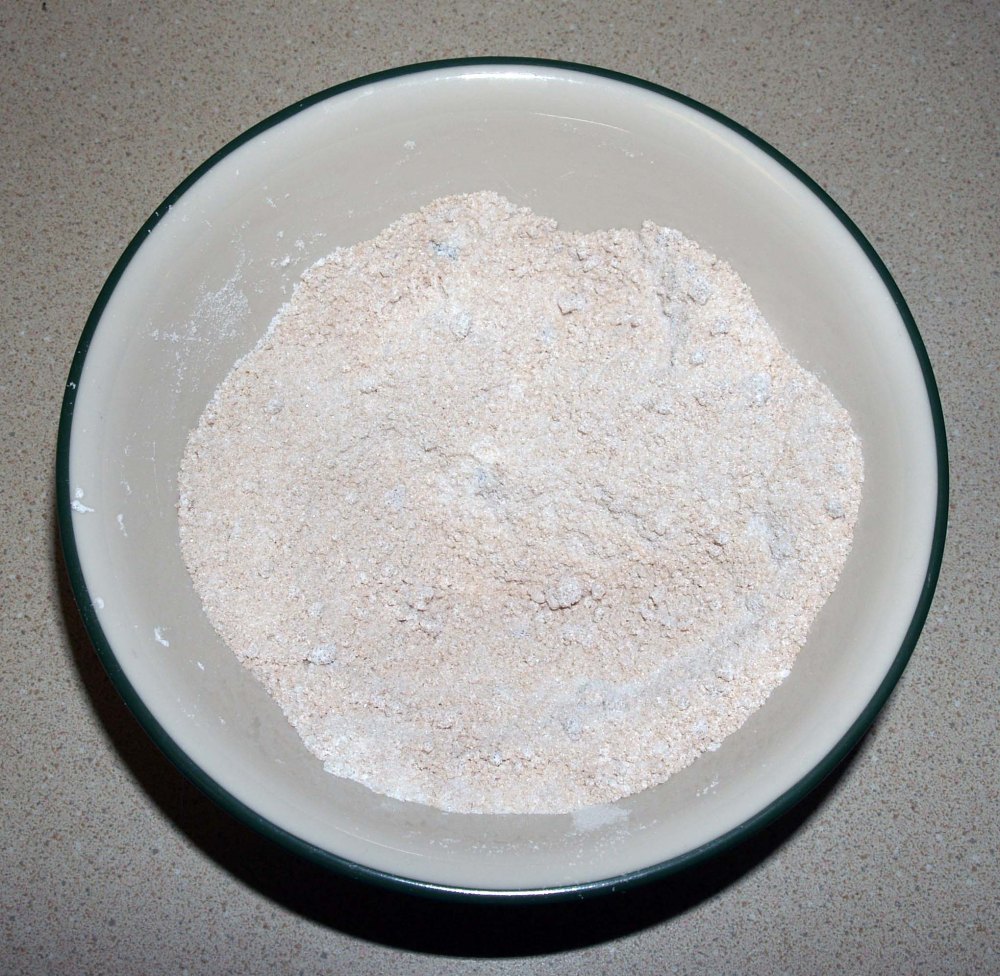
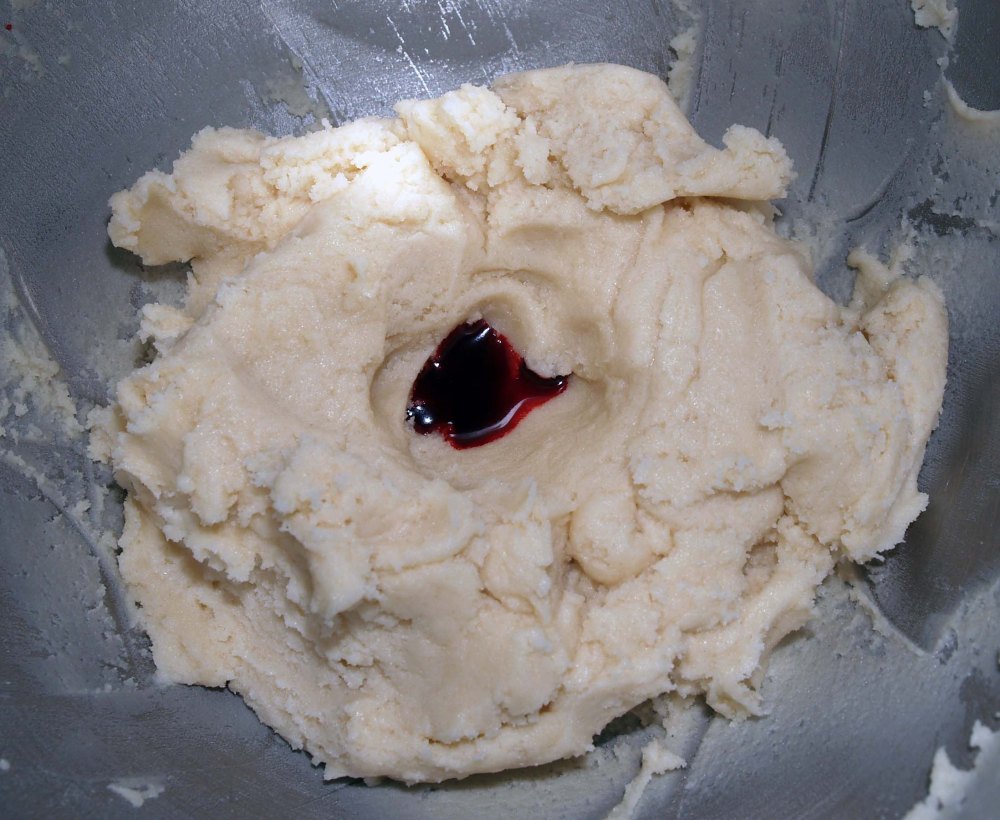
Next, grind your freeze-dried strawberries into a fine powder using a stand mixer. You can sift it to remove any remaining large-ish pieces, or you can just leave them in. They will re-hydrate when you add them into your custard, but they do make the texture a little weird because. That said, once everything’s put together, you don’t really notice. In summary, whichever approach you choose will work out fine.
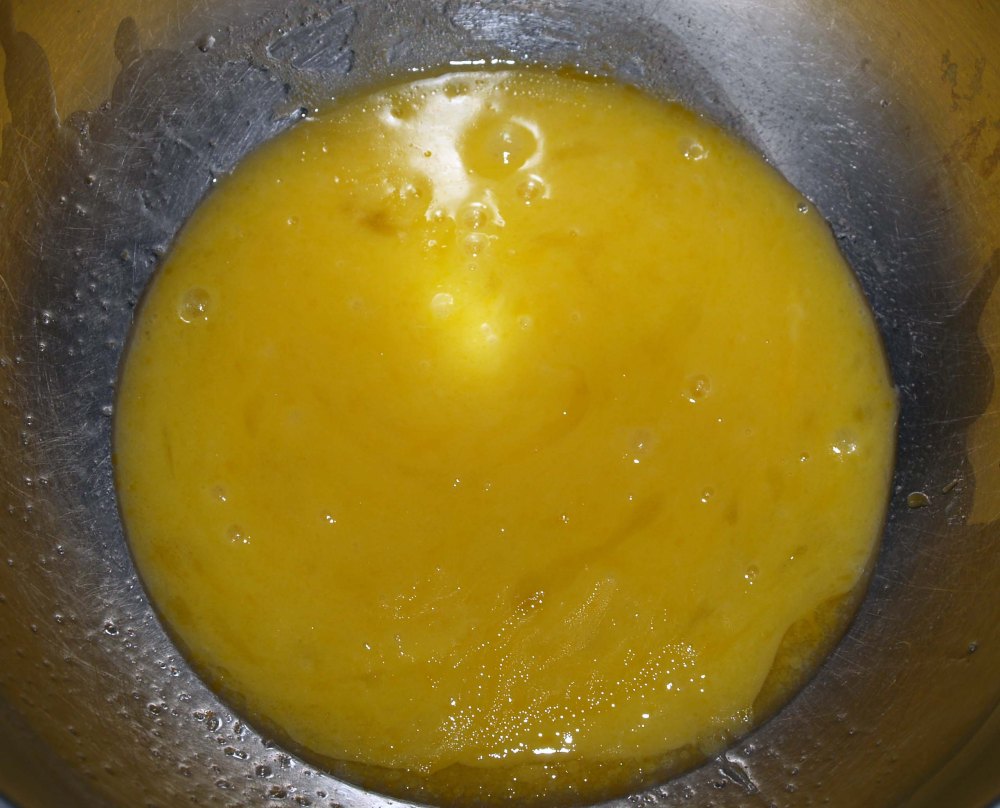
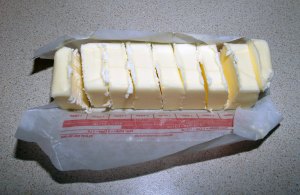
Step:3 Carefully separate your eggs . Set the yolks aside for now and reserve the whites for something else (macarons, anyone?). Cut your butter into cubes and set these aside as well.
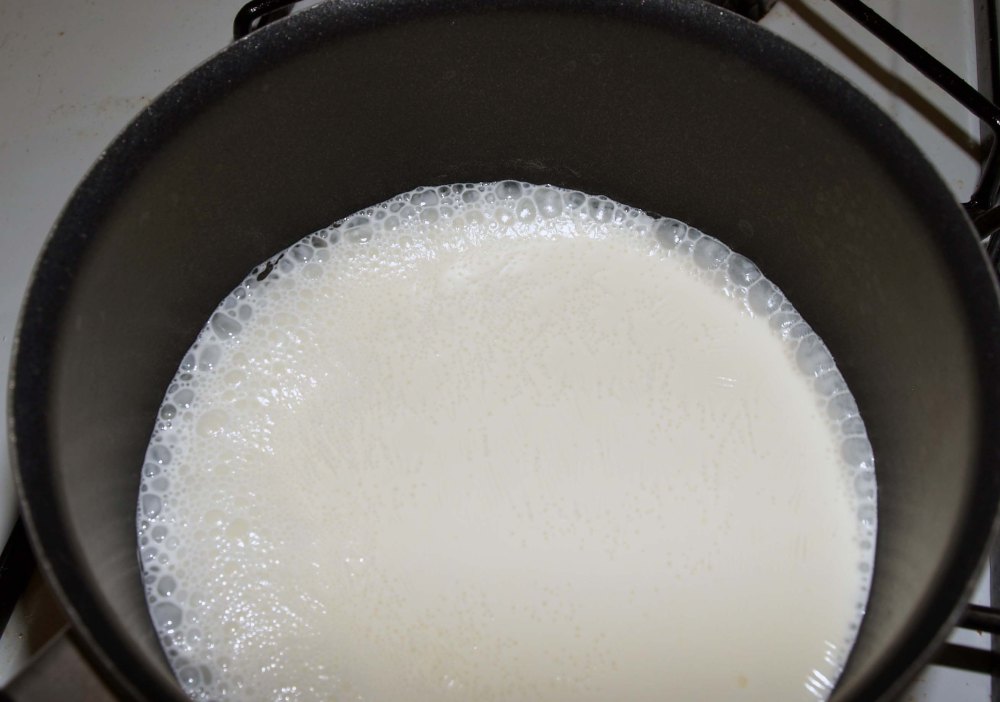
Step:4 In a medium saucepan, whisk together the sugar, cornstarch, and salt.
Whisk in the milk until the dry ingredients are dissolved.
Add the egg yolks and whisk the mixture well until there are no more yellow streaks.
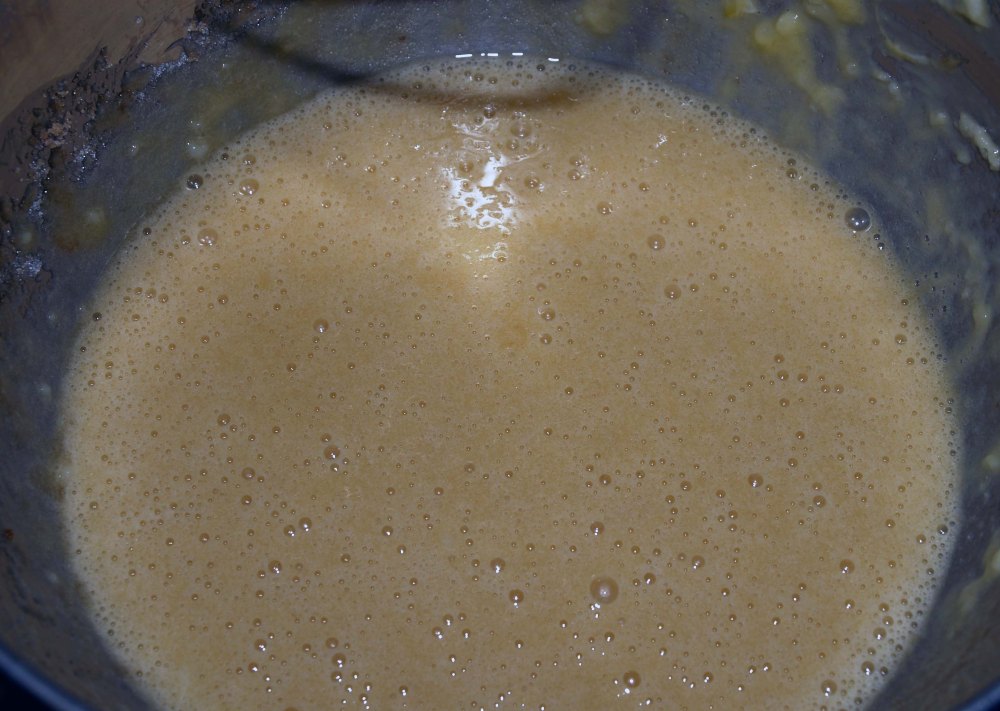
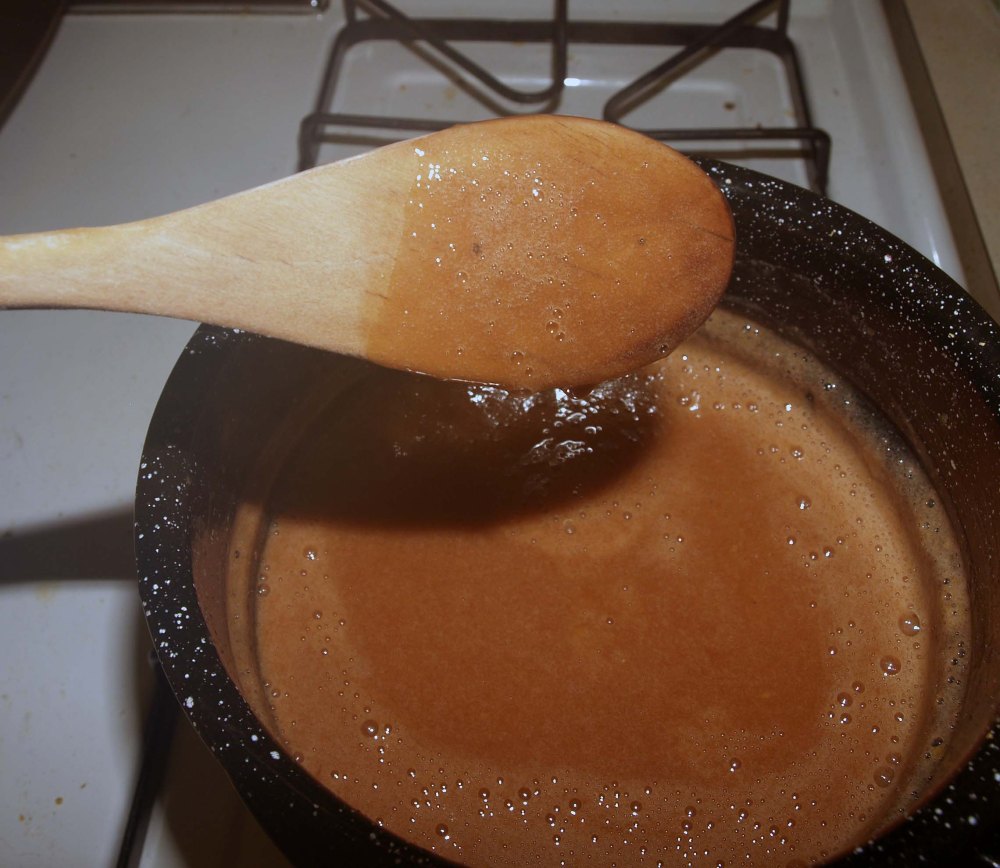
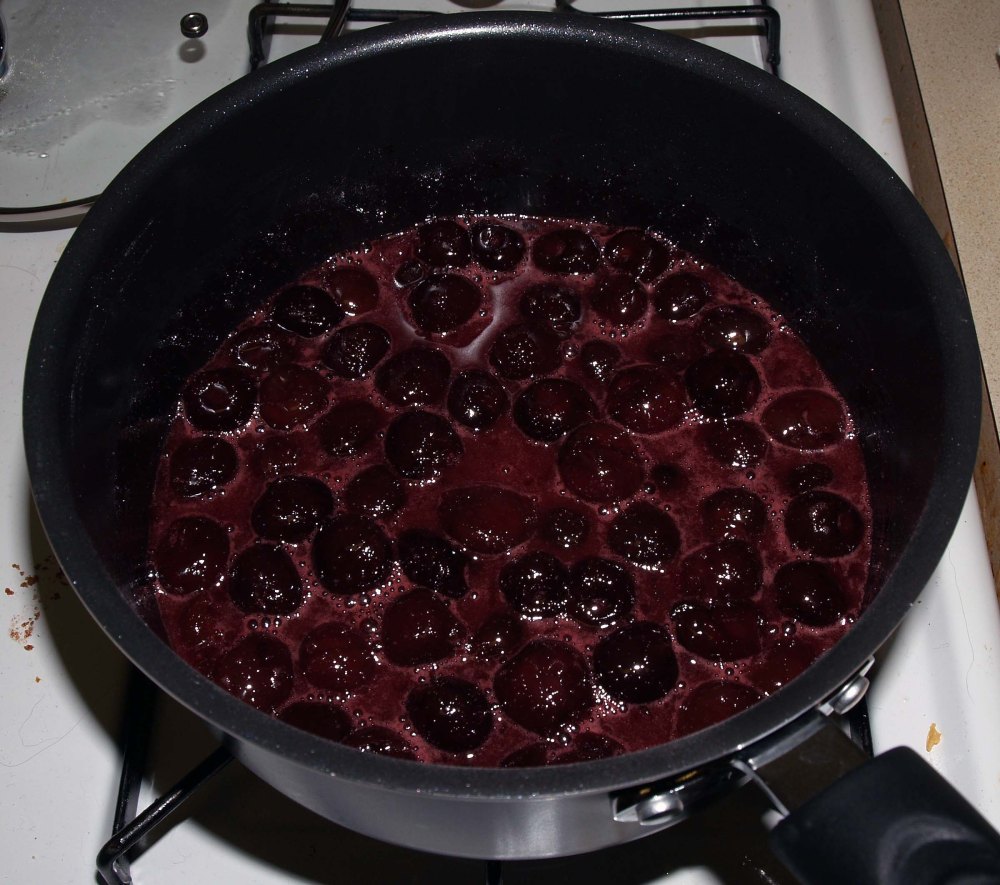
Step:5 Heat the mixture over medium heat and bring it juuuuuust to a boil, stirring frequently. Once it starts to boil, remove the pan from the heat immediately (but leave the burner on). Some clumps will have formed on the bottom, so whisk the custard well until it’s smooth again.
Return the saucepan to the heat and bring it back to a boil. Immediately turn the heat down to low to reduce it to a simmer and cook for 1 more minute, whisking constantly.
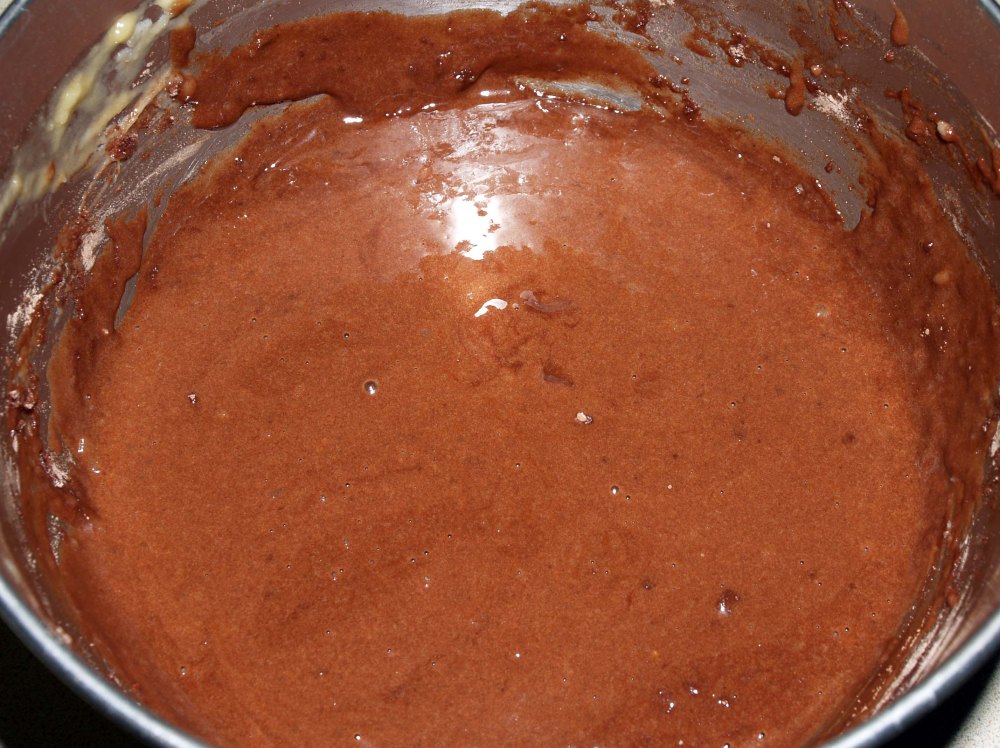
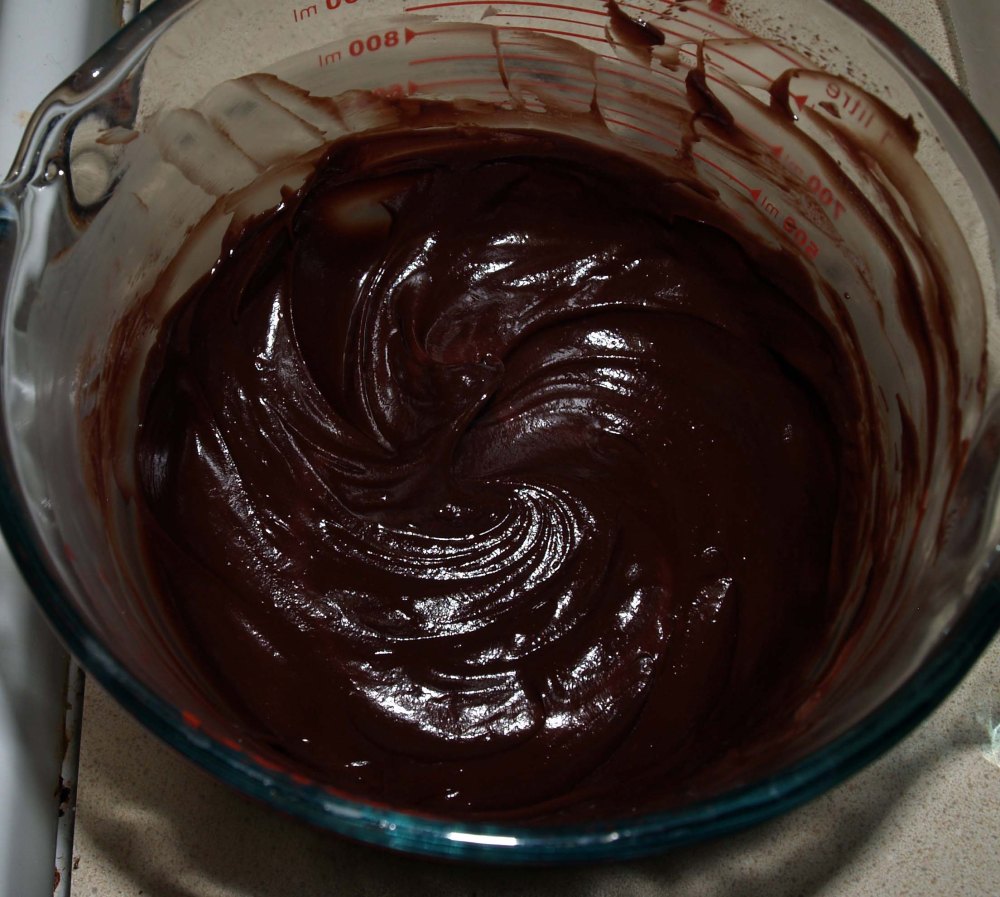
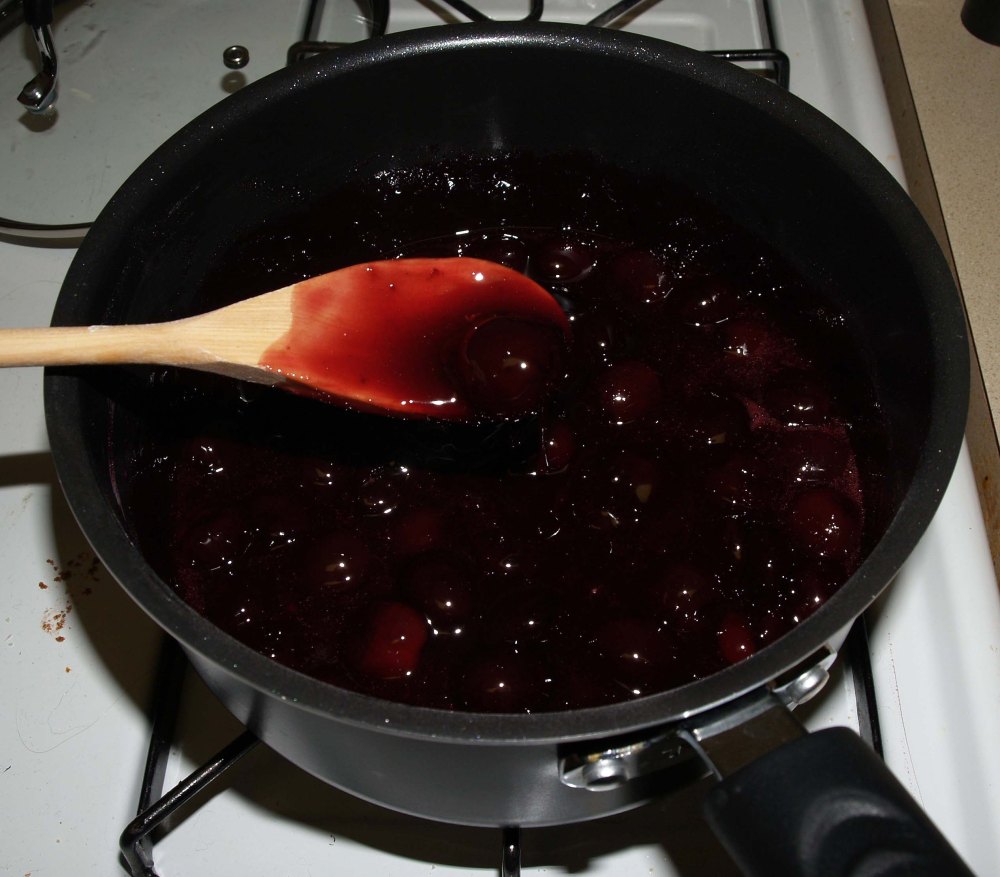
Step:6 Remove the pan from the heat again and whisk in the butter, 2-3 cubes at a time, and the vanilla extract.
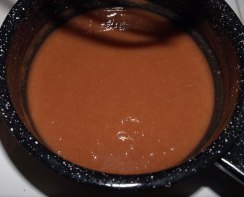
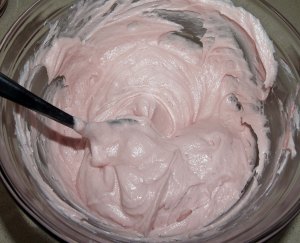
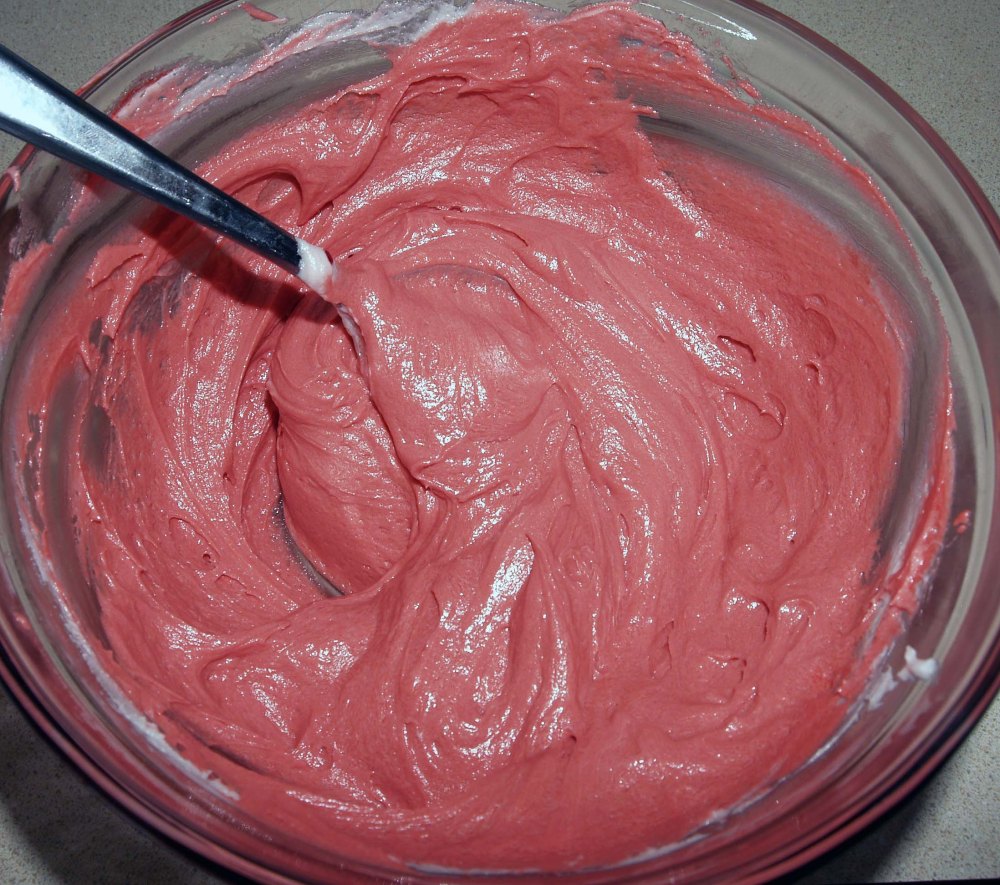
Whisk in the strawberry powder until the custard is as smooth as possible. As mentioned earlier, there may be some lumpy bits of strawberry as they rehydrate, but this is ok.
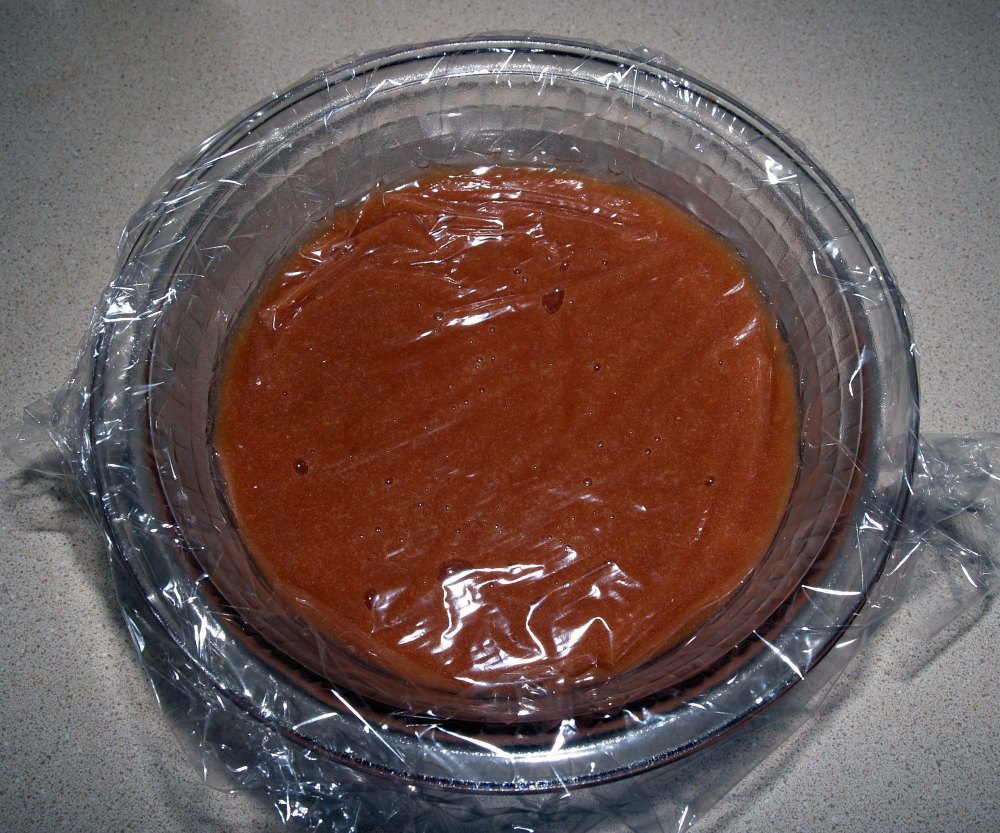
Transfer the finished custard to a medium bowl and press a piece of plastic wrap directly onto the surface. Put it in the fridge to chill until it’s completely cool.
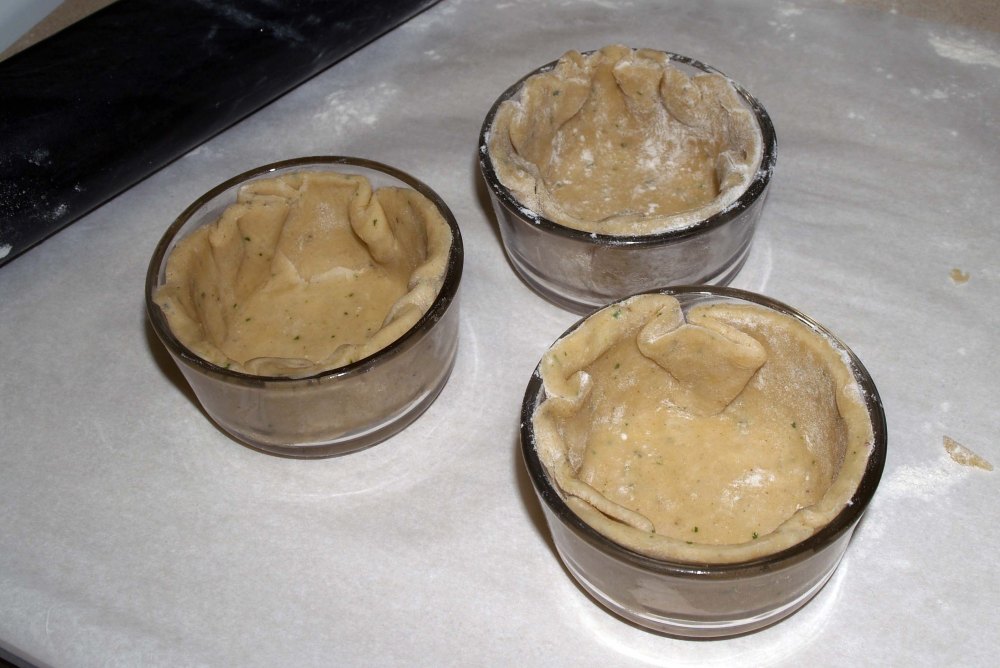
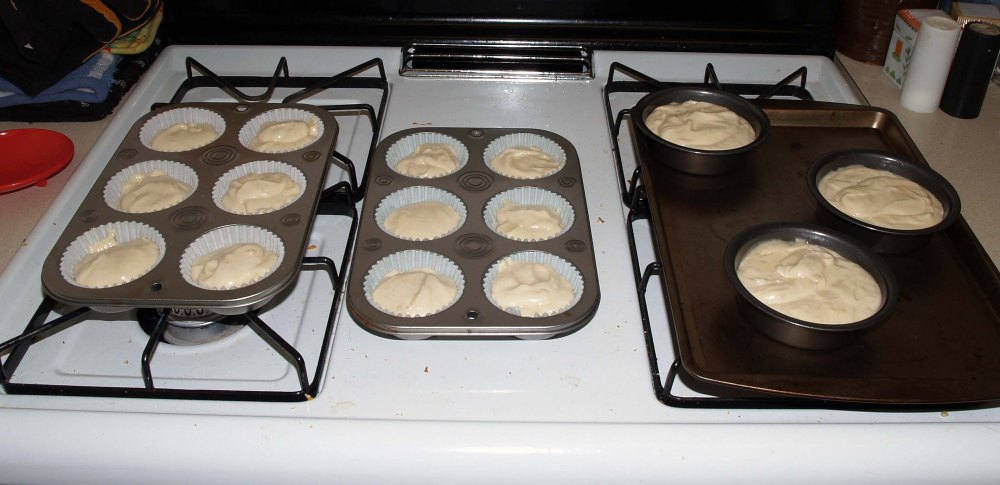
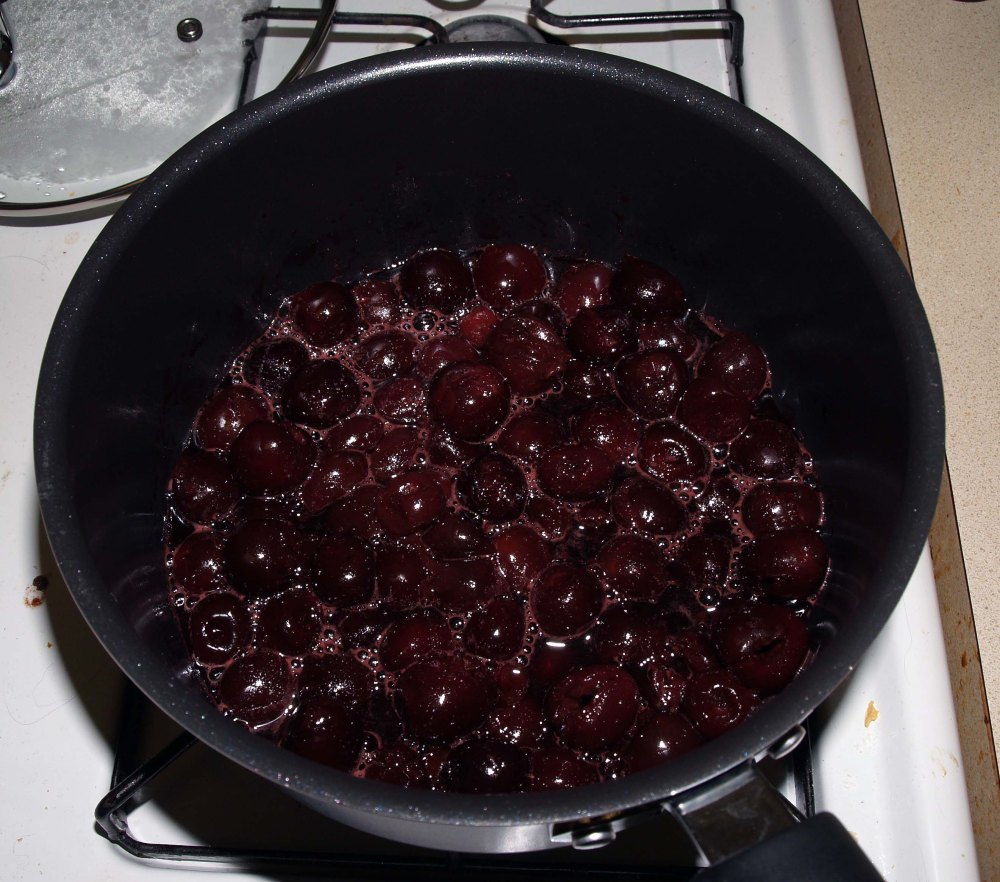
Step:7 When you’re ready to bring it all together, it’s time to slice up some strawberries. Cut off and discard the tops and slice each strawberry into very thin slices (approximately ⅛”-1/16″ thick). Separate out the best-looking slices and save them for the top of your pie. This is optional, but will make your finished pie look at little prettier.
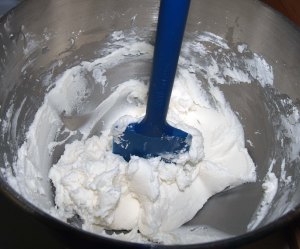
Spread approximately a third of the custard evenly across the bottom of the crust.
Arrange a single layer of strawberry slices on top.
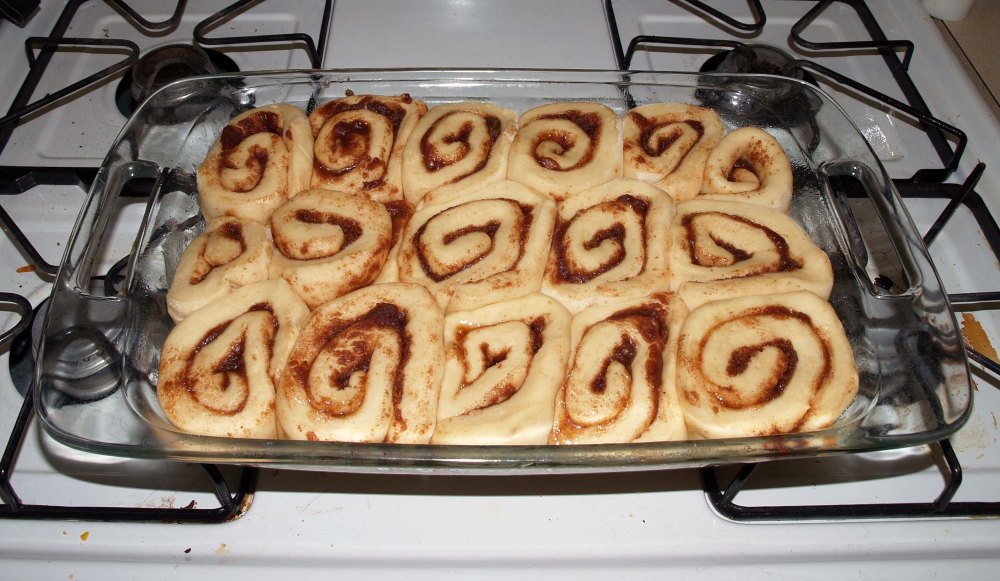
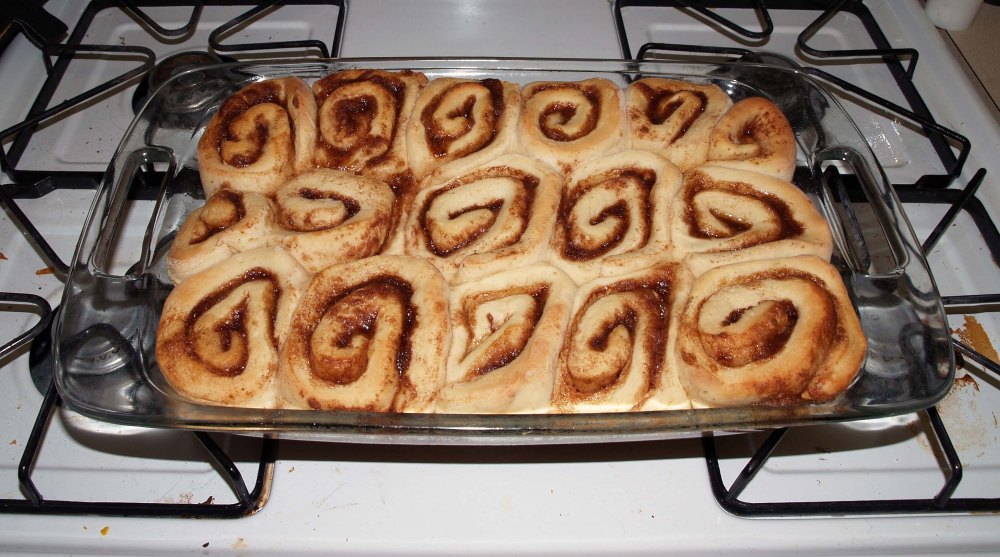
Step:8 Repeat the previous two steps twice each (custard-strawberries-custard-strawberries).
You can just pile strawberry slices on top, or you can arrange them to look like a flower with fairly minimal effort. To make the flower, first arrange a circle of the largest remaining strawberry slices around the outer edge of the pie to look like petals. It helps to actually rotate the pie plate while you do this so that they don’t end up oddly tilted.
Add another ring of strawberry slices to partially overlap with the outer layer.
Step:9 Continue to add concentric circles of strawberry slices, using smaller slices as your circles get smaller. When you get the the very middle, take two little edge slices and fold them in half. Stick them, interlocked, right into the middle of the flower.
That’s all there is to it! Your custard should be pretty set from having chilled completely before assembly, but you can chill your pie for another hour just to be safe if you wish. Refrigerate any leftovers for up to 3 days.
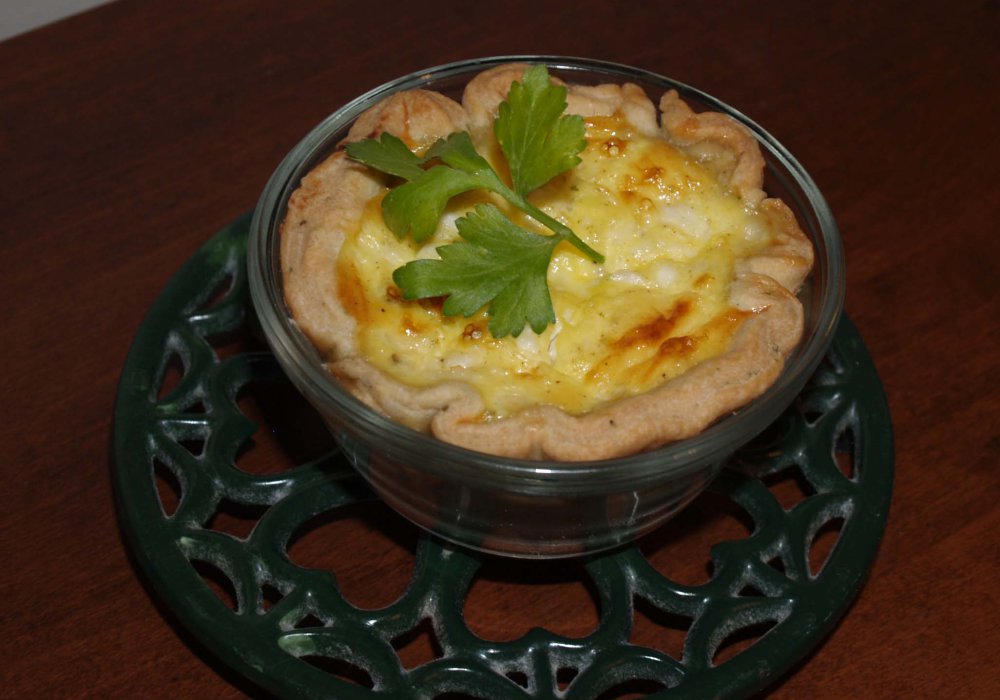
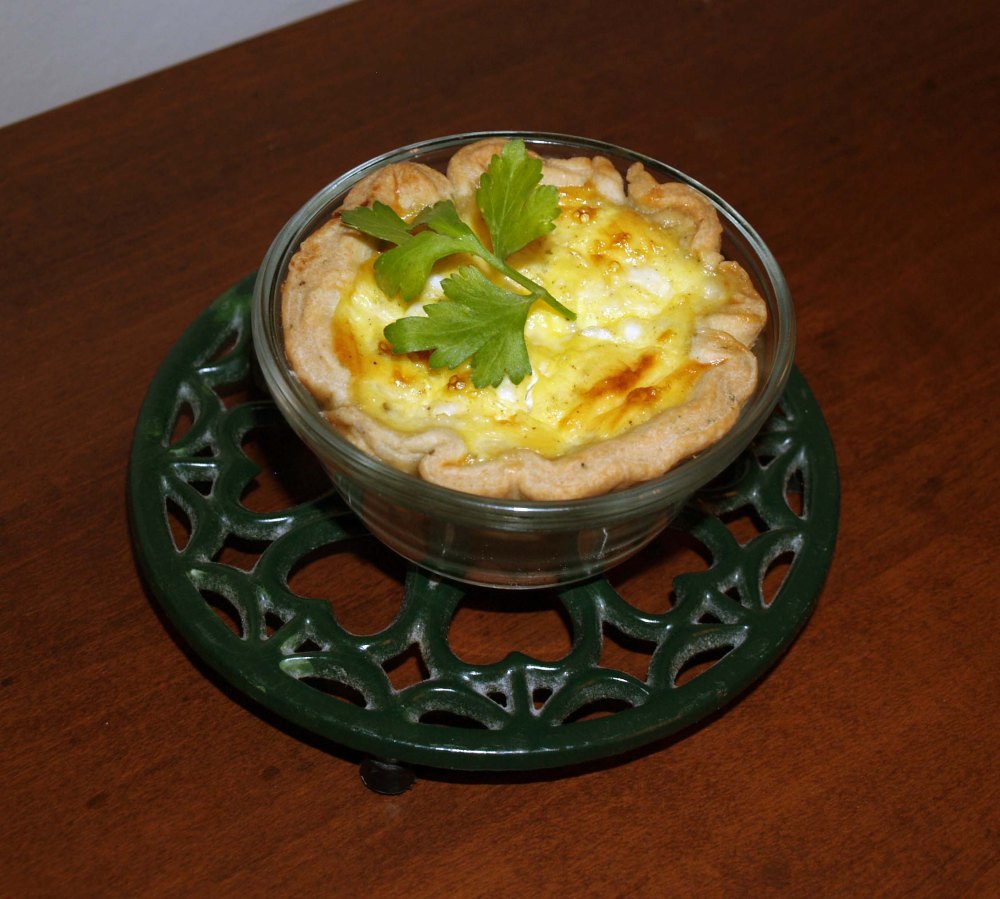
A stunning strawberry cream pie with three layers of fresh strawberry slices, strawberry-flavored custard, and a beautiful flower decoration on top. Like a banana cream pie that had a major strawberry makeover
Prepare and bake your graham cracker crust according to your recipe or package instructions. Turn off the oven and set the crust aside to cool completely
Grind the freeze-dried strawberries into a fine powder using a blender, food processor, or stand mixer. Sift to remove larger pieces if desired, or leave them in — they will rehydrate in the custard and you won't notice them once the pie is assembled
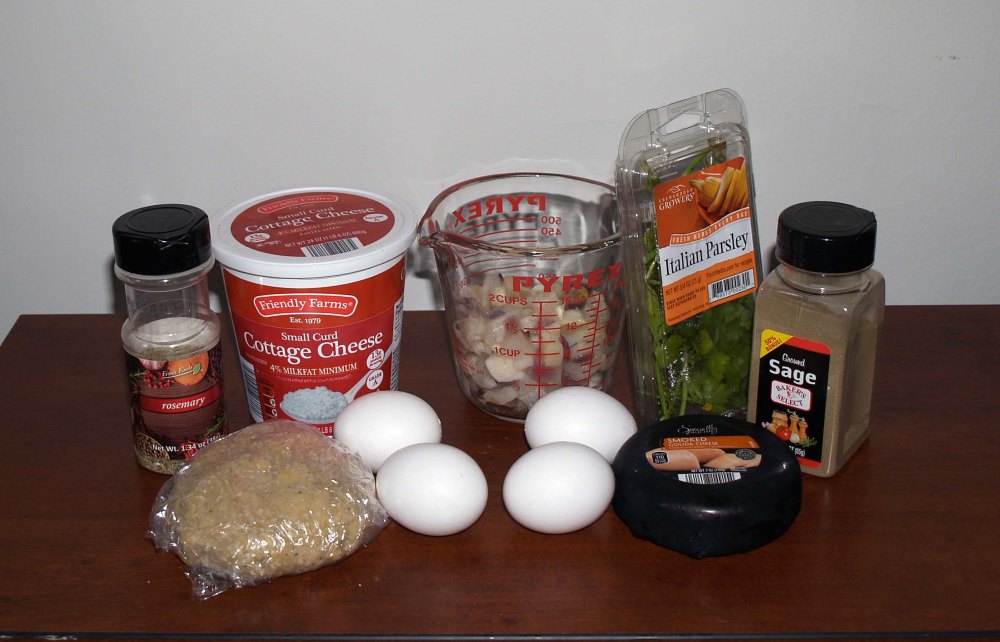
Carefully separate the eggs, setting the yolks aside. Reserve the whites for another use such as meringue or macarons. Cut the butter into ½ inch cubes and set aside
Make the Strawberry Custard
In a medium saucepan, whisk together the sugar, cornstarch, and salt. Whisk in the milk until the dry ingredients are fully dissolved. Add the egg yolks and whisk well until no yellow streaks remain
Heat over medium, stirring frequently, until the mixture just comes to a boil. Remove from heat immediately and whisk well to smooth out any clumps that have formed on the bottom
Return to the heat and bring back to a boil. Immediately reduce to a simmer and cook for 1 more minute, whisking constantly
Remove from heat. Whisk in the butter 2–3 cubes at a time, then whisk in the vanilla extract
Whisk in the strawberry powder until as smooth as possible. Some lumpy bits may remain as the strawberry rehydrates — this is fine
Transfer the custard to a medium bowl and press a sheet of plastic wrap directly onto the surface to prevent a skin from forming. Refrigerate until completely cool
Assemble the Pie
When the custard is fully chilled, slice the fresh strawberries very thin, about ⅛ to 1/16 inch thick. Set aside the best-looking slices for the decorative top layer
Spread approximately one third of the custard evenly across the bottom of the cooled crust. Arrange a single layer of strawberry slices on top
Repeat — spread another third of custard, then another layer of strawberry slices. Finish with the remaining custard and a final layer of strawberries
Decorate
To make the flower decoration, arrange a circle of the largest strawberry slices around the outer edge of the pie like petals. Rotate the pie plate as you work to keep them evenly angled
Add another ring of slices slightly overlapping the first. Continue adding concentric circles of strawberry slices, using progressively smaller slices as you work toward the center
For the very center, take two small edge slices, fold them in half, interlock them, and press them into the middle of the flower
Chill the assembled pie for at least 1 hour before serving. Refrigerate leftovers for up to 3 days
Notes
Have at least 1½ lbs of strawberries on hand and ideally 2 lbs — you will use more than you expect between the layers and the decoration, plus snacking. The custard must be completely chilled before assembly or it will be too loose to layer. Press plastic wrap directly onto the custard surface while it chills to prevent a skin forming. For an extra indulgent version, add a layer of whipped cream on top and stand halved strawberries cut-side down around the edge
Hey guys, remember me? The crazy lady who likes to bake foods based on Marvel movies and is a little bit obsessed with the Great British Baking Show? I’m back! Long time no see! I’ve been a bit consumed with life stuff lately, so I haven’t had much time or inclination to write. I’m not going to get into that right now, but I will at least say that things are finally starting to settle down and I’m starting to get back into the mood to do what I love: bake!
After a long spell of baking block and exhaustion, I finally had the inspiration for a bakeventure come to me out of the blue. I was perusing the baking aisle in Target, like ya do, when I spied a bag of Heath Milk Chocolate Toffee Bits. Just like that, the idea to make Heath bar and pistachio cookies popped into my head.
I eventually decided on shortbread because I suspected (correctly) that all the flavors would blend together well. I adapted the recipe for Scotch Shortbread from Joy of Cooking. The recipe is incredibly simple; it only requires 5 common ingredients and can easily be mixed by hand, so no special tools required. You can use a dough scraper to easily cut your cookies when they’re done, but it’s certainly not required.
Really the only change I made to the recipe was to add the Heath Bar pieces and pistachios. The whole batch was gone within 24 hours, so I’d call that a resounding success. You could easily switch up the mix-ins if you so choose, provided you keep the proportions roughly the same. Any more might mess up the texture of the cookies.
As a side note, I tried something new with my ingredient photos for this post. I like it so far, but let me know your thoughts in the comments!
You will need the following ingredients Heath Bar and Pistachio Shortbread:
I was feeling more like myself on this occasion, so I decided to go with my mix cd of my favorite happy songs (yes, I still make mix cds). For this bakeventure, I’m recommending whatever music makes you happiest (a bit of a cop out, I know, but I’m letting myself ease back into the swing of things ;-)).
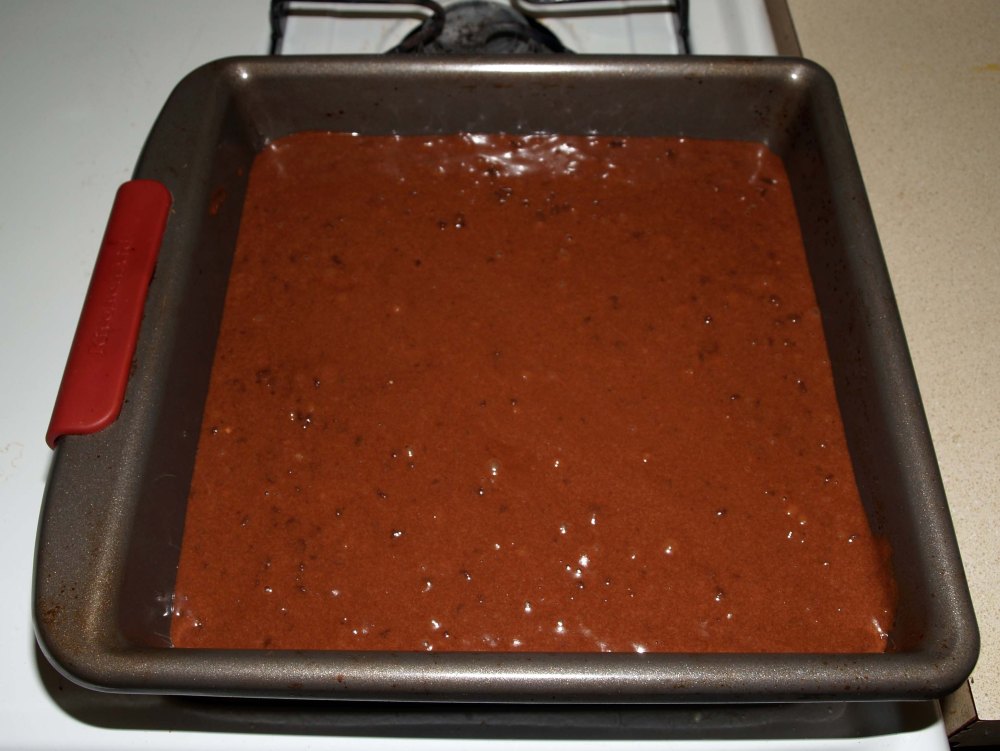
Step:1 First, preheat your oven to 300°F.
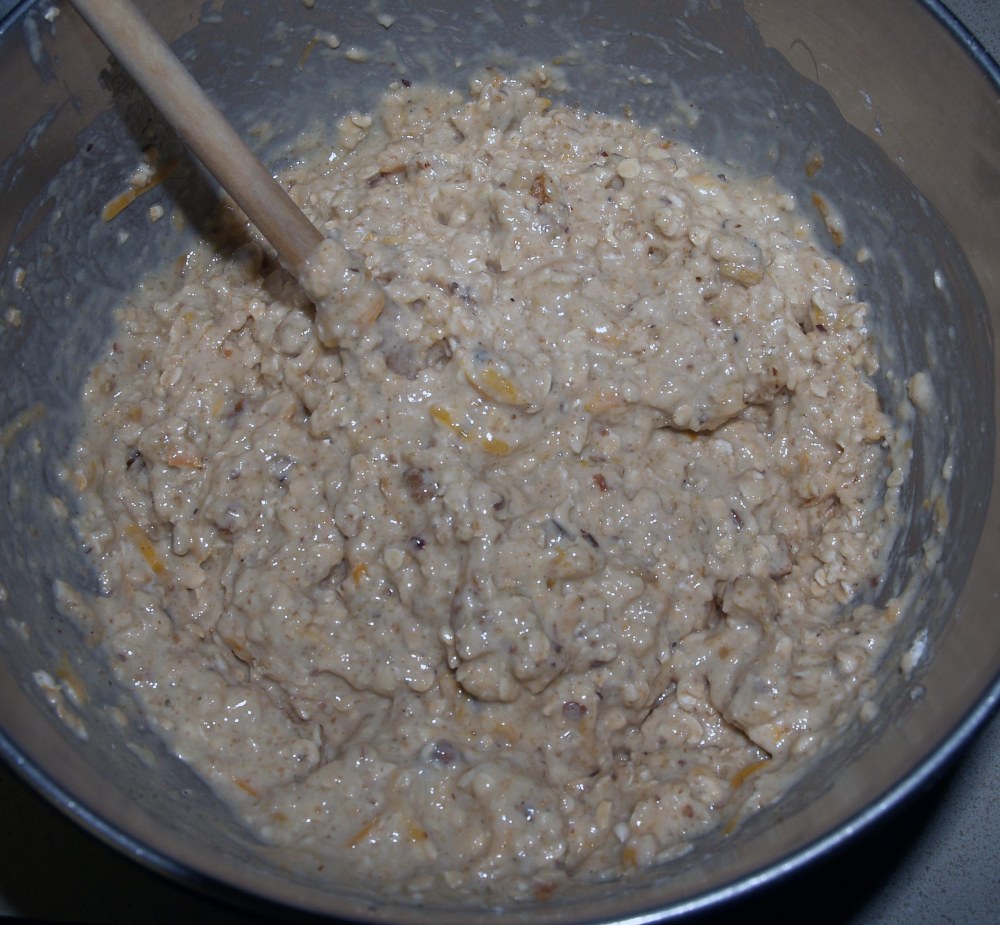
In a large bowl, cream together the butter, sugars, and salt until smooth.
Stir in the flour until crumbs form, then knead until the dough comes together.
Step:2 Knead in the Heath Bar pieces and pistachios until they’re evenly distributed throughout the dough.
Press the dough into an 8″ square baking dish and smooth the top as much as possible. It doesn’t have to be perfectly flat, but you’ll have prettier cookies and a better chance for even baking if you can manage to get the dough mostly smooth.
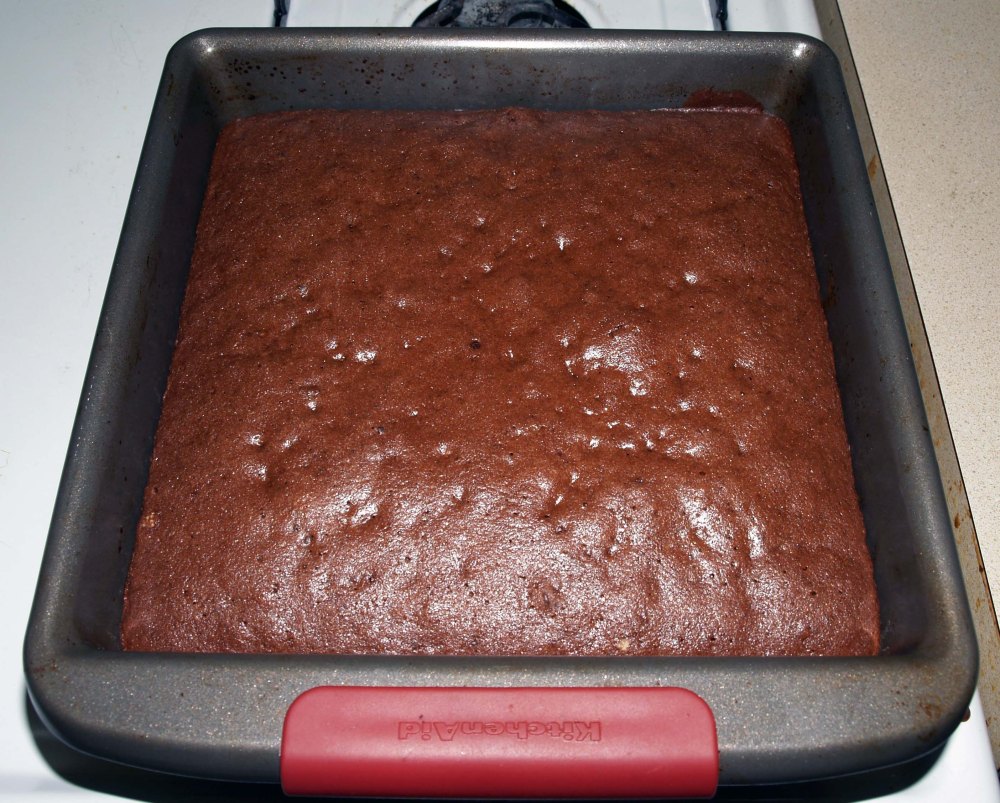
Step:3 Prick the dough all over with a fork. You’ll want to poke the fork in just about all the way through the dough.
Bake your shortbread for about 45-50 minutes, or until the top is golden and the edges are starting to turn brown. I let mine bake for 45 minutes and probably could have let it go for another 5, but I like my cookies on the softer side.
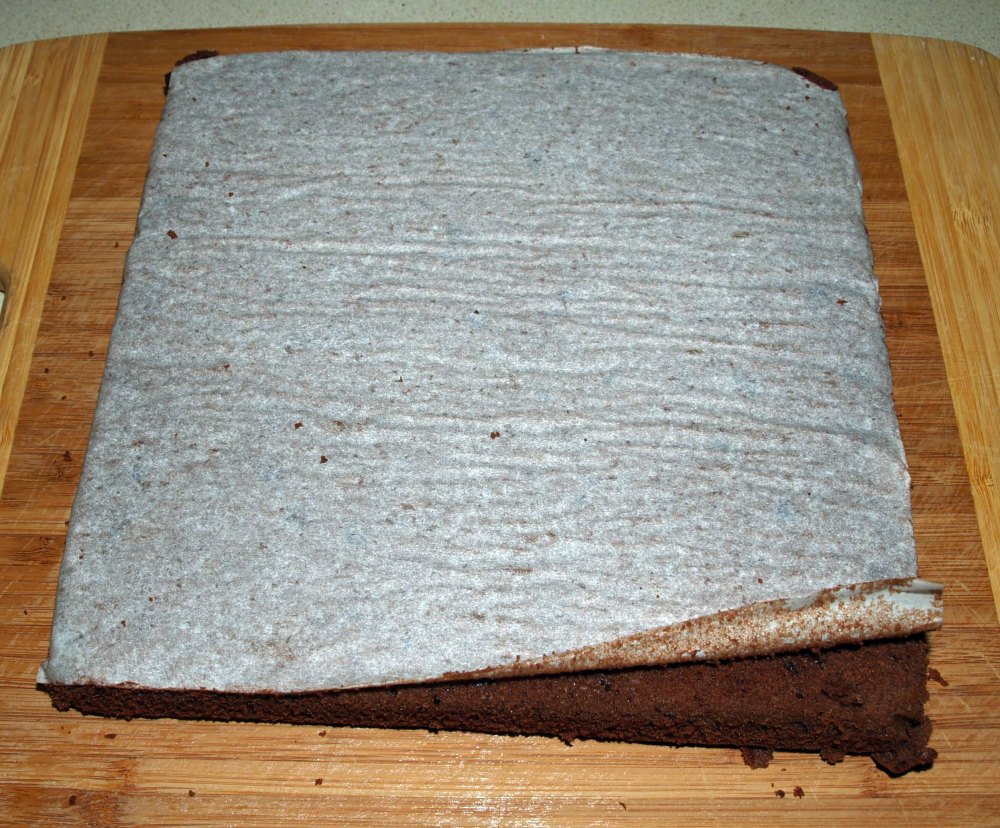
Step:4 Immediately slice your shortbread into 24 pieces (make 3 cuts in one direction and 5 perpendicular or 2 cuts in one direction and 7 perpendicular if you want longer cookies). I used a pastry scraper because it’s easy to get right up to the edge of the pan, but a knife will do just fine. Whichever implement you choose, just be sure to press straight it straight down and lift it straight up for each cut without sliding, as that can tear your cookies if the blade sticks to the still-warm inside.
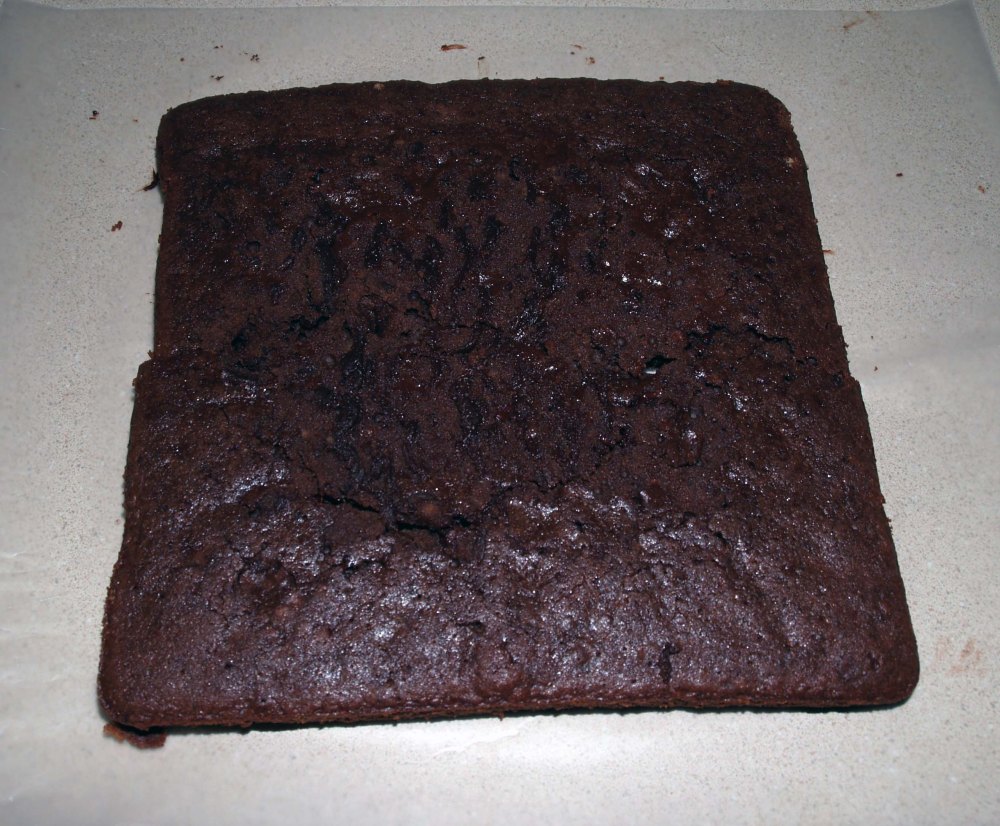
Step:5 Leave the cookies to cool completely in the pan, then lift them out with an offset spatula or butter knife.
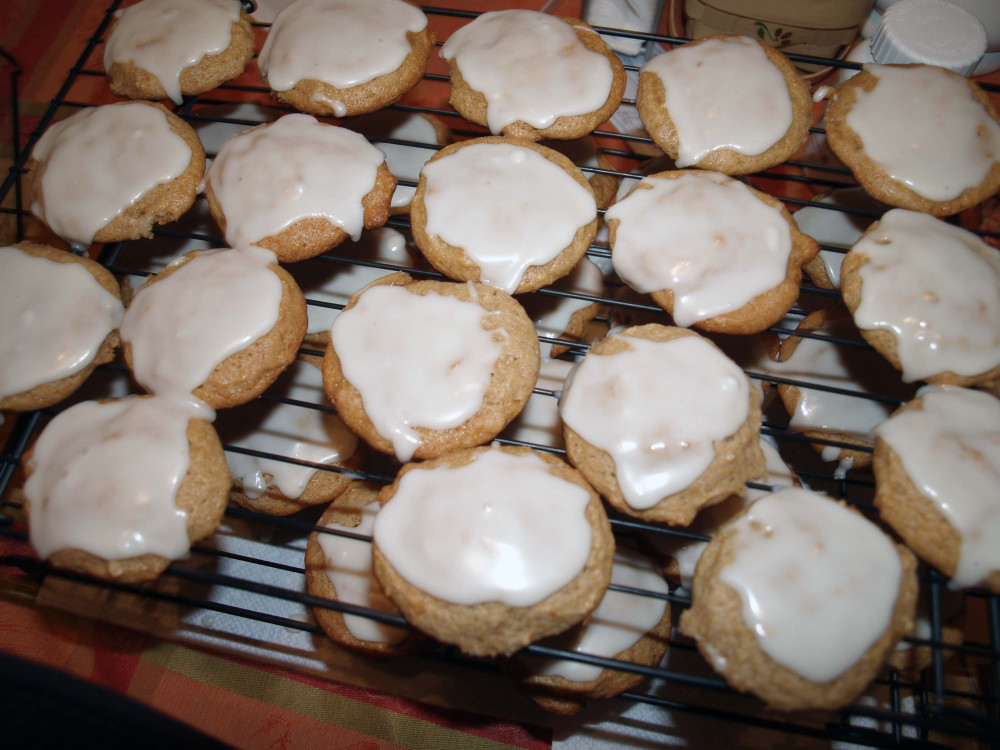
Buttery, melt-in-your-mouth shortbread studded with Heath Bar toffee pieces and finely chopped pistachios. Only 5 ingredients, no special tools, and gone within 24 hours
In a large bowl, cream together the butter, powdered sugar, granulated sugar, and salt until smooth
Stir in the flour until crumbs form, then knead until the dough comes together into a smooth ball
Knead in the Heath Bar pieces and pistachios until evenly distributed throughout the dough
Bake
Press the dough evenly into an ungreased 8-inch square baking dish. Smooth the top as much as possible — even thickness means even baking and prettier cookies
Prick the dough all over with a fork, pressing nearly all the way through the dough
Bake for 45–50 minutes until the top is golden and the edges are beginning to turn brown. For softer cookies remove at 45 minutes; for a crispier result go the full 50
Cut and Cool
Immediately upon removing from the oven, slice the shortbread into 24 pieces — make 3 cuts in one direction and 5 perpendicular cuts, or 2 cuts and 7 for longer cookies. Use a pastry scraper or sharp knife, pressing straight down and lifting straight up without sliding to avoid tearing the warm cookies
Leave the cookies to cool completely in the pan, then lift out with an offset spatula or butter knife
Notes
Cut the shortbread immediately out of the oven while it is still warm and soft — it will crumble if you wait until it cools. Press the knife or scraper straight down and lift straight up without dragging to keep the cuts clean. You can swap the Heath Bar and pistachios for other mix-ins — just keep the total amount roughly the same or it may affect the texture. The dough can easily be mixed entirely by hand with no electric mixer needed
Adventures in Mirror Glaze / Easy Home Baking Recipe / Pro Tips For Mastery In Baking
I finally got around to trying out mirror glaze, and I must say that I am pretty pleased with the result. You might recall when mirror glaze cakes took the world by storm last year (seriously, check out Olga Noskova’s Instagram if you’re in the mood for some major decorating envy). I knew when I saw them that I would have to try it myself someday. Of course, I put it off for about a year because it looked fiddly and precise, and I am lazy. Finally, the inspiration hit me, the time was right, and the stars aligned to push me into finally making a mirror glaze cake.
If I had to categorize it, I’d say mirror glaze lies somewhere between Jello and ganache. Jello makes sense, since it incorporates unflavored gelatin for consistency and shininess. Ganache also makes sense because the preparation method is pretty similar, and it also pours similarly. Where the magic comes in is how the two fit together. Mirror glaze takes the best properties of Jello and ganache and puts them together to make a smooth, reflective wonder. Clearly, Olga Noskova is an alchemist.
I admit that I’ve only done this once, so I don’t have much experience with mirror glaze yet, but it actually wasn’t all that hard. I followed this recipe for the most part (I’ve converted the measurements to standard for the convenience of my American readers, as well as my own). It was every bit as fiddly as I imagined, but each step in and of itself is not difficult (this is exactly how I describe making cheesecake). The only tools I used that might not be standard in every kitchen were a candy thermometer and a food processor, and you can probably get by without the food processor if you’re careful. All of the ingredients can be found in most larger grocery stores too (though the gelatin might not always be available in store).
I would like to note that next time I do this, I will probably use higher quality white chocolate bars rather than white chocolate chips. When I’ve made ganache in the past, I haven’t had any difficulty with melting chocolate chips, but it proved to be a challenge with mirror glaze. This is probably because chocolate chips have stabilizers in them meant to help them hold their shape (and possibly because my white chocolate chips were pretty old). I’d also use regular old liquid food coloring because my gel food coloring didn’t mix in all the way and left me with a bit of an unsightly blob of color at the end. It worked out for the best this time, but I’d prefer to have a bit more control over the final result.
I’m definitely game to try another mirror glaze in the future. Perhaps even a mirror glaze mousse. 😮 If you have experience with mirror glaze, I’d love to hear about it in the comments!
You will need the following ingredients:
200g gelatin powder (approximately 3 packets of this kind)
¼ cup water
7 oz. corn syrup
1 cup plus 2 Tbsp. granulated sugar
⅔ cup water
⅔ cup sweetened condensed milk (approximately half a can)
To start off, you will want to make sure that whatever you will be glazing is nice and cold. This time around, I used a two-layer chocolate cake, but I’ve seen many mirror glazes done on shaped mousse. I frosted my cake with a light-colored frosting so that there would be less chance of the glaze’s color being affected by the surface underneath, then left the whole thing in the fridge overnight. For extra insurance, you could also freeze your cake before glazing.
You want your surface to be as smooth as possible, because any bumps or other imperfections will show through the glaze and ruin the smooth, mirror-like surface. For best results, I recommend doing a crumb coat of frosting (if you are using a frosted cake), chilling the cake, then adding another layer of frosting on top to “spackle” it.
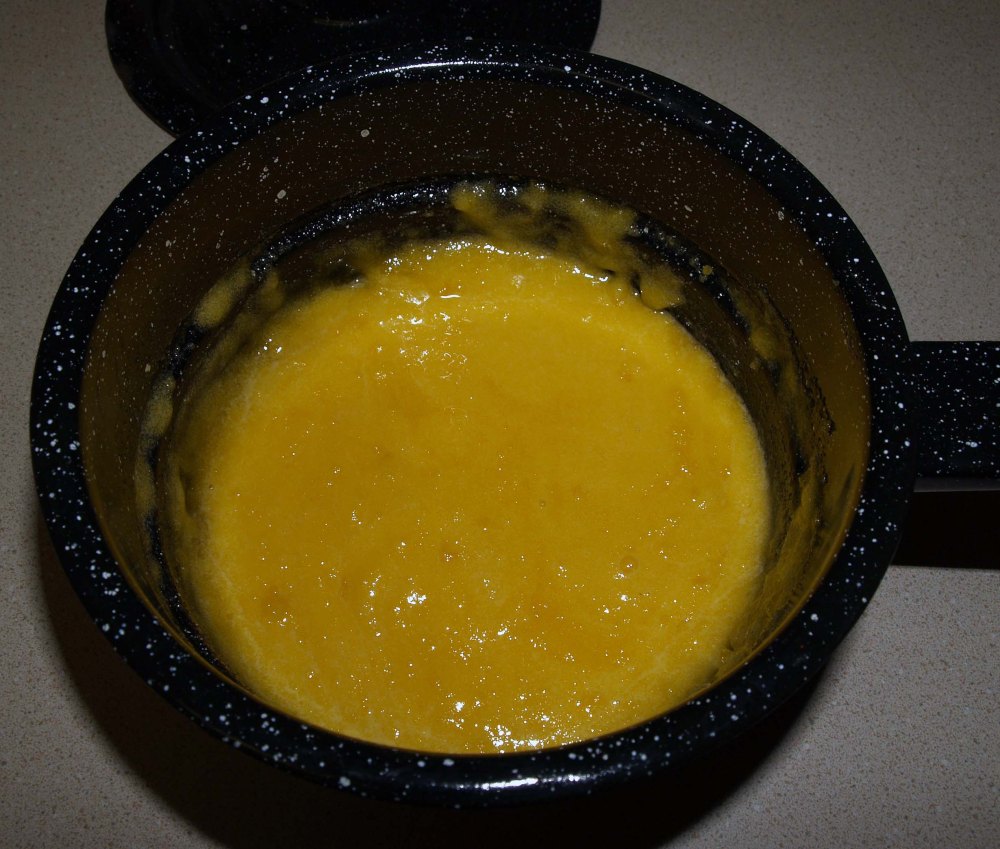
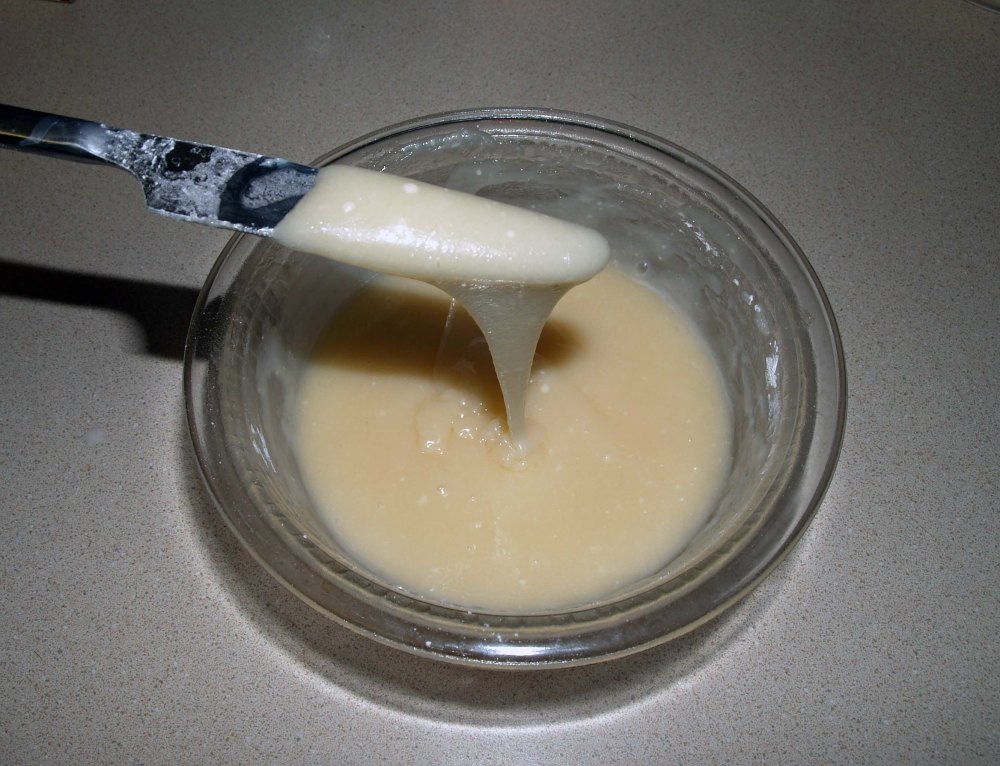
Once you’ve got your cake square away, it’s time to prepare the glaze. First off, sprinkle the gelatin granules over the ¼ cup of water in a small bowl. Set it aside to “bloom.” I poured the water over the gelatin and didn’t stir it, so I had dry spots on the bottom, as you can see below. This didn’t seem to affect the final product, but you might want to gently stir yours a little, just in case.
While the gelatin is soaking up all that water, whisk together the corn syrup, granulated sugar, and remaining water in a medium saucepan with a candy thermometer attached to the side. Bring the mixture to a boil over high heat.
When the temperature on the thermometer reaches 217°F, remove the pan from the heat and whisk in the gelatin.
Next, whisk in the condensed milk.
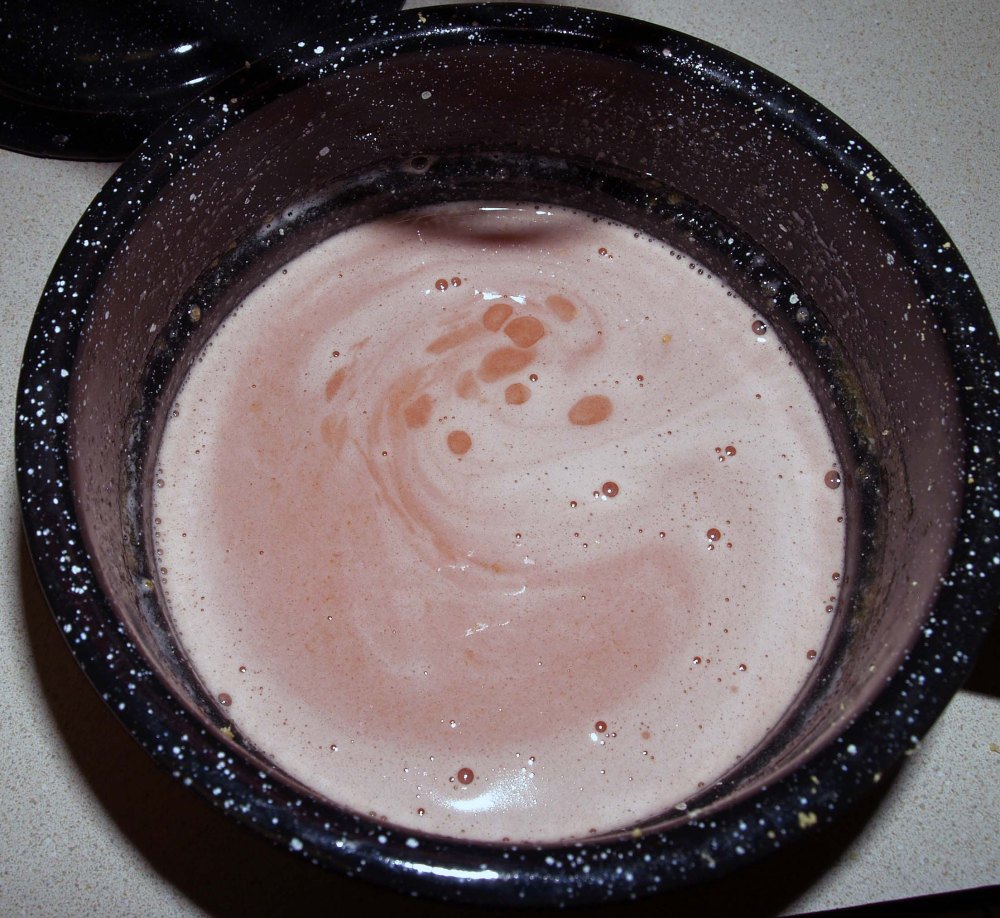
Pour the hot mixture over the chopped white chocolate or chocolate chips in a large, heat-proof bowl and let it sit for 5 minutes.
Gently whisk the mixture until the white chocolate is fully melted. As you can see, I had some trouble getting my chocolate to melt.
To combat the clumpiness of my glaze, I went against the source instructions and ran it through a food processor on high speed to smooth it out. This did produce a lot of little bubbles, but I was able to work with it.
Once your glaze is smooth, transfer it to a container that will make it easy to pour, such as a glass measuring cup, and gently stir in your liquid food coloring. I used gel food coloring this time, but this probably would have worked better with liquid food coloring because the gel left some unwanted clumps behind.
Now, we wait. Set the glaze aside to cool to about 85°F, stirring every few minutes to prevent a skin from forming on top. As I mentioned above, my glaze had a lot of little bubbles rise to the top due to its stint in the food processor. If you have the same problem, you can press a paper towel to the surface of the glaze and lift off the bubble part right before you use it.
Once the glaze has reached the proper temperature, it’s go time. To save yourself some mess, set a cooling rack on top of a roasting pan or high-sided baking sheet and carefully transfer your cold cake to the rack. [This way, the excess glaze will drip off into your tray and not all over your counter. If you’re careful about it, you can collect the excess glaze and use it again.] Have an icing spatula or butter knife at the ready in case the glaze needs to be smoothed or helped along a little.
Starting in the center of the cake, slowly pour the glaze on top. It should spread out on its own, but if your cake isn’t quite level (mine wasn’t…), you might need to concentrate your pouring on the sparser areas. I didn’t end up needing to smooth my glaze, but if you find that it’s clumping up or not quite covering any areas, now’s the time to whip out that spatula or butter knife.
At this point, your work is just about complete. If you want, you can swirl in some liquid food coloring with a toothpick and your fingers. If you do this, you’ll need to work quickly because if you wait too long, you will end up ruining the nice, smooth finish of your glaze.
At this point, your work is just about complete. If you want, you can swirl in some liquid food coloring with a toothpick and your fingers. If you do this, you’ll need to work quickly because if you wait too long, you will end up ruining the nice, smooth finish of your glaze.
When you’re done decorating, leave the cake alone until the glaze is mostly set. The drips on the bottom will hold their shape and stop dripping, and the glaze will have an almost springy consistency.
Run a sharp knife around the bottom edge of your cake to remove the drips. VERY carefully, transfer your cake to your serving dish of choice. A cake lifter will come in very handy right about now, as will an extra pair of hands if they’re available.
That’s all there is to it. Refrigerate your cake for at least half an hour to allow the glaze time to fully set. When you’re ready to serve, make sure that you use a sharp knife to cut it. Store leftovers in the refrigerator.
Tune in next time to find out more about the rest of this cake!
A smooth, glossy, reflective glaze that sits somewhere between Jello and ganache — poured over a chilled cake for a stunning mirror-like finish. Fiddly but each step is straightforward
10½ozwhite chocolate, finely chopped (bars preferred over chips)
liquid food coloring of choice
Method
Prepare the Cake
Make sure your cake is completely cold before glazing. For best results frost the cake with a crumb coat, chill, then add a second smooth layer of frosting to fill any imperfections. The surface must be as smooth as possible — any bumps will show through the glaze
Refrigerate the frosted cake overnight or freeze for extra insurance before glazing
Make the Glaze
Sprinkle the gelatin granules over the ¼ cup of water in a small bowl. Gently stir to avoid dry spots on the bottom. Set aside to bloom for 5 minutes
In a medium saucepan with a candy thermometer attached, whisk together the corn syrup, granulated sugar, and remaining ⅔ cup water. Bring to a boil over high heat
When the temperature reaches 217°F, remove the pan from the heat and whisk in the bloomed gelatin until fully dissolved
Whisk in the sweetened condensed milk
Pour the hot mixture over the chopped white chocolate in a large heatproof bowl. Let sit for 5 minutes without stirring
Gently whisk until the white chocolate is fully melted and the mixture is smooth. If the chocolate is stubborn or clumpy, carefully blend on high speed in a food processor to smooth it out — note this will create small bubbles
Transfer to a pourable container such as a glass measuring cup. Stir in liquid food coloring. Avoid gel coloring as it can leave clumps
Set the glaze aside to cool to approximately 85°F, stirring gently every few minutes to prevent a skin from forming. If bubbles appear on the surface, press a paper towel lightly onto the surface and lift away just before pouring
Glaze the Cake
Set a wire cooling rack over a roasting pan or high-sided baking sheet. Carefully transfer the cold cake onto the rack — this catches excess glaze which can be collected and reused
Have an offset spatula or butter knife ready in case the glaze needs guiding
Starting from the center of the cake, slowly pour the glaze over the top in a steady stream. It will spread outward on its own. Concentrate pouring on any sparse areas if the cake is not perfectly level
If desired, quickly swirl in additional food coloring with a toothpick while the glaze is still wet. Work fast — waiting too long will disturb the smooth finish
Leave the cake undisturbed until the glaze is mostly set and the drips have stopped. Run a sharp knife around the bottom edge to remove the drips. Very carefully transfer to a serving plate using a cake lifter and an extra pair of hands if available
Refrigerate for at least 30 minutes to allow the glaze to fully set. Use a sharp knife to slice and serve. Store leftovers in the refrigerator
Notes
Use high quality white chocolate bars rather than chips — chocolate chips contain stabilizers that help them hold their shape and can make them difficult to melt smoothly in this recipe. Use liquid food coloring rather than gel — gel coloring does not incorporate fully and can leave unsightly color blobs. The glaze must be poured at approximately 85°F — too hot and it will slide off, too cool and it will set before covering the cake. A candy thermometer is essential. The smoother your frosted surface underneath, the more mirror-like the final result
Yggdrasil Braided Bread typically refers to a robust, multi-stranded braided loaf inspired by Nordic mythology and medieval Scandinavian baking traditions. It is an enriched dough (often using ingredients like dark molasses, honey, and whole-wheat or rye) that is woven into a complex, tree-like braid to represent the World Tree.
Weeeeee’re baaaa-ack! I swear I didn’t plan to wait this long between posts, but as usual, life got in the way. The MCU baking series is trucking right along this week with a companion recipe for Thor: The Dark World. For this recipe, I’ve rendered Yggdrasil (the Norse “world tree”), and the nine realms it connects, in bread.
This is probably one of my more out-there recipes, I have to admit. As usual, the idea for the recipe sort of popped into my mind out of the blue somewhere in the middle of watching the movie. How do you encapsulate the main conflict of the movie while also acknowledging some of the subplots that are important to the larger storyline to which all of the MCU movies contribute? In bread, obviously.
So first, let’s talk about the source material. Thor: The Dark World focuses on an inter-realm event known as the convergence, during which the nine realms of Norse mythology align and the barrier between realms is thinner. This is all well and good, but as you might expect, this phenomenon leaves all of the realms vulnerable to evil intentions. Malekith the Accursed, the leader of the dark elves of Svartalfheim, attempts to harness the power of the Aether (SPOILER: one of the Infinity Stones /SPOILER) to bring darkness to all of the nine realms. Thor saves the day, with the help of Jane Foster and friends. Yea!
At this point, you might be asking yourself how I got from there to braided bread, and I promise, we’re almost there. One of the subplots of the movie revolves around Thor’s relationship with his brother, Loki. Thor doesn’t trust Loki as far as he can throw him, but he needs Loki’s help to circumvent Odin’s orders and stop Malekith. This goes about as well as you would expect. In thinking about the differences between Thor and Loki, as well as their interwoven motives, I got the idea to use braided bread to represent them. The brothers are as different as night and day, so it only made sense to make one dough for each of them. Thor’s dough is light, chewy, aromatic, and full of herbs and seeds. Loki’s dough is dark and sweet with an underlying bitterness. Each one can stand on its own, but when you braid them together, you find an unlikely partnership.
I based the recipe for Thor’s dough on the recipe I used in this post. Like Thor, it is fairly straightforward and hearty. Loki’s dough, on the other hand is based on the recipe in this post. Instead of the usual sugar, I used blackstrap molasses as a sweetener to give the dough a hint of bitterness. [You can find it at Trader Joe’s for $4-5, last I checked.] I also included cinnamon and raisins to make it taste almost like gingerbread.
Unfortunately, the Loki dough didn’t rise as well as the Thor dough did, as you can see in the photos. I suspect this is because I was impatient when activating my yeast and didn’t let the molasses and water cool enough before sprinkling the yeast on top. This may have killed most of the yeast, thus the sub-par rise. However, I suspect that even without that error, it may not have risen as much as the herb dough because of the addition of rye flour. If I were to make this again, I would probably tinker with the proportions a bit to make the braid a bit more even (this would also leave a better volume of dough to make the crown and roots of the tree, which were a little sorry, if I’m being honest).
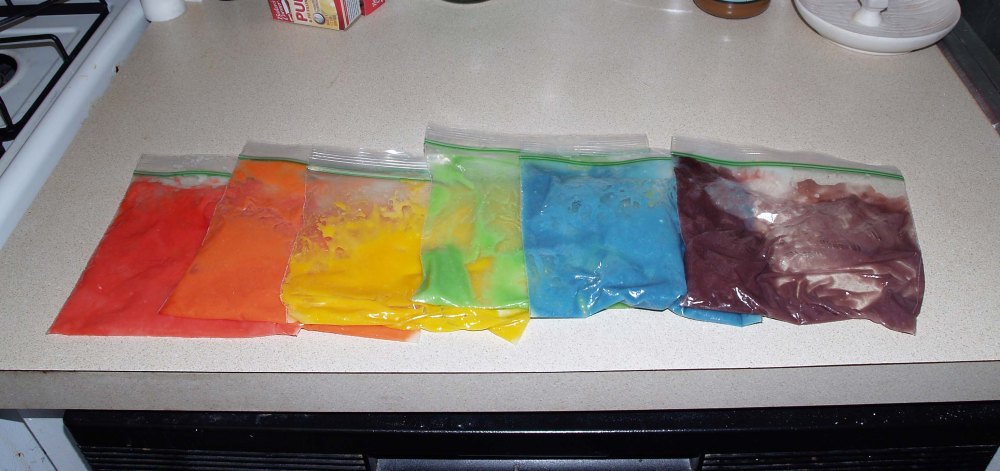
Once I braided the two doughs together, I used different sizes and shapes of pimento jars (like these and these) to represent the nine realms within Yggdrasil. They’re not entirely lined up, but let’s just pretend that they are in a higher dimension. 😉 I would have preferred using more of the tiny two-ounce jars, but wasn’t able to find them in any of the four stores I checked that day. I did test ever jar I used in the oven at 500°F for 20 minutes before baking to make sure that they wouldn’t explode or do anything else crazy I wasn’t expecting. I would definitely recommend testing your jars and following the direction to add hot water to the jars before baking to help prevent cracking due to temperature shock. If you don’t have that many pimento jars (because you’re not a crazy person like me), or just don’t want to put them in the oven, you can also use crumpled balls of aluminum foil as placeholders for whatever containers you’d like to use. Just pull them out and throw them away once the bread is baked.
For fun (and because I had a pile of pimentos on my hands), I decided to make a dip to represent the Aether. It’s really simple and easy to make, and the simple addition of some olive oil and balsamic vinegar to the top gives the effect of the flowing red substance from the movie. For the rest of the jars, I used cream cheese, butter, olive oil, vinegar, cinnamon sugar, and an assortment of sugar in some small favor jars that I had leftover from my wedding favors (pie spices, in case you were wondering). You can put whatever you want in the jars, or get even more creative and make little planets (if you are on the same level of crazy as me).
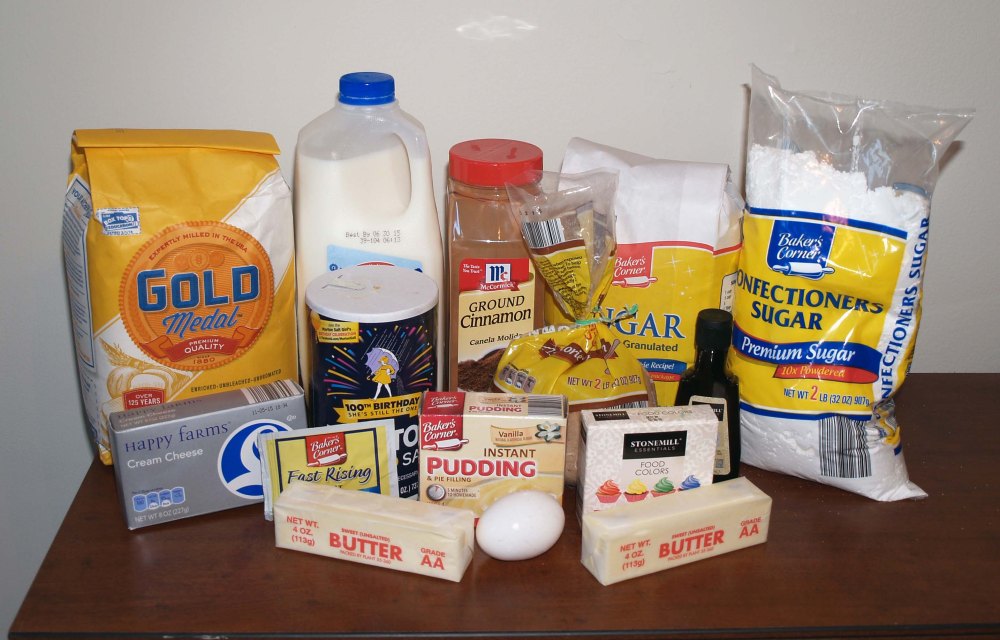
You will need the following ingredients:
For the Thor bread:
4 oz. lukewarm water
¼ cup powdered sugar
1 packet active dry yeast
2 Tbsp. unsalted butter, melted
¼ cup warm milk
2 eggs, lightly beaten
1 tsp. salt
1 tsp. fennel seeds
1 tsp. celery seeds
1 oz. sunflower seed kernels
1 sprig rosemary, minced (or 1 tsp. dry)
1 sprig sage, minced (or 1 tsp. dry)
18 oz. (approx. 2¾ cups) bread flour
For the Loki bread:
2 oz. lukewarm water
2 oz. lukewarm blackstrap molasses
1 packet active dry yeast
2 Tbsp. unsalted butter, melted
¼ cup warm milk
2 egg, lightly beaten
9 oz. bread flour
9 oz. rye flour
1 tsp. salt
1 Tbsp. ground cinnamon
½ cup raisins
For the Aether dip/spread:
2 jars pimentos
1 clove garlic
1 shallot, roughly chopped
1 tsp. Italian seasoning
1 tsp. olive oil, plus more for presentation
1 tsp. balsamic vinegar, plus more for presentation
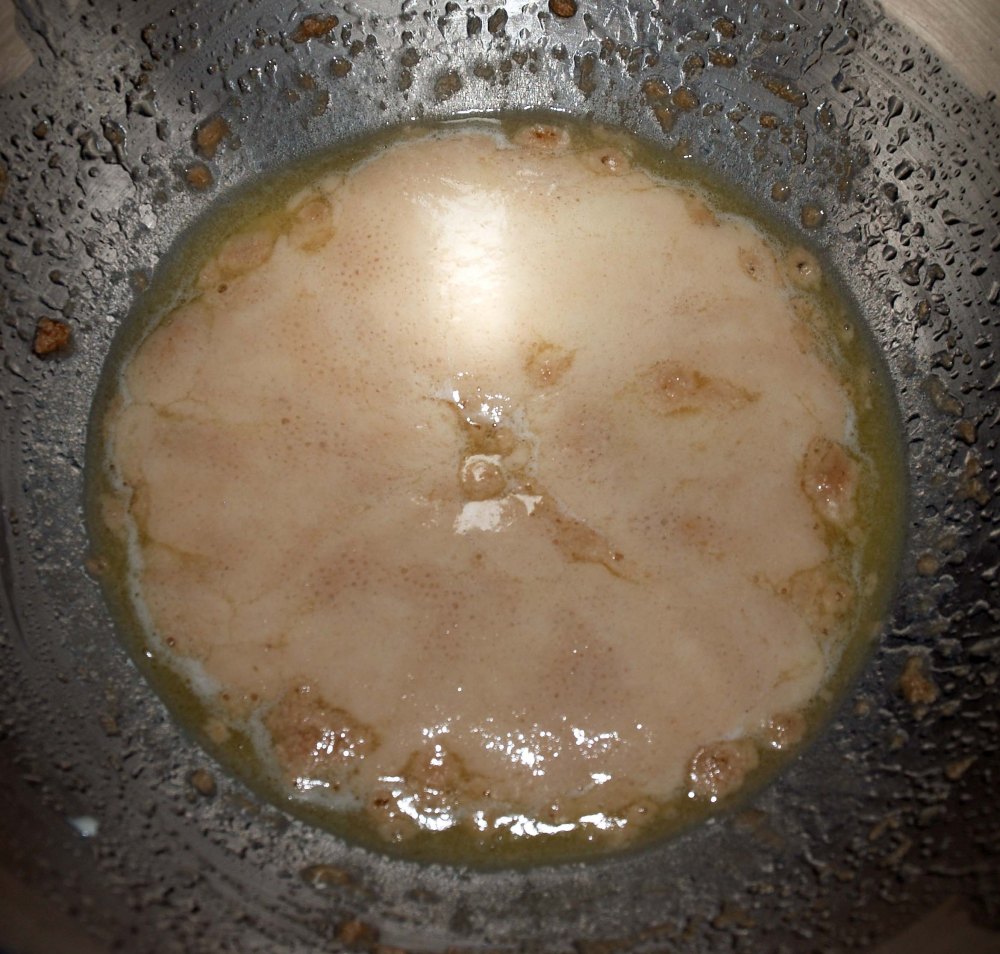
The process to make both doughs is roughly the same. I chose to make the herb bread dough first, so that’s the order I’m going to write about here, but it won’t make much difference either way. To start off, dissolve the powdered sugar in the warm water in the bowl of a stand mixer or other large bowl. Sprinkle the packet of yeast on top and let it sit for about 5 minutes, or until it looks creamy.
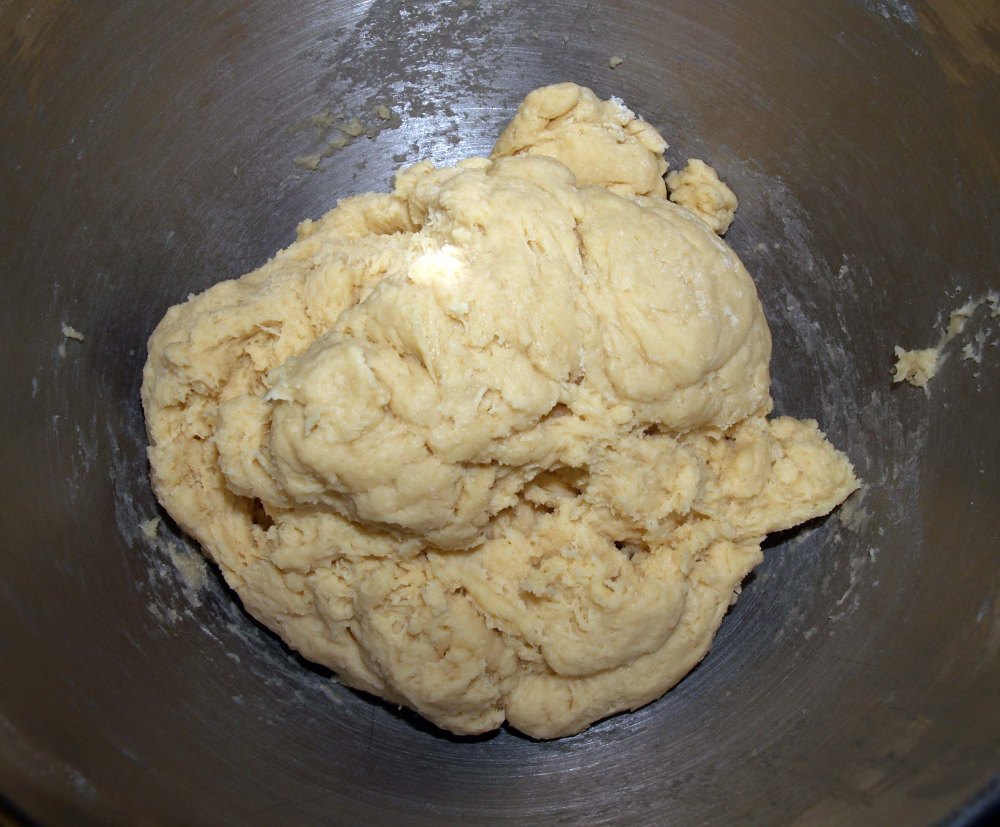
Next, add in the melted butter, milk, eggs, salt, fennel seeds, celery seeds, sunflower kernels, rosemary, and sage (that’s a mouthful!) and stir with the dough hook attachment or by hand with a wooden spoon until the mixture is combined. At this point, it will look like a chunky mess.
Add the flour and continue to stir the mixture until a soft dough forms.
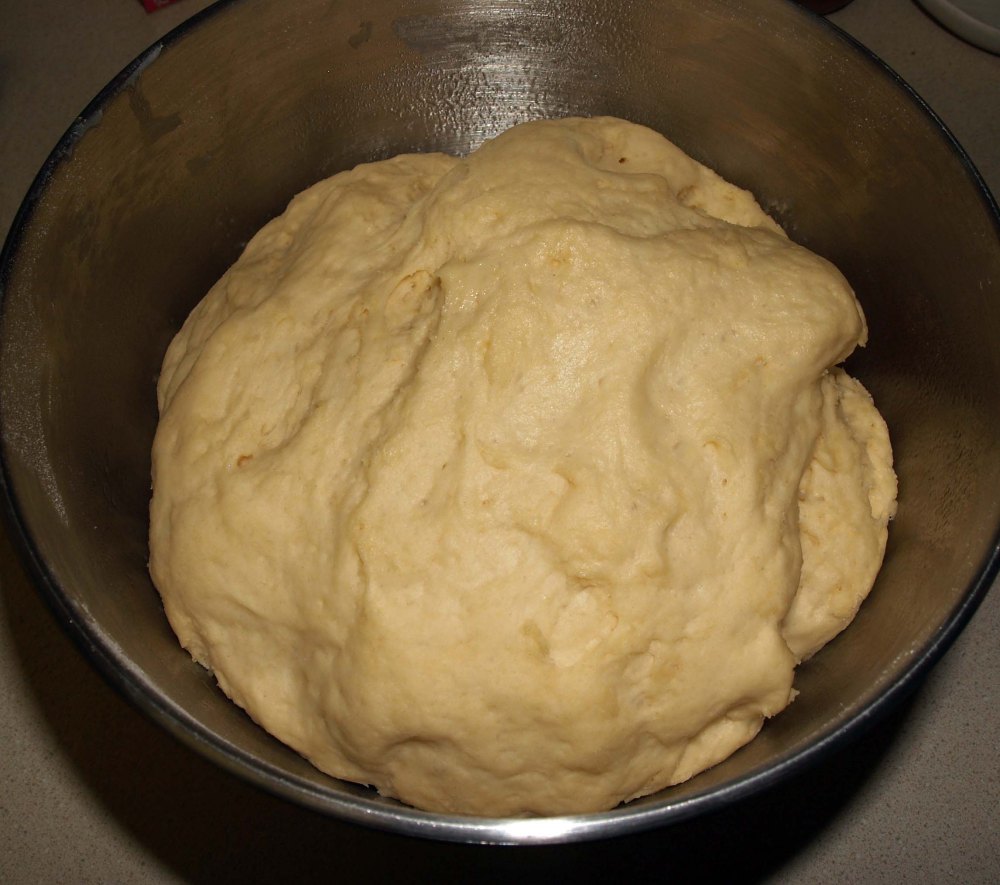
If you’re using a stand mixer, you can take the easy route and knead the dough with the dough hook at the lowest speed for about 5 minutes, or until the dough is soft and elastic. Otherwise, you will need to knead it by hand for about 10 minutes. Once your dough has reached the desired consistency, transfer it to an oiled bowl, turning once to coat both sides. Cover the bowl with a kitchen towel or plastic wrap and set aside.
Next, we’re going to do pretty much the same thing with the molasses dough ingredients. Instead of dissolving sugar in water, you’re going to stir together the water and molasses until smooth, then sprinkle the yeast on top of that mixture. Again, let it sit for 5 minutes, or until creamy. [Note: my liquids were too hot, so it may have killed my yeast. Because of this, my bread didn’t rise as well as it should have. As long as you let your water and molasses cool to lukewarm before adding the yeast, you should be fine.]
Next, add in the butter, milk, and eggs and stir until combined.
To make sure everything is mixed correctly, it’s best to stir together your flours, salt, and cinnamon in a separate bowl before adding them to the wet ingredients. This step is not entirely necessary, but I like to stir about a cup of this mixture into the wet ingredients first to make a sludgy liquid.
Add the remaining dry ingredients and stir until the dough begins to come together, then add in the raisins and work them in until they’re distributed throughout the dough. Knead the dough for 5 minutes with a mixer or 10 minutes by hand, until soft and elastic.
As you can see above, my dough kept trying to climb out of the bowl. If that happens to you, just carefully push it back down. Once you’re done kneading, place the dough in an oiled bowl and turn it once to coat the other side. Cover it with a kitchen towel or plastic wrap just like you did with your first dough.
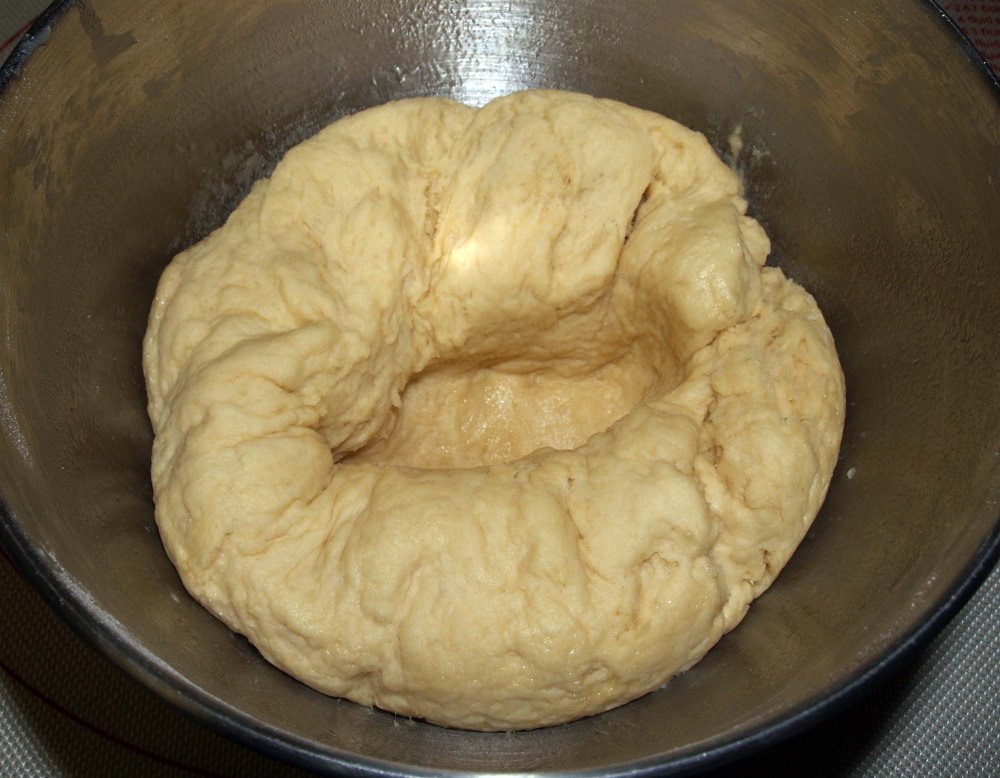
Leave both doughs to rise in a warm place for about an hour, or until approximately doubled in size (we’re using our imagination here for my sorry molasses dough). I preheated my oven to 200°F, turned it off, and then placed both bowls in the oven to help the process along.
Punch the doughs down and divide each of them in half, returning one portion of the molasses dough to its bowl.
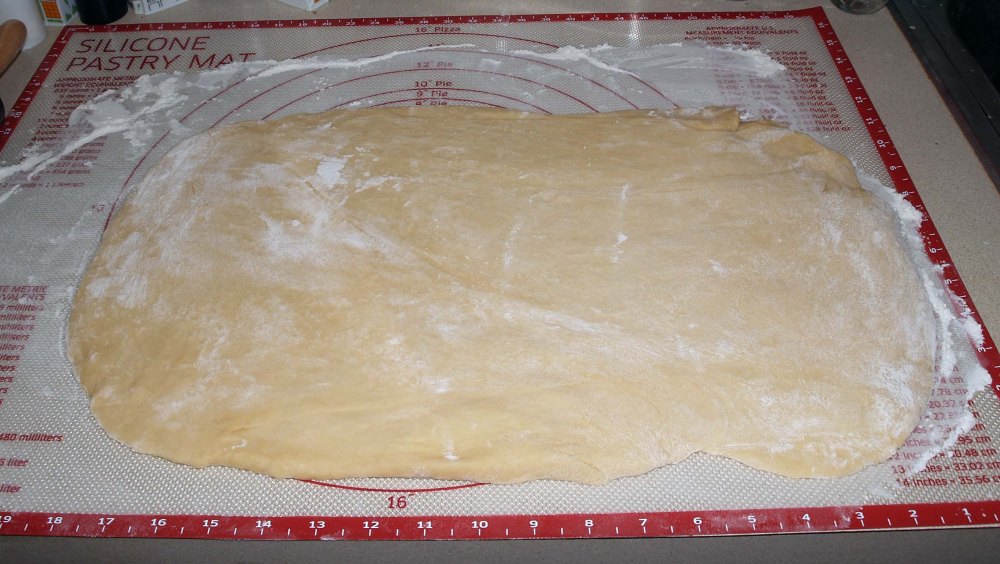
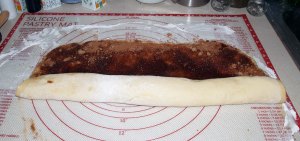
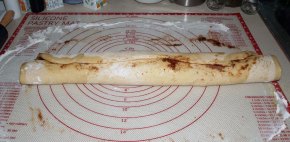
Line a large cookie sheet with parchment paper. Roll the three portions of dough (two herb and one molasses) into thick ropes, approximately 2 feet long each.
Arrange the three ropes on the cookie sheet with the molasses dough in the center.
Loosely braid the dough ropes together, leaving about 4-6″ unbraided on each end. You want to leave enough space here to fit your jars in between the plaits. The extra rope on the ends will give you a little wiggle room when you inevitably need to adjust everything.
Carefully insert your ramekins, jars, or aluminum foil balls in the spaces between the braids. You will probably have to manipulate the braid a bit to get all of this to fit.
Line a second cookie sheet with parchment paper and divide the remaining molasses dough in half. Use one piece to make the crown of the tree and the other to make the roots. I made cuts in each dough ball so that I had tendrils to bend around, then manipulated them so that I could fit some more jars in the bends (it is hard to fit 9 little jars in one giant braided bread, after all).
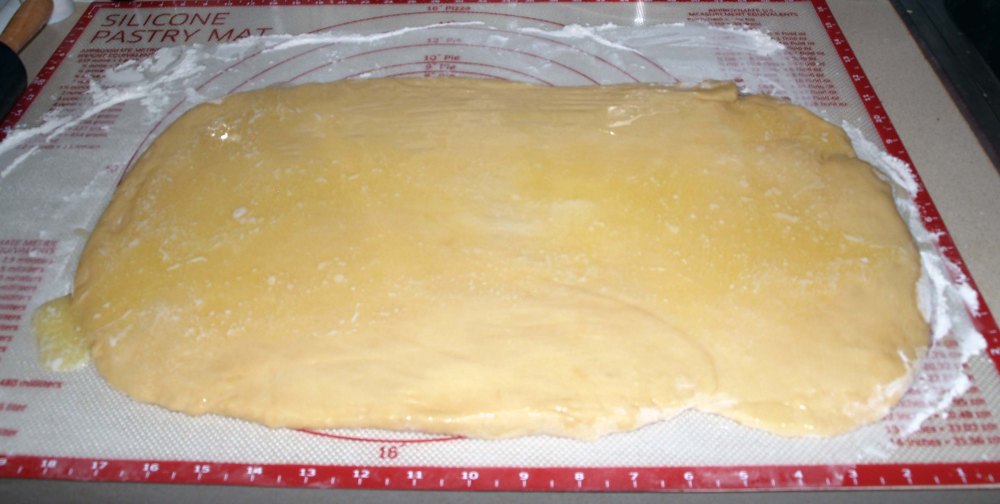
Leave all shaped bread pieces to rise for another hour. It won’t quite double in size, but it should puff up noticeably. Beat an egg and carefully brush egg wash all over the top of the bread, wiping up any drips on the parchment paper.
Preheat your oven to 375°F. While you’re waiting, fill each jar or ramekin approximately halfway with hot water. This will help to prevent the jars from cracking due to the sudden change in temperature when they go into the oven. I did test my jars in a 500°F oven for 20 minutes first before using them, and I’d suggest you do the same if you’re using anything that doesn’t explicitly say it’s oven-safe.
When everything is cool enough to handle, CAREFULLY remove the jars/ramekins from the bread and pour out the water. At this point, you can clean them up a bit of you want, but you’re just going to put them right back into the bread, so it’s not vital to get them spotless.
Finally, it’s time to make the Aether dip. This is the easiest part of the whole thing. First, drain the pimentos. Then, put them in a food processor along with the garlic, shallot, Italian seasoning, 1 teaspoon of olive oil, and 2 teaspoons of balsamic vinegar. Process until it is about the consistency of crushed tomatoes (or whatever consistency you’d prefer, really).
Transfer the dip into one or more of the jars in the bread and top with a drizzle of olive oil and a splash of balsamic vinegar. Swirl them around a little for visual effect.
You can fill the remaining jars with dips of your choice. I decided to use a mix of sweet and savory dips and spreads, as well as some little jars of dry spices where the foil balls were. If you’d like suggestions, olive oil, softened butter and/or cream cheese, and pesto would work well, as would cinnamon sugar, red pepper flakes, and Italian seasoning.
The bread will keep for up to 5 days in an airtight container, but be sure to refrigerate any perishable dips (including the Aether dip).
Two artisan bread doughs — one light and herby (Thor) and one dark and molasses-spiced (Loki) — braided together to represent Yggdrasil, the Norse world tree, with nine realm jars woven throughout. A showstopping MCU-inspired centerpiece bread
Dissolve the powdered sugar in the lukewarm water in a large bowl or stand mixer bowl. Sprinkle the yeast on top and let sit for about 5 minutes until creamy
Add the melted butter, warm milk, eggs, salt, fennel seeds, celery seeds, sunflower kernels, rosemary, and sage. Stir with a dough hook or wooden spoon until combined
Add the bread flour and mix until a soft dough forms. Knead with a dough hook on low speed for 5 minutes, or by hand for 10 minutes, until soft and elastic
Transfer to an oiled bowl, turn once to coat, cover with a towel or plastic wrap, and set aside to rise
Make Loki's Molasses Rye Dough
Stir together the lukewarm water and blackstrap molasses until smooth. Make sure the mixture is truly lukewarm — too hot will kill the yeast. Sprinkle the yeast on top and let sit for 5 minutes until creamy
Add the melted butter, warm milk, and eggs. Stir until combined
In a separate bowl stir together the bread flour, rye flour, salt, and cinnamon. Add about 1 cup of the flour mixture to the wet ingredients first to form a thick liquid, then add the remaining dry ingredients and stir until the dough comes together
Add the raisins and knead them in until evenly distributed. Knead the dough for 5 minutes with a mixer or 10 minutes by hand until soft and elastic
Transfer to an oiled bowl, turn once to coat, and cover with a towel or plastic wrap
First Rise
Leave both doughs to rise in a warm place for about 1 hour until approximately doubled in size. Pro tip: preheat oven to 200°F, turn it off, then place both covered bowls inside
Shape and Braid
Test all jars or ramekins in a 500°F oven for 20 minutes before use to confirm they are oven-safe and will not crack. Set aside
Punch down both doughs. Divide each in half, returning one portion of the molasses dough to its bowl for the crown and roots
Line a large cookie sheet with parchment paper. Roll the two herb dough portions and one molasses dough portion into thick ropes approximately 2 feet long each
Arrange on the cookie sheet with the molasses dough rope in the center. Loosely braid the three ropes together, leaving 4–6 inches unbraided at each end to allow space for the jars
Carefully insert jars or ramekins in the spaces between the braids, manipulating the braid as needed to fit them. Arrange as evenly as possible
Line a second cookie sheet with parchment. Divide the remaining molasses dough in half. Shape one piece into the crown of the tree and one into the roots by making cuts to create tendrils and bending them around additional jars
Second Rise and Bake
Leave all shaped bread pieces to rise for another hour until noticeably puffed. Beat an egg and carefully brush egg wash over all bread surfaces, wiping up any drips on the parchment
Preheat oven to 375°F. Fill each jar approximately halfway with hot water to prevent cracking from temperature shock
Bake for 25–30 minutes until the bread is deep golden brown. Cool until safe to handle, then carefully remove the jars, pour out the water, and set the jars aside
Make the Aether Dip and Serve
Drain the pimentos and place in a food processor with the garlic, shallot, Italian seasoning, olive oil, and balsamic vinegar. Process to the consistency of crushed tomatoes or your preferred texture. Season with salt and pepper
Transfer the dip into one or more of the jars set into the bread. Drizzle a little olive oil and balsamic vinegar on top and swirl gently for visual effect
Fill remaining jars with fillings of your choice — softened butter, cream cheese, olive oil, pesto, cinnamon sugar, or dry spices all work well
Store bread in an airtight container for up to 5 days. Refrigerate any perishable jar fillings including the Aether dip
Notes
Make sure water and molasses are truly lukewarm before adding yeast to Loki’s dough — liquid that is too hot will kill the yeast and result in poor rise. Rye flour also causes a denser rise than white bread flour so do not be alarmed if Loki’s dough rises less than Thor’s. Test all jars in a hot oven before baking with them to confirm they are oven-safe. Aluminum foil balls can be used instead of jars as placeholders and removed after baking. This recipe makes a very large showpiece — plan for plenty of counter and oven space
This week, I wanted to bake something for what has become one of my favorite holidays: Day of the Dead, or Dia de los Muertos. While Day of the Dead is not a part of my cultural heritage, I love the concept of the holiday. Rather than mourning the loss of loved ones and wallowing in sadness, the focus of Day of the Dead is to celebrate those who are no longer with us and invite their souls to visit. It’s actually a two-day holiday that happens on November 1 and 2. The first day celebrates children and infants, and the second day celebrates adults. Families create altars, or ofrendas, which hold pictures of the deceased loved ones, as well as favorite items and foods, candles to light their way, and glasses of water to quench their thirst. Other traditional elements include marigolds, tissue paper decorations (papel picado), and the ubiquitous sugar skull. I incorporate the elements that are most meaningful to my family in my personal celebration, but this year I wanted to try something a bit more traditional and make pan de muerto.
Pan de muerto is a sweet bread that is traditionally eaten during the celebration. I used this recipe from The Spruce, which incorporates orange zest and anise (or fennel) seeds. I basically followed the recipe almost exactly, so I’m not going to include my own PDF recipe here. The only change I made was to use vanilla sugar instead of plain granulated sugar in the dough and on top of the bread. The bread has a lovely flavor on its own, so it’s really an unnecessary step, but I liked the hint of vanilla that the vanilla sugar added. I’ve never seen it anywhere for sale, but it is quite easy to make (though it does take time). All you have to do is put some used vanilla beans in an airtight container with some granulated sugar and let it sit. Shake it from time to time and break up any clumps before use. Easy.
I did make a bit of a blunder in shaping the bread’s decorations, as it’s something I’ve never done before. At first, I formed 4 pieces of dough into bone shapes and put them on top of the round loaf. The dough bones looked too fat, so I split them in half and made 8 dough bones instead (there are pictures of this later, so you don’t have to mentally visualize it). They looked alright, if not quite right, before the bread rose, but after rising, it was apparent that this loaf was not going to look quite how it was supposed to. When I went back to reference images, I realized that most people make bone pieces long enough to drape across the whole loaf and cross them at the top (oops). I’ll definitely try that next time in the hopes of achieving a more authentic presentation.
One other thing I would like to note is that the recipe as written makes a LARGE loaf. My leftovers are currently split between three gallon storage bags. You can easily halve the recipe if you don’t want that much bread, or you can split the dough into two or four to make smaller loaves. Smaller loaves are likely to bake faster, so make sure to account for that and keep an eye on your bread while it’s baking.
Pan de Muerto Recipe Ingredients you need:
For the bread:
4 oz. (one stick) unsalted butter, softened
¾ cup granulated sugar (I used homemade vanilla sugar)
3 tsp. fennel/anise seeds
1 tsp. salt
6 cups bread flour
4 large eggs, at room temperature
1¼ cups lukewarm water (no warmer than 110°F)
2 Tbsp. grated orange zest (this took about two large oranges)
2 packets (4½ tsp.) fast-acting yeast
½ cup orange juice for the glaze
¾ granulated sugar for the glaze, plus more for finishing
Let’s get baking!
In a large bowl, mix together the butter, sugar, fennel seeds, salt, and ½ cup of the flour. I started doing this with a wooden spoon, then switched to a hand mixer, then just used my bare hands, so use whatever works for you. This part is a lot more like making cookie dough than bread dough, in my experience so far.
In a separate bowl, gently beat together the eggs, water, and orange zest. I heated the water in a Pyrex measuring cup in the microwave, then added the eggs and orange zest to the water and mixed it all with a fork.
Add the egg mixture to the butter mixture along with an additional ½ cup of flour (we’re up to one out of six cups now). Mix until all of the lumps are broken up.
Stir in the yeast and another ½ cup of flour.
Stir in the remaining 4½ cups of flour, 1 cup at a time, until a soft dough forms. You may want to switch to mixing with your hands if you are having trouble using a spoon or electric mixer.
Knead the dough on a well-floured surface for about a minute. You should feel it become firmer and more elastic in that time.
The directions didn’t say to do this, but I put the dough in a greased bowl, turning it once to coat both sides, to rise. It was cold in my apartment on baking day, so I turned my oven on to 200°F, then turned it off and put the bread inside to rise (covered with a damp towel, as directed) for an 1½ hours.
When the dough has become enormous, punch it down and separate off approximately ¼ of it (or separate it into however many portions you would like if you are making smaller loaves).
Form the remaining dough into a semi-sphere (or a domed circle, if that’s more your speed) and transfer it to a parchment-lined baking sheet. This loaf would have been too big for my regular rimmed cookie sheets, so keep that in mind if you want to make a large loaf like this.
Divide the reserved dough portion into four pieces and one small piece (for the ball on top of the loaf).
Form the dough pieces into shapes vaguely reminiscent of bones and drape them across the top of the loaf (as I mentioned earlier, I made eight smaller bones pieces and didn’t like how they turned out, so that’s why my pictures don’t quite reflect my instructions here).
Cover your loaf with a damp dish towel and leave it to rise in a warm place for another hour. Towards the end of the rising time, preheat your oven to 350°F. [If you’re proofing your dough in there, be sure to take it out before you start preheating!]
Bake the bread for about 40 minutes, or until it reaches an internal temperature of 200°F on an instant-read thermometer (I use one like this) and the top is well-browned. Apparently I forgot to take a picture of my bread when it came out of the oven, but you should be able to get the idea from this picture of the glazed loaf.
Leave the bread to cool completely on a cooling rack.
When your bread is cool, prepare the glaze. All you have to do is whisk together the orange juice and sugar in a small saucepan and bring the mixture to a boil, whisking it occasionally to make sure nothing is sticking to the bottom of the pan. Keep an eye on this, because it boils over QUICK, and you don’t want to be cleaning sticky orange glaze out from under your stove top like SOME people around here…
Once the syrup boils, remove it from the heat and brush it all over your bread.
For a finishing touch, sprinkle granulated sugar all over the bread. Slice and serve in large wedges, and store leftovers in an airtight container.
A traditional Mexican sweet bread flavored with orange zest, anise seeds, and a hint of vanilla, glazed with orange syrup and dusted with sugar. Made to celebrate Día de los Muertos on November 1st and 2nd
In a large bowl, mix together the butter, sugar, fennel or anise seeds, salt, and ½ cup of the bread flour until combined. Use a wooden spoon, hand mixer, or your hands — the texture at this stage is similar to cookie dough
In a separate bowl, gently beat together the eggs, lukewarm water, and orange zest
Add the egg mixture to the butter mixture along with another ½ cup of flour. Mix until all lumps are broken up
Stir in the yeast and another ½ cup of flour
Stir in the remaining 4½ cups of flour, 1 cup at a time, until a soft dough forms. Switch to mixing by hand if needed
Turn the dough out onto a well-floured surface and knead for about 1 minute until the dough feels firmer and more elastic
First Rise
Place the dough in a greased bowl and turn once to coat both sides. Cover with a damp towel and leave to rise in a warm place for 1½ hours until doubled in size. Pro tip: heat your oven to 200°F, turn it off, then place the covered bowl inside
Shape and Second Rise
When the dough has risen, punch it down. Separate off approximately ¼ of the dough and set aside. Form the remaining dough into a domed round loaf and transfer to a parchment-lined baking sheet
Divide the reserved dough into 4 equal pieces and one small ball. Roll the 4 pieces into long bone shapes and drape them across the top of the loaf, crossing them at the top. Place the small dough ball at the very center where the bones cross
Cover loosely with a damp towel and leave to rise in a warm place for another hour. Toward the end of the rising time, preheat oven to 350°F
Bake
Bake for about 40 minutes, until the top is well browned and an instant-read thermometer inserted into the center reads 200°F
Transfer to a wire rack and cool completely before glazing
Glaze and Finish
In a small saucepan, whisk together the orange juice and ¾ cup sugar. Bring to a boil over medium heat, whisking occasionally. Watch carefully — it boils over very quickly
Remove from heat and brush the glaze all over the cooled bread
While the glaze is still wet, sprinkle granulated sugar generously over the entire surface. Slice into large wedges and serve. Store leftovers in an airtight container
Notes
To make vanilla sugar: place used vanilla beans in an airtight container with granulated sugar and let sit for several days, shaking occasionally. It is a subtle but lovely addition to this bread. This recipe makes a very large loaf — halve the recipe or divide the dough into 2 or 4 smaller loaves if preferred. Smaller loaves will bake faster so check for doneness earlier and monitor closely. When shaping the bone decorations, make them long enough to drape all the way across the loaf and cross at the top for the most authentic presentation
Caramel Apple Pie/ How to make ” Caramel Apple Pie” Easy Baking Recipe / Homemaking
Fall weather seems to have come and gone, and somehow I haven’t published an apple recipe yet. What has become of I Wanna Bake!? </melodrama> However, since it’s still officially fall until December 20, I’m going to squeeze one in there so that this fall won’t be a complete and total bust. 😉 Without further ado, I bring you caramel apple pie!
This caramel apple pie came about because of my husband, as many of my bakeventures do. We both love caramel apples, but he’s allergic to raw apples, so that fall staple is, sadly, forbidden for him. Fortunately, cooked apples are perfectly fine (yes, it’s a thing). So that he could still experience that magical mouthful of fall, I decided to try to turn it into a pie. The result didn’t quite capture the whole experience of biting into a sticky, crunchy caramel apple skewered precariously on a stick, but it was definitely delicious.
This pie is based on the same recipe I usually use for apple pie. The filling is incredible basic, requiring only apples, flour, and brown sugar. I left out the cinnamon this time, even though it felt like it went against my very core to do so, because I wanted to stay true to the flavor of caramel apples. The pie will, of course, taste delicious with cinnamon in the filling and/or crumble, so you can add two teaspoons (or more, depending on your appetite for cinnamon) if you’re so-inclined.
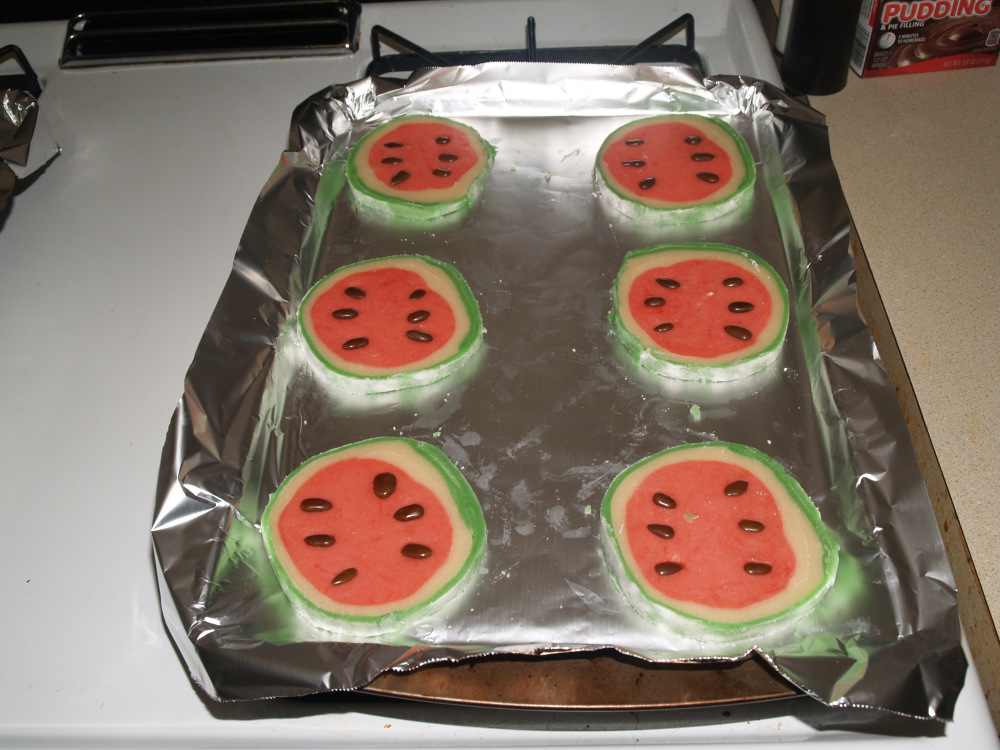
I decided to use a crumble topping, using chopped peanuts instead of the usual walnuts or oats to go with the caramel apple theme (the ones I buy are usually rolled in chopped peanuts). It added a nice sweetness and crunch to the pie, but be careful when baking because it tends to brown quickly. I’d guess that’s because peanuts are naturally oily, but it could also be that my oven has a mind of its own when it comes to temperature control. Either way, make sure to check your pie after about 40 minutes and cover it with foil, shiny side out, if you notice that it’s browning too quickly.
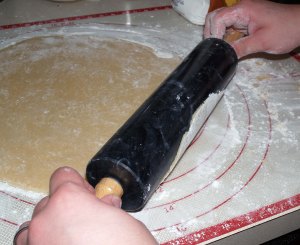
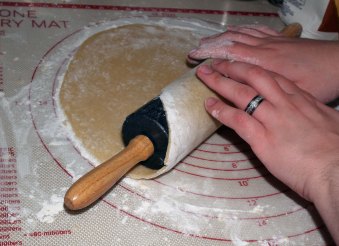
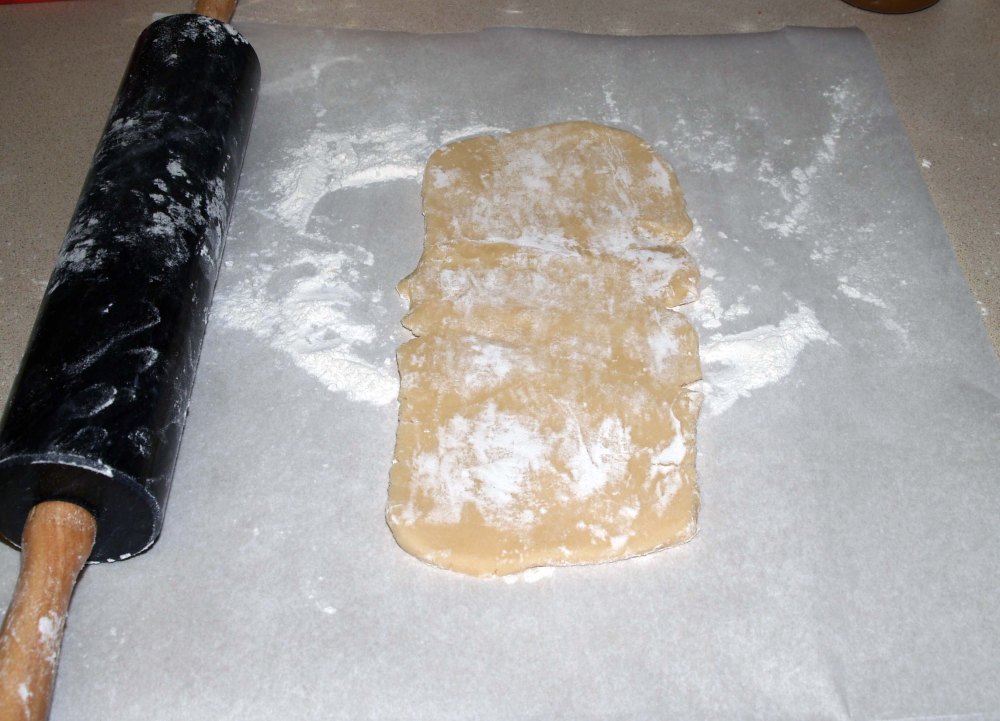
I will confess that I used store-bought pie crust for this one because I just didn’t have it in me to make pie crust. While I now prefer to make my own, I really don’t think there’s anything wrong with store-bought (as evidenced by one of my attempts at click bait). It tastes fine, has reliable results, and just makes things easy. Of course, I couldn’t just let it be entirely easy, so I added a braided edge to the pie to pretty things up a little. It worked out nicely, and wasn’t difficult at all. The trick is to make sure that all of your strips are the same width, which should be fairly small (approximately ¼” or less), and then to braid the ends of each strand together once they’re all arranged on the pie.
The other shortcut I took was to use store-bought caramel sauce. I actually did try to make my own according to this recipe from Sally’s Baking Addiction, but while it looked right, the sauce had a burnt flavor that was just unpleasant. Most likely, in the time it took to take the pictures, I overcooked it. I’ve made caramel before, and I’m sure I’ll do it again, so I’m not too bothered by it. You can attempt to make your own if you’re feeling ambitious, but if not, Trader Joe’s sells a decent jar of salted caramel sauce (and salted caramel really isn’t my thing, so you know it has to taste pretty good if I’m recommending it anyway). Whatever you decide, be sure to give the pie a try with the caramel, because it really does bring the flavor up to the next level of tastiness.
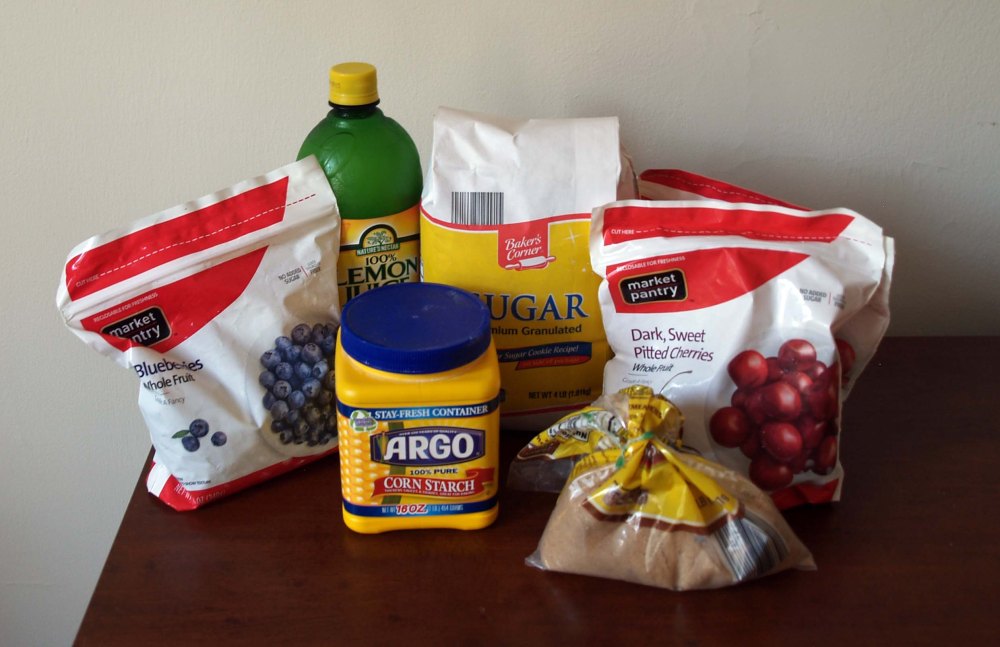
You will need the following ingredients:
For the pie:
1 recipe sweet pie crust, or 1 box store-bought pie crust (if you don’t plan on doing anything decorative with the crust, you will only need half of the crust recipe or one roll of store-bought)
8 cups assorted apples, peeled, cored, and chopped
1 cup brown sugar
¼ cup all-purpose flour
heavy cream for brushing crust (optional, and only if you’re using decorations)
To start off, prepare your pie crust (here’s a helpful tutorial) and let it chill for at least an hour.
When your pie crust is nice and firm, peel, core, and chop your apples into roughly ½” chunks. To get the most fruit out of my apples, I like to cut them in half once I’ve peeled them, then remove the cores and stems with a melon baller before chopping.
Toss the apple chunks together with the brown sugar and flour in a large bowl until well-combined. Set aside for now.
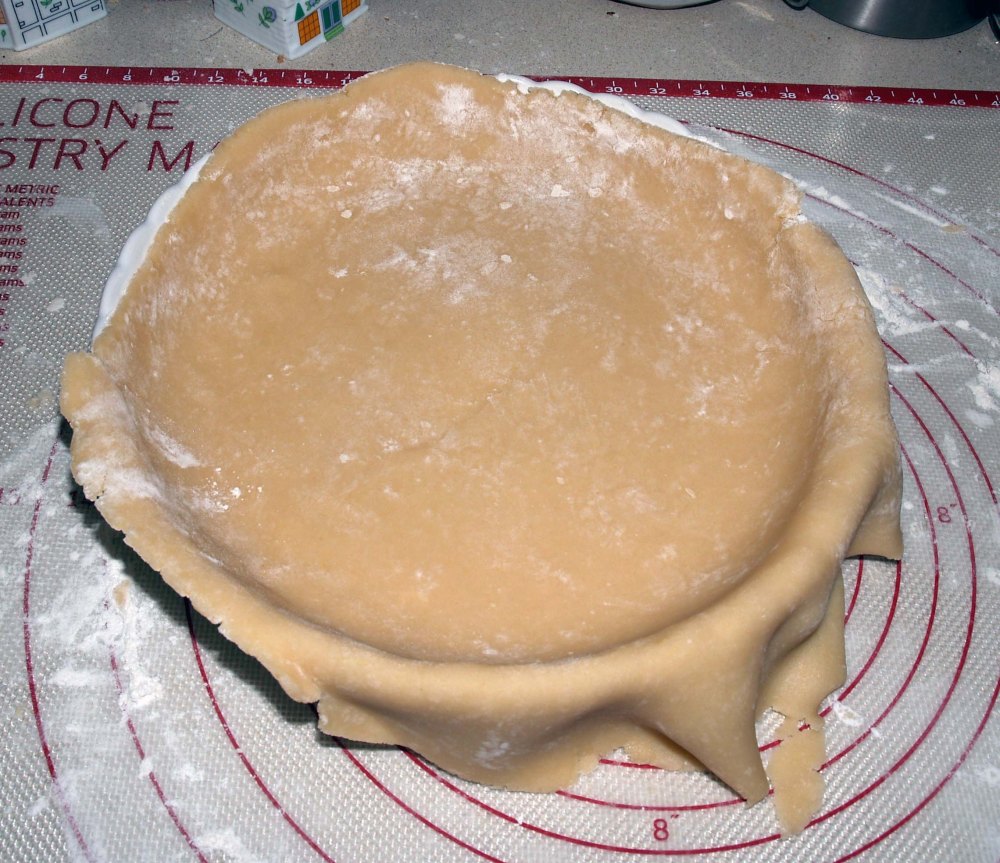
On a lightly-floured surface, roll out half of the pie crust and fit it carefully into a 9″ deep dish pie plate.
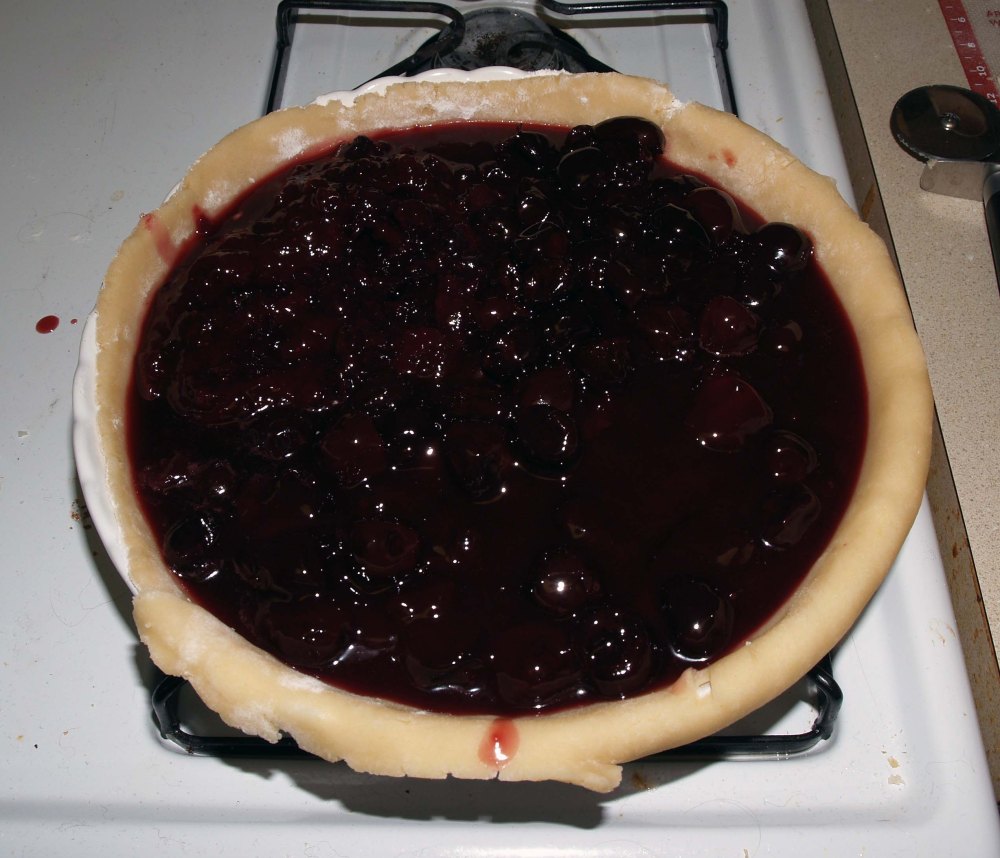
Spread the apple mixture evenly inside the bottom pie crust. Refrigerate the pie while you make the crumble to make sure the crust doesn’t melt from the heat of the oven.
Now, prepare the crumble. In a small bowl, stir together the brown sugar and all-purpose flour until well-mixed.
If you haven’t already, chop your peanuts until they resemble fine gravel.
Stir the peanuts into the flour-sugar mixture, then cut in the softened butter until pea-sized crumbs form.
Take your pie back out of the fridge and sprinkle the crumble evenly across the top.
I decided to roll out my remaining pie crust, cut it into thin strips, and make a braided edge. I’ll probably write a separate post about this to add to my list of pie crust decorations, so I’m not going to go into detail here.
If you do choose to add a border, I suggest brushing it with a little bit of heavy cream. This gives it a nice, golden color when it bakes.
By now, your oven should be pre-heated. If it’s not, put the pie back into the fridge while you wait for it to come up to temperature. When the oven is ready, bake the pie for about an hour, or until the crust and crumble are browned and the filling bubbles up through the crumble. If the crust looks like it’s browning too quickly when you check the pie, you can cover it with aluminum foil (shiny side out) to slow it down a little.
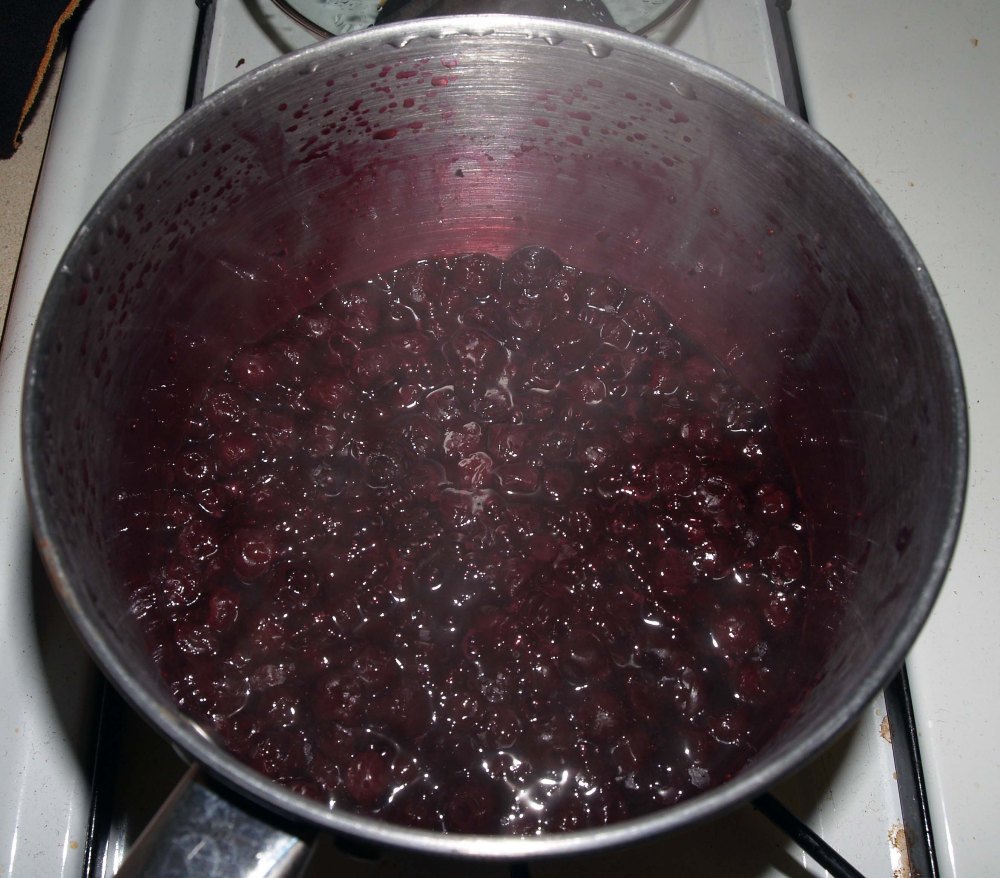
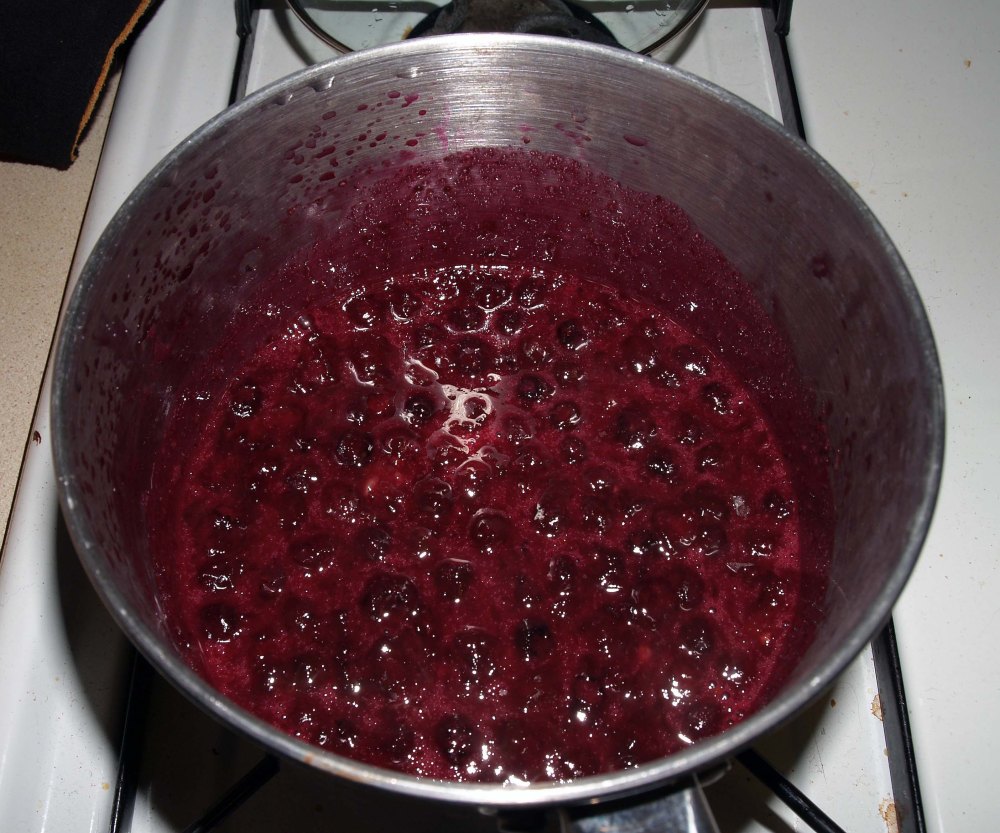
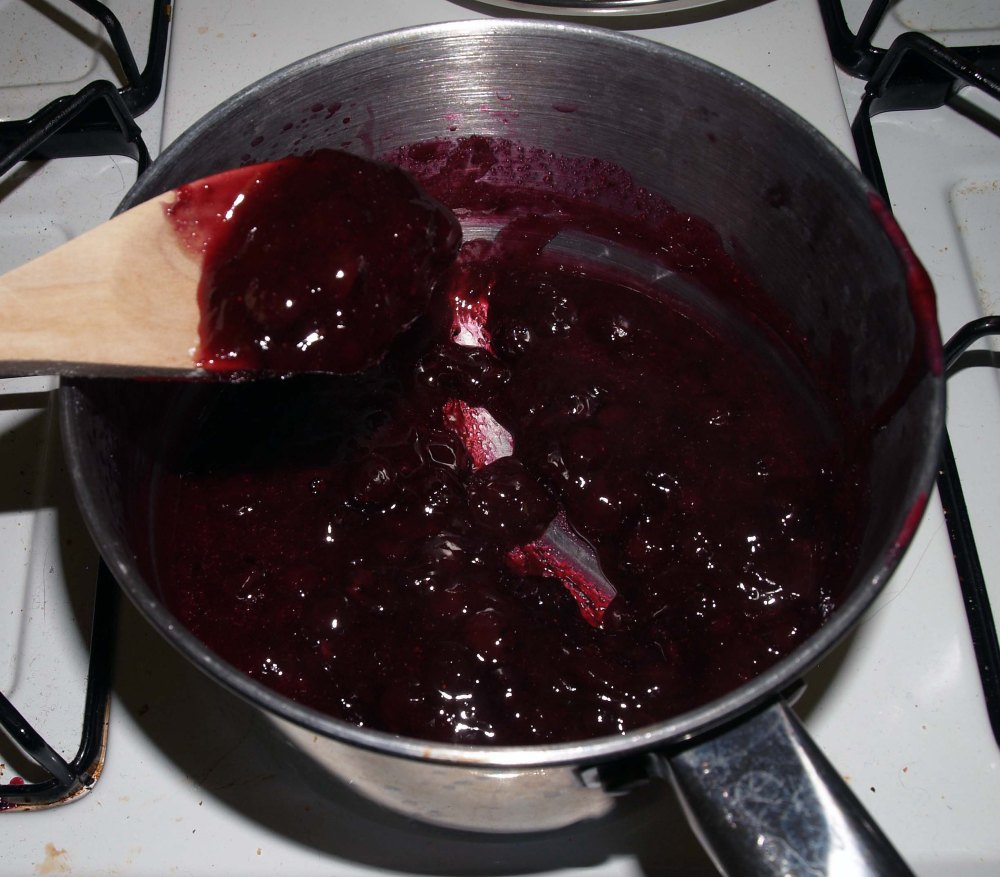
I also attempted to make homemade caramel sauce a la this recipe, but it ended up tasting a bit burnt. I’m not going to re-write the process here because I really didn’t change the recipe at all other than omitting the salt, and mine didn’t come out well anyway. Here are my photos anyway, because I think the process of turning sugar into caramel is cool.
Instead, I bought a jar of salted caramel sauce at Trader Joe’s, and it worked out just fine for me. The pie is delicious on its own, but I’d definitely encourage you to try it with the caramel. Just drizzle each slice with some warmed-up caramel sauce before serving and you’re good to go.
Enjoy!
You can download the printable PDF recipe here: Benbaker0078@gmail.com
Iron Man’s Mandarin Orange Chocolate Cake / Easy Cake Recipe Home Baking Tips
We’ve made it to Phase Two! Following my previous mirror glaze post, it’s time to reveal the cake it covered. This week, we’re talking about Iron Man 3. To find out how that relates to mandarin orange chocolate cake (which I can assure you tastes even better than it looks), read on!
I was a little nervous when I got to Iron Man 3 because at this point, I’ve already written two Iron Man recipes for this series (you can check them out here and here). I didn’t really want to do more arc reactors because I’d already been there, done that. Thankfully, watching the movie helped to give me a jump start and get me out of arc reactor land.
According to the IMDB summary, “When Tony Stark’s world is torn apart by a formidable terrorist called the Mandarin, he starts an odyssey of rebuilding and retribution.” As is often the case with Marvel movies, there is a lot going on here. Tony Stark is not only dealing with his PTSD-like symptoms following the Battle of New York in The Avengers, but he is also dealing with some demons returning from his past. The movie starts off with an unfortunate song choice (I’ll spare you the link so you don’t have to get it stuck in your head) to show that we’re flashing back to a New Year’s Eve party in 1999. It’s there that pre-Iron Man Tony Stark makes some enemies and sets the stage for the events that are about to unfold.
When we return the the present day, a new terrorist who calls himself the Mandarin is threatening the world, and Tony Stark is not about to sit back and take it. However, beneath the veneer of the Mandarin lurks the true villain. Stark’s self-obsessed, hedonistic lifestyle has come back to bite him, and this time his enemy is smart enough to distract him with a decoy. It’s not exactly difficult while watching the movie to figure out what’s really going on, particularly with the initial flashback, but there are a few twists that might be unexpected. I will admit that I was reminded of this song from Unbreakable Kimmy Schmidt whenever the increasing number of Iron Man suits and drones came up, but overall, the movie was still entertaining.
So, obviously, I chose mandarin orange because of the conveniently-named villain. However, mandarin oranges (or clementines in my case) turn out to provide just the right amount of sweetness and tartness to complement the heavy chocolate cake. It isn’t news that chocolate and oranges go together, after all. I wasn’t able to get mandarin oranges at this time of year, so I used clementines instead, since they are in the same family. I believe that mandarins would make everything a bit more tart, so if you’d like to have that effect but are stuck with clementines like me, you can substitute a little lemon juice for some of the clementine juice instead.
The mirror glaze was also thematically inspired by the movie to represent the veneer of the Mandarin (I know, I’m going a bit overboard with these, but hey, I’m having fun). I talk about it in more detail in my previous post, so I’m not going to say much about it here. It doesn’t really change the flavor of the cake at all, but it looks lovely and did manage to help me save the cake from near-disaster when I almost dropped it (the glaze was sticky enough to hold everything together when I caught it on its way down).
I’ve used almost the same cake recipe before in my cinnamon chocolate cake with cookie butter frosting, and it’s based off of this recipe by Sally’s Baking Addiction. This time, I added a little hot sauce for a bit of extra kick. I forgot to include the ground cinnamon, and I missed it, so I’ve included it in the recipe so that you can enjoy the full extent of the cinnamony goodness. The frosting is based on my favorite Magnolia Bakery vanilla frosting recipe. I’ve replaced all of the liquid with mandarin orange/clementine juice and added the zest for good measure, and it is absolutely delicious, if I do say so myself. I’ve been tempted more than once to just eat it with a spoon. The mandarin orange/clementine curd is adapted from this recipe by Martha Stewart. I have to say, usually I don’t quite like Martha’s recipes, but this one turned out just right. It worked exactly as advertised and it tasted just right. Good job, Martha (clearly she needs my praise :-P).
You will need the following ingredients:
For the cake:
1¾ cups all-purpose flour
1¾ cups granulated sugar
1 Tbsp. ground cinnamon (not picture)
1 tsp. baking powder
1 tsp. baking soda
1 tsp. salt
1 cup buttermilk OR 1 cup milk plus 1 Tbsp. lemon juice
½ cup vegetable oil
2 eggs, room temperature
1 tsp. vanilla extract
8 oz. strong chai tea, or other cinnamon black tea of choice
2-3 dashes of hot sauce (optional)
For the mandarin orange/clementine curd (sorry, no picture):
6 large egg yolks
grated zest of 3 mandarin oranges or clementines
½ cup mandarin orange or clementine juice
¾ cup granulated sugar
1 stick cold, unsalted butter, cubed
For the mandarin orange/clementine frosting:
8 oz. (2 sticks) unsalted butter, softened
6-8 cups powdered sugar
½ cup mandarin orange or clementine juice, strained
There are a lot of parts to this cake, so it helps to (a) get started a few days in advance and (b) do things in a certain order so that everything has time to cool/chill/set as necessary. My suggested first step is making the cake.
Preheat your oven to 350°F and prepare two 9″ cake pans. Set aside.
If you’re making your own buttermilk with milk and lemon juice, simply stir the milk and lemon juice together in a glass or ceramic container and let sit for at least 5 minutes. It will get clumpy and gross (this is what you want).
Brew your chai/cinnamon tea in 8 ounces of boiling water according to the package directions. I used Tea Forte’s Bombay Chai because it brews really strong and spicy. Sadly, it seems to be out of stock everywhere I’ve thought to look, but you can still get it in a 3-tea sampler stack, which I also have and like. It’s a loose-leaf tea, so I make it with this awesome set of tea infusers. If all that’s too much nonsense for you, regular teabags will work fine. I’m particularly find of Stash’s chai, too. [In case you couldn’t tell, I’m always down to chat about tea.]
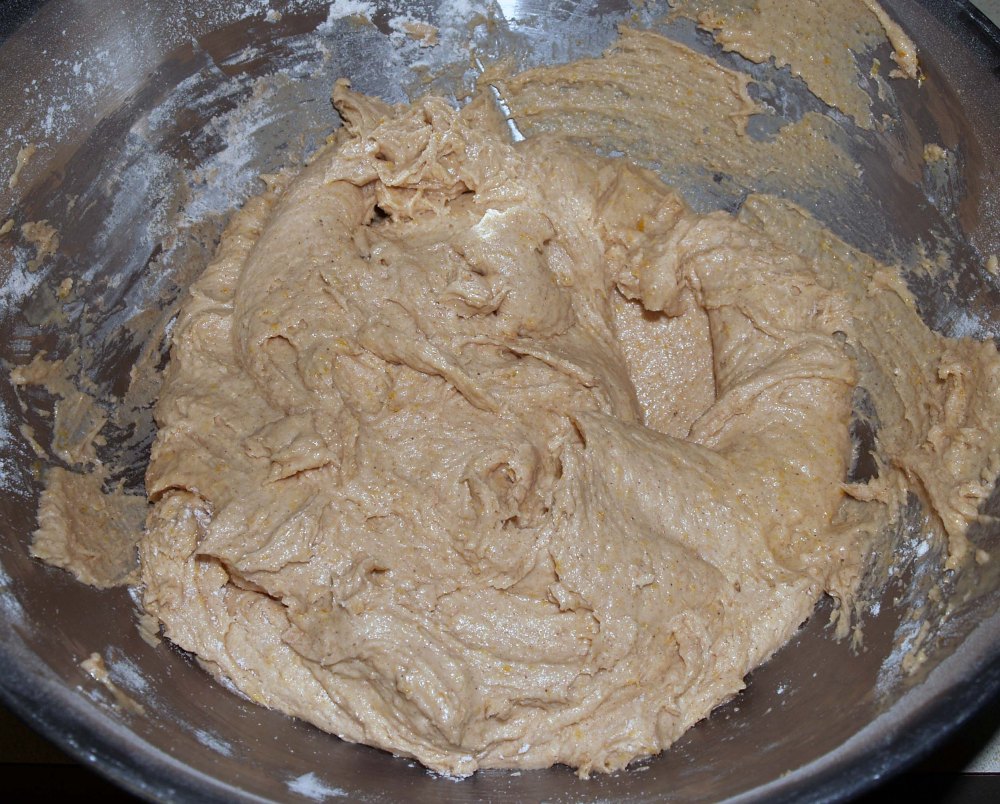
In a medium bowl, whisk together the flour, sugar, cocoa powder, cinnamon, baking soda, baking powder, and salt. Set aside.
In a large bowl, beat together the buttermilk, oil, eggs, and vanilla extract until combined.
Fold in the dry ingredients until combined. It doesn’t have to be perfect, but all the dry stuff should be at least moistened, and there shouldn’t be any large lumps (I had some persistent lumps, so I mixed the batter briefly with my hand mixer to break them up).
Carefully stir in the hot tea and the hot sauce until fully-incorporated. It won’t want to mix in at first, but keep at it and it’ll eventually get there.
Divide the batter between your two prepared cake pans. Ideally, you’d do this with a kitchen scale to ensure accuracy, but no one will judge you if you just eyeball it (I did). Whack each cake pan on the counter a few times to release any air bubbles trapped in the batter.
Bake the cakes in the preheated oven for about 23-27 minutes, or until a toothpick inserted in the center comes out clean and the cake springs back when gently pressed. If your kitchen starts to smell deliciously chocolatey a bit earlier than expected, check the cakes for doneness then just in case.
Leave the cakes to cool in the pans for about 15 minutes, then run a sharp knife around the edge of each to release them. Carefully turn them out onto cooling racks to cool completely.
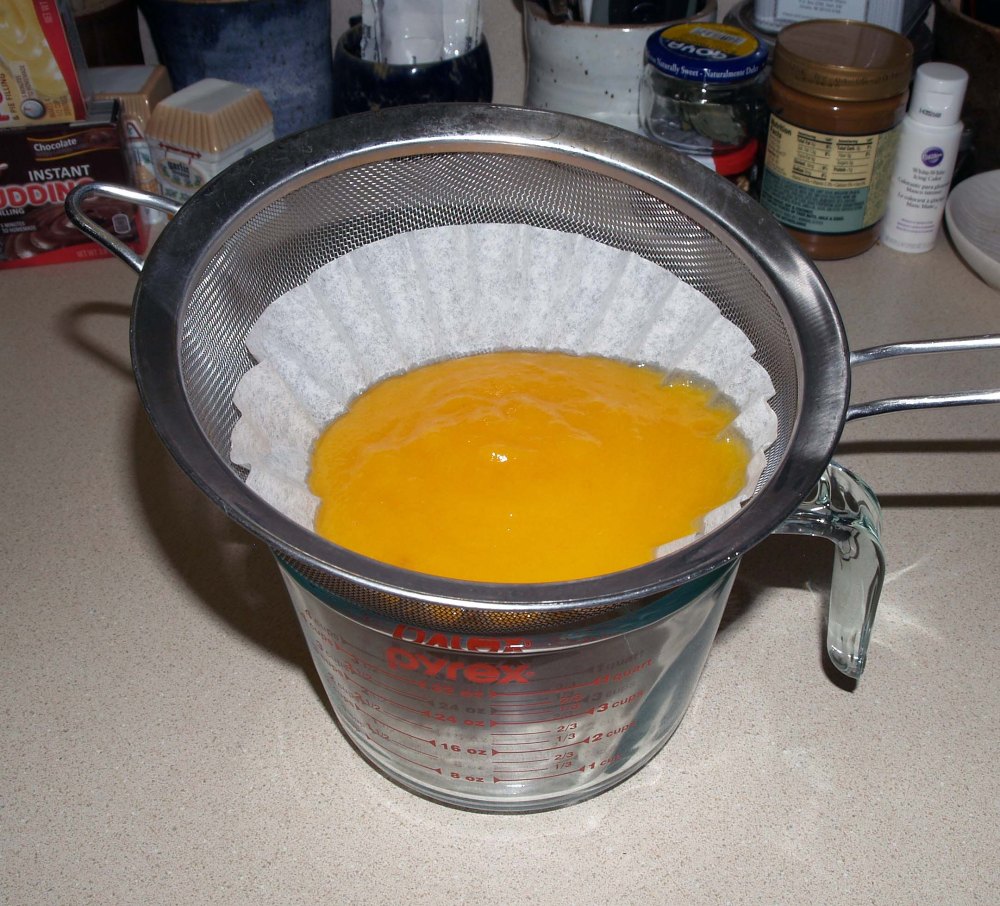
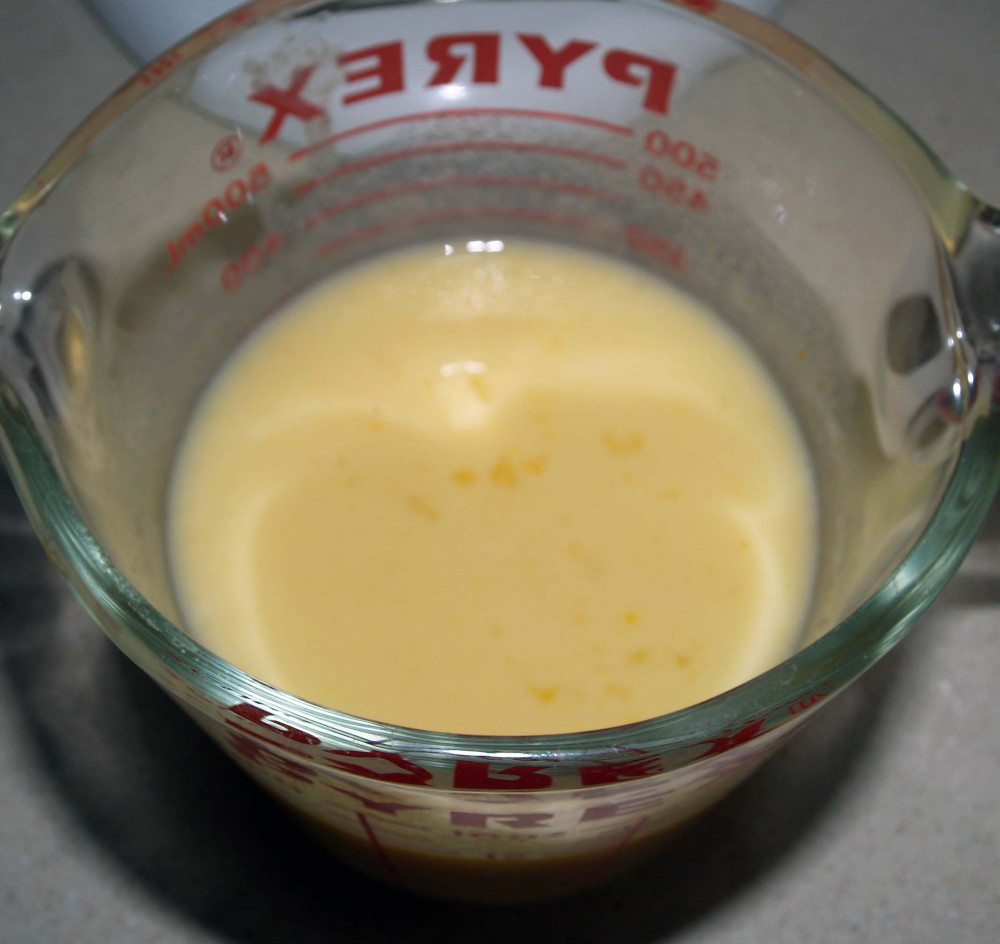
While the cakes are baking, start on the mandarin orange curd. First, set a medium, metal bowl inside a larger metal bowl filled with ice and water. The metal bowls are important here because you’re going to be pouring hot liquid into the smaller bowl, and the temperature difference can cause glass or ceramic bowls to crack.
In a medium bowl, whisk together the egg yolks, mandarin orange zest and juice, and sugar until smooth.
Cook the mixture over medium heat, stirring constantly, until it is thick enough to coat the back of a wooden spoon. This should take 5-7 minutes.
Remove the saucepan and stir in the butter cubes 1 at a time, waiting for each cube to melt completely before adding the next.
Pour the curd through a fine-mesh strainer into the smaller bowl you set up in the ice bath earlier. You may need to use a rubber spatula to help it through.
Let the curd sit in the ice bath until cool, stirring frequently to prevent a skin from forming on top. After about half an hour, it should be cool to the touch. At that time, press a piece of plastic wrap directly onto the surface of the curd and refrigerate it until set (at least 1 hour). You can pour it into a smaller container at this point if you prefer.
Once you’ve prepared your curd, it’s time to go back to your cakes. By now, they should be cool enough to handle. At this point, wrap each cake separately in plastic wrap and freeze them. Overnight is preferable, but if you can’t wait that long, try to leave them for at least a few hours. This will make them easier to work with when it comes time to level, frost, and fill them.
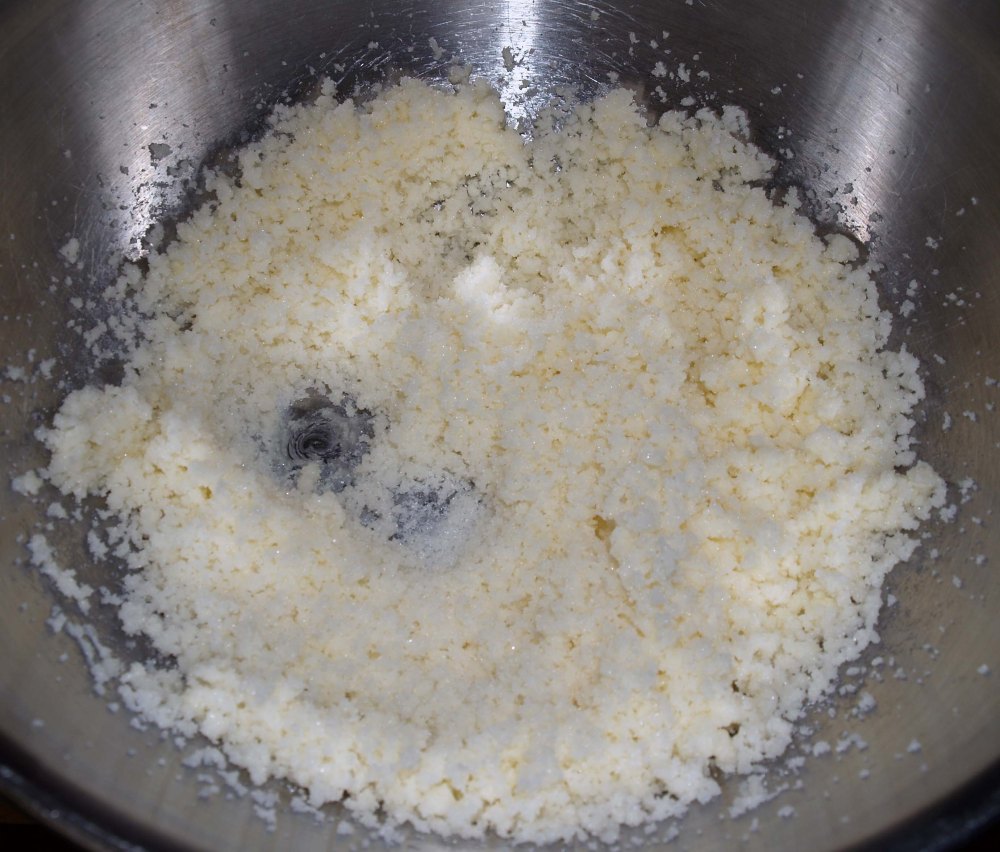
When you are about ready to start assembling your cake, it’s time to prepare the mandarin orange frosting. In the bowl of a stand mixer or other large bowl, beat the softened butter for about 3 minutes until it’s creamy.
Add 4 cups of powdered sugar and beat until fluffy.
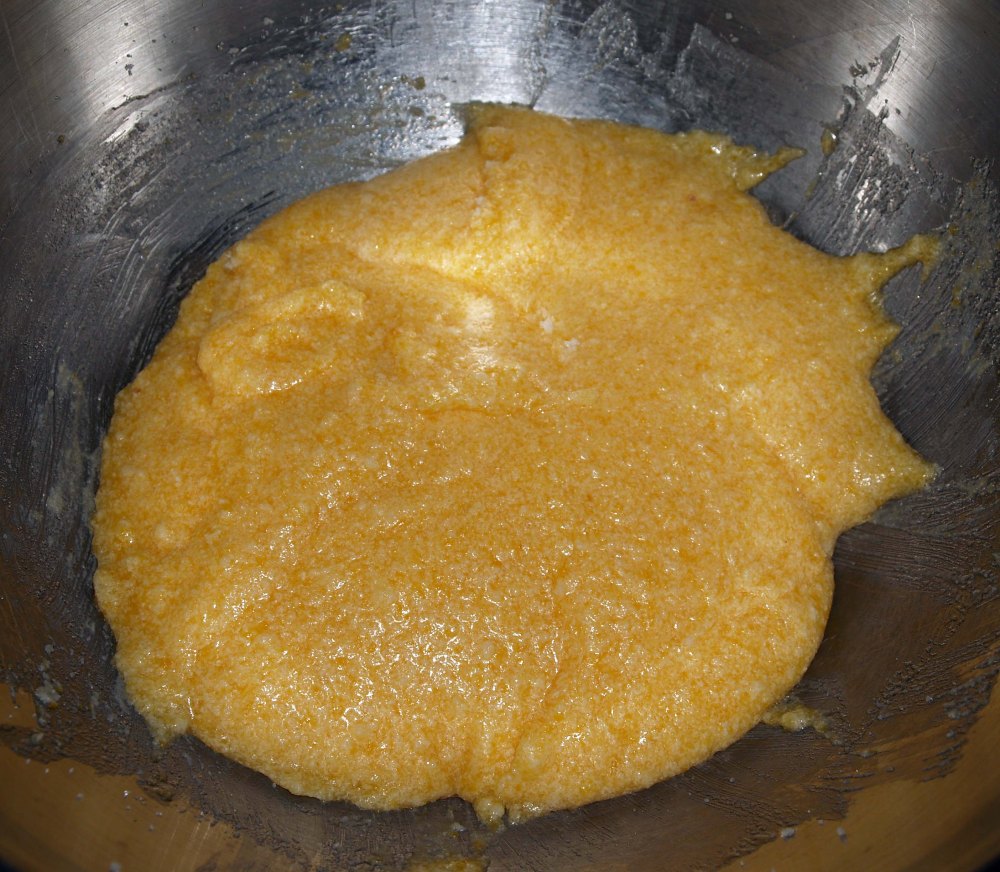
Add the mandarin orange juice and zest and beat until creamy, about 5-7 minutes. Add the remaining powdered sugar 1 cup at a time, beating 2 minutes after each addition until smooth. Beat the frosting on low speed until it is smooth and spreadable.
Now it will all start to take shape, because it’s time to assemble! Take your cakes out of the freezer and unwrap them. If they’re a bit domed, now’s the time to level them (I didn’t and suffered the consequences). Place one cake on a cake board or plate, cut side up. Spread a thin layer of frosting all across the top and pipe a frosting “dam” around the edge using a piping bag or a regular ol’ resealable gallon bag.
Take your mandarin orange curd out of the fridge, discarding the plastic wrap, and carefully spread some inside the dam. Do not go above the dam! You will have leakage and you will be sad (I speak from experience).
Place your second cake cut side down on top of the bottom layer. I think it looks kind of like a giant Oreo.
Frost the top and sides of the cake with a very thin layer of frosting (this is called the crumb coat). Make it as smooth as you can, but don’t worry too much, because you’re going to add more frosting later.
If you’ve added too much curd and/or your cakes aren’t level, you may have some curd breaking through the dam. It’s not ideal, but just try to patch it with extra frosting as much as possible.
Chill the cake for at least an hour to set the crumb coat. While you are waiting, prepare your mirror glaze (if using) according to the directions in last week’s post.
When your crumb coat has set, take your cake out of the fridge. Smooth any obviously pointy bits with your fingers. With the remaining frosting, add patches to the sides of the cake. Hold an icing spatula or the flat side of a butter knife up the the edge of the cake and rotate the board to smooth the frosting over the side. Repeat as necessary until you’ve smoothed the whole side of the cake. Once the side is nice, smooth the top with extra frosting as well. A cake turntable is really helpful for this, but you can still get by without one.
If you’re not trying the mirror glaze (even though I think you should because it’s cool), you can stop now and add any finishing touches you like. If you are glazing, put the cake back in the fridge while you wait for your mirror glaze to cool to the proper temperature. The rest of the process is described in the mirror glaze post referenced above. I decided to add some red flourishes to the finish with liquid food coloring to add in some Iron Man colors, and it ended up being reminiscent of Iron Man’s suits exploding in the final battle scene (if you use your imagination ;-)).
Let your cake sit until set, then transfer back to a cake board or serving platter. Slice with a clean knife to serve and refrigerate leftovers for up to 5 days.
Macarons- Easy Recipe / Home Baking / How To Bake Macrons At Home
As I mentioned previously, I wasn’t about to let macarons get me down. After the first failed attempt, I took to Google to learn what could be learned and tried again the next day armed with all the tips and tricks the internet had to provide.
I found some comprehensive instructions by Brave Tart (the other posts linked in the beginning are helpful, too) that gave me some much-needed confidence. I highly recommend reading that post and all the others linked at its beginning if you want to get into the macaron game, but are feeling totally incapable after a botched attempt. I followed the recipe and steps on Brave Tart exactly (even the sifting!) and, lo and behold, my macarons actually looked like macarons!
So, aside from trying a different recipe and actually sifting, what did I do differently this time? Let’s dive right into the analysis.
Some things remain the same, like the need for sifting your almond flour with your confectioner’s sugar to make sure there are no large chunks and to aerate the dry mix a bit. I also whisked it for good measure, as the two ingredients didn’t look combined enough for my taste after sifting.
The recipes diverge when you get to the meringue step, though. This recipe takes you through the steps of making a French meringue. The recipe I used last time used an Italian meringue instead. I’m not sure if this affected my end result, but it’s definitely a variable to retest at a later time. I also had to beat the meringue for a full 10 minutes, which seemed like too much, but worked out in the end.
After making the meringue, the recipe instructed me to dump all of the dry mix into it (the other recipe directed you to add the meringue into the dry mix in stages, only using as much as was needed to achieve the right texture) and then fold the two together. Which leads me to…
Stirring and Folding
The new recipe had some helpful advice on how to fold the meringue and dry ingredients together. Basically, you need to flatten the meringue and knock out the air, which is really counter-intuitive, considering you just spent 10 minutes beating air into it. To do this, you need to (a) count your strokes and (b) scrape the mixture against the side of the mixing bowl with a rubber spatula to knock the air out.
When the batter flows off the spatula in a thick, continuous stream, it’s ready for piping (this part worked the same as before). So far, so good, right? Now we reach a boss battle: air bubbles.
Air Bubbles
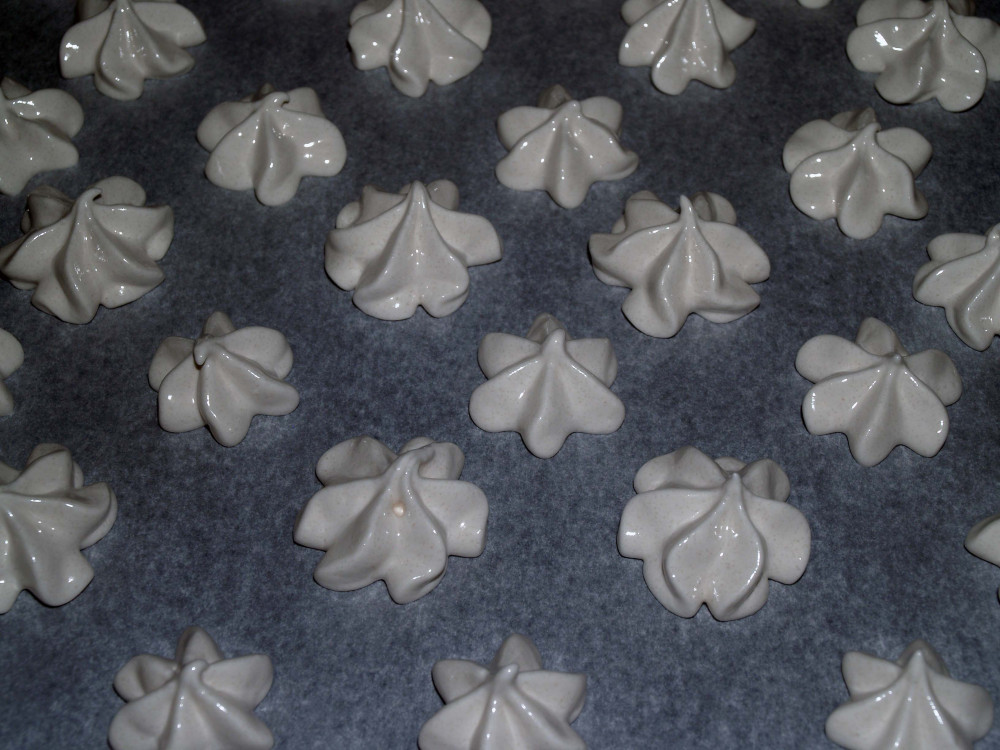
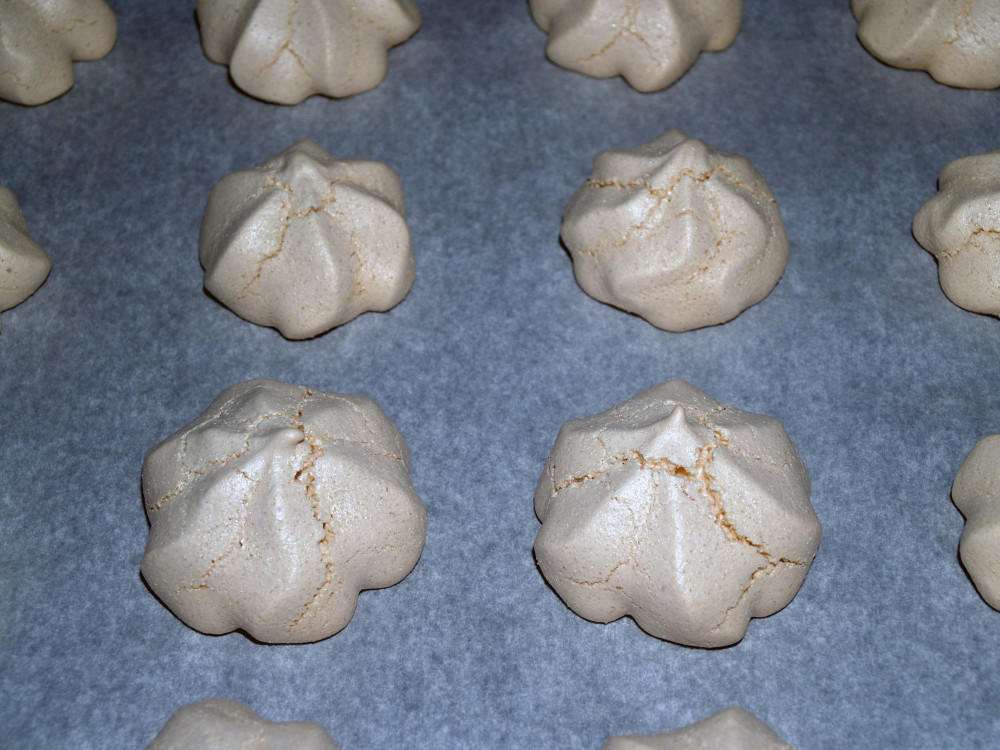
As I mentioned last time, I suspected that some large air bubbles were to blame for the dramatic cracking my macaron shells experienced. This time, I made sure to whack my cookie sheets against the counter HARD several times. I let them sit for about 15 minutes and, sure enough, little bubbles rose up to the top and popped (I helped a few along with a toothpick). Some of them did leave little dimples in the surfaces, but that was a price I was willing to pay, as it wasn’t too noticeable in the long run.
Oven Temperature
While some baked goods will be alright with a bit of temperature variation, macarons definitely do not fit into that category (nor does anything that depends on meringue, really). I’ve known for a long time that my oven has a mind of its own, but I just kind of wished my way through the first batch of meringues. That led to cracking and sadness. That same day, I went out and bought a cheap oven thermometer. Turns out, my oven was about 50° too hot the next time I attempted macarons. After some tinkering with the temperature (and much swearing at my lying oven), we were in business. Each time I peeked through the window, my shells were miraculously bubble free, and they came out just right. Success!
I’ll admit that I still have some work to do (I’d like to eliminate those little peaks and get some taller feet), but I’m pretty happy with the result, considering that this was only my second time ever attempting macarons.
I hadn’t added any food coloring because I didn’t have powdered food coloring yet (more on that in a future post), so I took Brave Tart’s advice and painted some of the shells with food coloring after baking instead. I used Wilton’s gold color mist on some and Wilton’s gold candy paint on others (you can get these at a more reasonable price at your local craft store). You can just barely see it on the front, left, and top macarons:
I didn’t like the smell of the color mist at first, but it dissipated over time. Both types of color added a nice shimmer and sheer layer of color, so this is a nice way to decorate your macarons without messing with the liquid content too much.
As for the filling, I used the recipe for French buttercream in the Bouchon Bakery cookbook that I got my first macaron recipe from. It was delicious, if you like butter (who are we kidding, of course you like butter). The only problem I have with it is that it can’t be out of the fridge too long or it melts due to the high butter content. In the future, I’d probably try a more standard buttercream that’s higher on powdered sugar content.
So, I’m a macaron expert now, right? Just kidding, I still consider myself a novice. I will keep trying and, hopefully, improve my technique with practice. If you’ve mastered the macaron, I’d love to hear the secrets of your witchcraft!
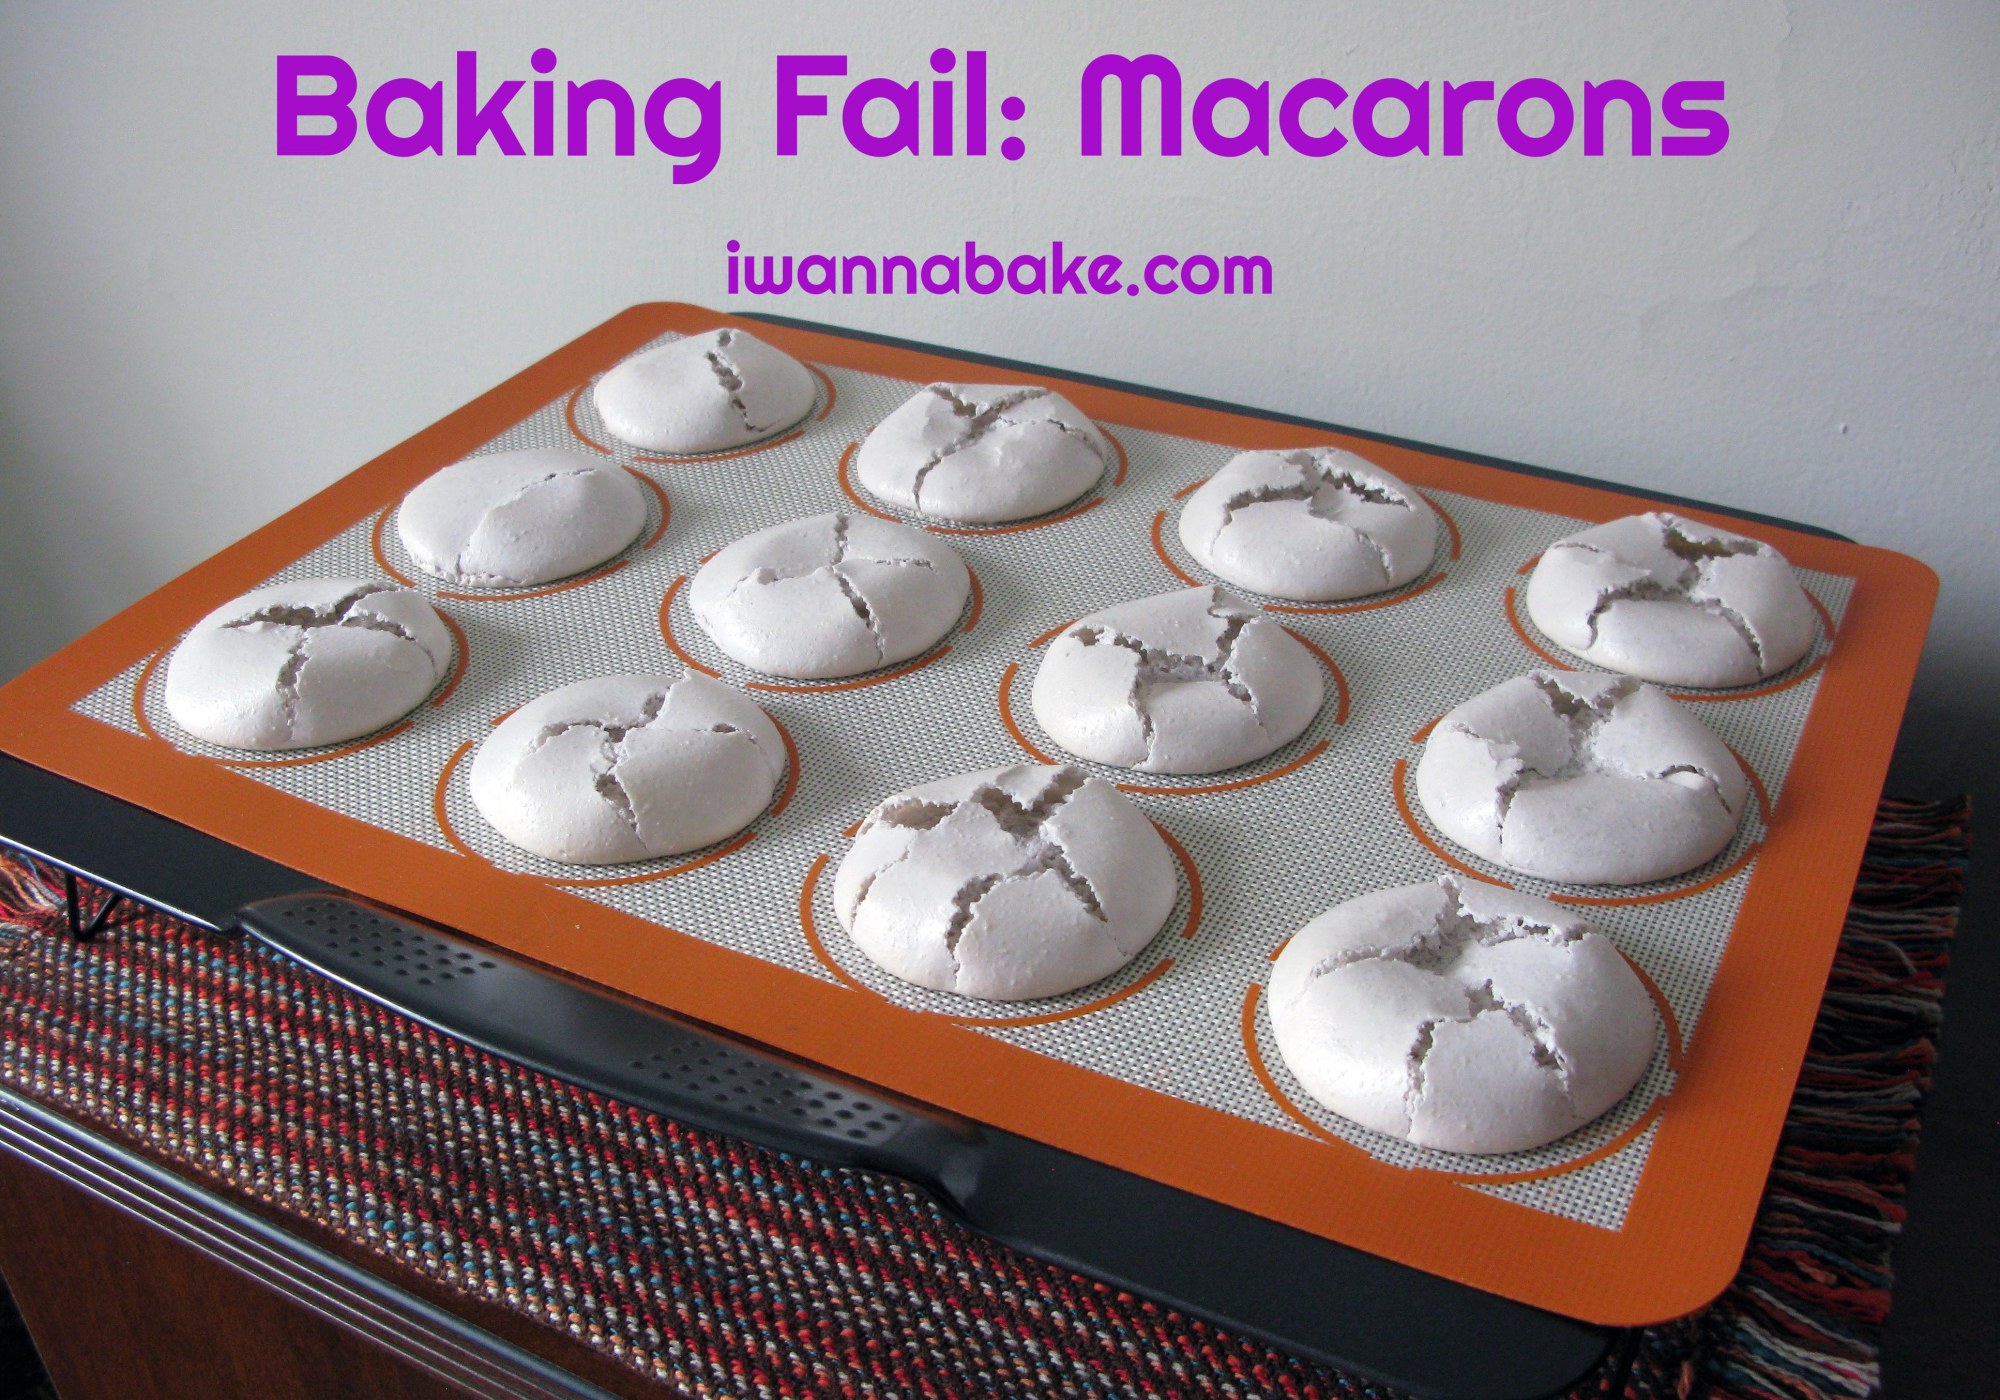
I finally decided to surrender to the trend and try my hand at macarons. I knew it would be difficult, but I secretly expected that as long as I was careful, I’d be able to achieve at least passable results on the first try. As evidenced by the pictures, I was wrong.
I started off by buying Thomas Keller’s Bouchon Bakery, a fancy cookbook that the internet assured me was a good authority on the subject. The recipe required a whole lot of fiddling and some very precise measurements, so it sounded about right. I also choked down any sense of thriftiness and spent $13 on a pound of almond flour, because darn it, I was going to do this right. [Note: I’ve since learned that you can buy almond meal at Trader Joe’s for about half the price.] I whipped out my trusty kitchen scale, separated a bunch of eggs, and got to work. Sadly, some time and many dirty dishes later, I could see the product of my hard work cracking and deflating away in the oven.
I will admit that, while the plan was to follow the recipe exactly, I didn’t end up quite doing that. First, I have a pathological aversion to sifting. I think it takes too long and seems unnecessary unless there are chunks of stuff in your dry ingredients that you don’t want to be there. My (obscenely expensive) almond flour was quite finely ground, so rather than sifting the almond flour and the powdered sugar like I was supposed to, I just whisked it until it looked completely smooth and a little airy.
Additionally, the recipe calls for a vanilla bean, but dude, those things are expensive, and none of my usual grocery stores carry them. I knew that introducing additional liquid into the batter was a recipe for disaster, but I decided to add a teaspoon of my homemade vanilla extract anyway. As if that wasn’t enough, I added a little purple gel icing color to the mix too. I’m including some slideshows of the step-by-step photos I took to give you some idea of how the process went. First, I started off with the almond meal mixture. So far, so good.
Next, I made the meringue. I didn’t start the syrup soon enough, so the egg whites probably got a bit over-mixed, but the meringue itself seemed to turn out well, even with the addition of the vanilla extract and food coloring, so things were still looking good.
Next came the tricky part: incorporating the meringue into the almond mixture. This was the part that I was least sure of because I had never seen the batter made before. I had no idea what the consistency should really look like (I find the ribbon description a little unhelpful), so now I was winging things.
Thankfully, now we were back in my wheelhouse. I transferred the batter to a piping bag and piped out circles of batter onto special silicone mats made specifically for making macarons. [The mats were a gift, but I did go out and buy these rimless cookie sheets at Michael’s to accommodate them. Those were a good purchase.] The batter spread a little, but that was expected.
I had already preheated the oven per the recipe’s directions, so I put the first tray in and hoped for the best. Clearly, that is not what I got (the second tray followed suit).
A botched bakeventure is always a letdown, but I didn’t get disheartened. At the end of the day, I did a pretty good job of following the recipe, for me at least. However, the results made it clear that I needed to do better. As any perfectionist might do, I consulted the internet and came across this post on macarons. I highly recommend reading it, as well as this one, preferably before you start. I’ve assembled my notes based on those posts and my own speculations in the hopes of helping you avoid this spectacular cracking.
Humidity/Moisture
It has been raining or humid where I live everyday since the day I decided to try macarons. I kid you not. On the day I finally broke down and said I was trying it anyway, we were on the verge of thunderstorms all day long. This, combined with the added moisture in the batter, could have contributed to air bubbles that rose and popped during baking.
Oven Temperature Discrepancies
I know my oven runs hot, but I really have no idea what temperature it actually is at when the knob says 300°F (the answer: anywhere between 325° and 350°). Meringue does best at lower temperatures, so it probably would have been better to turn it down about 25° and just watch the shells rather than go with the written temperature and hope that it wouldn’t ruin them (because it did).
Over- or Under-Mixing
I may have either over-mixed the meringue or not knocked enough air out of it while folding it into the almond flour mixture. I will admit that I probably added too much meringue as well. The recipe tells you to add ⅓ of the meringue into the almond mixture and fold the remaining meringue in in small portions so that you don’t make the batter too liquidy. The batter didn’t really seem like it needed any more meringue early on, but it seemed wrong to have this much leftover:
The piping texture didn’t turn out terrible, but as you can see in the earlier pictures, each shell seemed to have a large air bubble inside, which led to some pretty dramatic cracking. Which leads me to my next point:
Air Bubbles
Every recipe I’ve read suggests rapping your cookie sheets on the counter to release air bubbles. This is usually something I have no problem doing, but for some reason, I really wimped out on it this time. I only did it once, and it was a pretty weak attempt. It’s very likely that the air bubbles trapped inside banded together beneath the surface, causing it to rise up like it was supposed to, but without the support of the batter inside. With nothing to hold it up, the skin cracked, and the inside deflated even more. Moral of the story: whack those cookie sheets on the counter like you’re trying to kill a roach (hard and repeatedly for good measure).
Looking Ahead
Not to be defeated by a cookie, I tried again the next day armed with my newfound knowledge. I followed the recipe from the post I referenced above, and I ended up with significantly better results. They’re still not perfect, but it’s only the second run.
So fear not, macarons are totally doable. They just might take a little practice and a lot of science (and actually following a recipe).
Happy New Year! I hope everyone’s off to a great start to 2016 so far (and adjusting faster to writing 2016 in dates than I am)! I don’t know about you, but even I have just about hit my limit on sweets throughout the holiday season. Because of this sugar overload, I decided to try something that tastes a bit healthier for the first bakeventure of the year (note: I only said tastes healthier. Let’s not go crazy just yet.). What tastes healthier than oatmeal and grapefruit? Grapefruit, oatmeal, walnut muffins, of course!
I started with King Arthur Flour’s basic muffin recipe and made adjustments based on my own liking. I referred to this recipe from Allrecipes a bit, but based on the reviews, I didn’t place much stock in that one. You’ll notice in the photos that my muffins didn’t rise all that much. That’s most likely because I replaced the milk called for with grapefruit juice, but didn’t change the baking powder to baking soda. For a more detailed account of the difference between baking powder and baking soda, read this article by Sally’s Baking Addiction, but suffice it to say that when you increase the acid in your recipe (in this case adding grapefruit juice), you may need to adjust your leavening. Next time I make these, I’ll probably try them with ½ teaspoon of baking soda instead of the one tablespoon of baking powder instead.
Despite having a full cup of fresh grapefruit juice and the zest of a whole grapefruit in the batter, these muffins have just a hint of grapefruit flavor. As a matter of fact, Josh couldn’t even taste it (those of you who know us know this is weird because I’m usually the one whose tastebuds are less sensitive). If you try the recipe and can’t taste it, I’d suggest juicing an extra grapefruit and reducing the juice on the stove until it’s down to 1 cup of liquid. This will intensify the grapefruity taste.
I felt it was only natural to add nuts to an oatmeal batter, but if nuts aren’t your thing, you could either leave them out or substitute some dried cranberries or other fresh or dried fruit. If you do this, stir them into the dry ingredients first so that they get coated in flour and don’t sink to the bottom. This recipe is pretty malleable, so the sky’s the limit with mix-ins. If you come up with a particularly tasty combination, please share!
You will need the following ingredients (sorry, no picture this time):
For the muffins:
1¼ cups all-purpose flour
1 cup oats (quick cooking are fine)
½ cup brown sugar
1 Tbsp. baking powder
1 tsp. ground ginger
1 cup walnuts or pecans, chopped
zest of one grapefruit, grated
1 cup grapefruit juice, strained (this took me 1½ grapefruits)
2 large eggs
¼ cup unsweetened applesauce
decorating sugar (optional)
For baking ambiance:
It seems like I haven’t seen the sun in a month! While my inclination was to give in and listen to some classic grunge, I decided instead to fight back against the grayness and put on a bubbly 80’s playlist I found on Amazon Prime Music. The songs were not all necessarily my cup of tea, but the playlist basically served as an 80’s music radio station with no commercials, so I’d say it was a success.
Preheat your oven to 500°F. Line 18 muffin cups with paper wrappers and grease the wrappers (don’t skip this step or you won’t be able to get the muffins out whole).
Chop your nuts until they resemble gravel.
In a medium mixing bowl, stir together the flour, oats, brown sugar, baking powder (or baking soda if you’re making that change), ginger, grapefruit zest, and walnuts until all ingredients are fully-incorporated. Do your best to break up any clumps of sugar you see.
In a separate bowl, whisk together the grapefruit juice, eggs, and applesauce until smooth.
Stir the wet ingredients into the dry ingredients just until all the dry ingredients are wet. The batter will still be lumpy, but resist the urge to make it smooth.
Fill each muffin cup approximately ⅔ full with batter.
Sprinkle the decorating sugar on top of the muffins (if using) and put them in the oven. Immediately decrease the oven temperature to 400°F and bake for 15-20 minutes, or until the tops are lightly browned and a toothpick inserted into the center of each muffin comes out clean.
Leave the muffins in the muffin pan(s) just until they are cool enough to handle, then remove them from the pans to cool completely. Store in an airtight container.
Enjoy!
You can download the printable PDF recipe here: Benbaker0078@gmail.com
Red Velvet Beet Brownies – How to make Red Velvet Beet Brownies – Easy Recipe Home Baking
I bake interesting and delicious things all the time (if I do say so myself), but sometimes I just want some brownies. I like them dense and fudgy with more chocolate chips inside than a brownie has any right to contain. Boxed brownies with a mess of broken candy (known fondly around my home as “garbage brownies”) are a treat I rarely allow myself to indulge in these days. However, garbage brownies wouldn’t make for a particularly interesting post, now would they? That’s where red velvet and beets decided to barge into the picture.
I will admit that I’m not really into the red velvet craze in general. It’s usually just chocolate cake dyed red. However, as you saw with my vegan cake, when I decide to invent something, I go all out. I started with the recipe I used for triple chocolate potato brownies as the base and tinkered with it until my vision was realized. Anyone who’s ever eaten or cooked beets knows that they do a bang up job of turning everything they touch bright pink, so it seemed only natural to replace the potatoes with beets.
Unfortunately, while these brownies were decently velvety, they didn’t turn out to be particularly red once baked. If a bright red color is what you’re really after, you can try adding some red food coloring to brighten them up a bit. You can also swap out the white chocolate chips for semi-sweet or dark chocolate chips, chopped nuts of your choice, or a mixture. I found that that white chocolate chips melted a bit, leaving holes and streams of melted chocolate around the edges. It still tasted good, but looked a bit messy.
Surprisingly, these brownies actually taste better cold than hot out of the oven. This runs counter to all of my experience with brownies thus far, but sometimes you just have to try something different to get unexpectedly pleasant results. Perhaps I’ll take it one step further and freeze them next time.
For Red Velvet Beet Brownies You Will Need These Ingredients:
For the brownies:
1 cup pureed beets (one 16-oz. can)
2 eggs and 1 egg yolk
½ cup canola oil
¼ cup beet juice (from can of beets)
1 tsp. vanilla extract
½ cup granulated sugar
½ cup brown sugar
1¼ cups all-purpose flour
⅓ cup cocoa powder
½ tsp. baking powder
⅛ tsp. salt
8 oz. white chocolate chips (optional)
For frosting and decoration:
3 oz. cold cream cheese
2 Tbsp. unsalted butter, softened
2 Tbsp. milk
1 tsp. vanilla extract
1½ cups powdered sugar
decorating sugar or sprinkles (optional)
For baking ambiance:
The radio keeps coming back to Heart these days, so I decided to take that as a sign and use their music to fuel this bakeventure. Let the Wilson sisters’ music rock out while you whip up some shockingly magenta brownie batter.
Preheat your oven to 350°F. Grease a 9″ square baking pan or line the bottom with parchment paper (this is my preferred method).
Drain and reserve the liquid from one can of sliced or whole beets. Put the beets in a food processor and add about ¼ cup of the beet juice back in (this helps with the pureeing process). Process the beets on high until smooth, stopping to scrape the sides of the bowl as needed.
In a large bowl, beat together the eggs, egg yolk, and canola oil until smooth.
Add in the beet puree, beet juice, white and brown sugar, and vanilla extract. [If you’d like redder brownies than mine turned out, this is when you should add your red food coloring.] Beat until just combined.
In a medium bowl, stir together the flour, cocoa powder, baking powder, and salt. Add the dry ingredients to the wet ingredients, and beat until just incorporated (the batter should still have some lumps).
Stir in the white chocolate chips.
Scrape the batter into the prepared baking dish and bake for 20-25 minutes, or until a toothpick inserted into the center of the brownies comes out clean.
Before Baking
As you can see, my white chocolate chips melted a bit, leaking out around the edges and leaving some holes in the top. If this is going to bug you, you can swap in chopped nuts or plain chocolate chips, or just leave them out entirely.
Leave the brownie to cool for about 15 minutes, then run a sharp knife all the way around the edge to release it. Place a cutting board or other stiff, flat surface on top of the pan and quickly flip it over. Peel off the parchment paper on the bottom of the brownie.
Hopefully, you have another cutting board or other large, flat thing to flip the brownie again. If not, you can put a piece of waxed paper on top, then put a cooling rack on top of that to invert the brownie. Leave it to cool completely.
Meanwhile, it’s time to prepare the frosting. In a medium bowl, beat the cream cheese, butter, vanilla, and 1 tablespoon of milk until just combined.
Beat in the powdered sugar, ¼ cup at a time, until smooth.
At this point, you can use the frosting as-is or thin it out with an additional tablespoon of milk (this is what I did).
When the brownie is cool, spread the frosting evenly across the top.
Sprinkle with decorating sugar or sprinkles if desired.
Cut the brownie into pieces using a sharp knife or pizza cutter (I decided to cut it into 20 pieces), serve, and enjoy!
Dense, fudgy chocolate brownies made with pureed beets for a natural magenta hue, loaded with white chocolate chips and topped with a tangy cream cheese frosting. Better cold than warm — trust the process
8ozwhite chocolate chips (or semi-sweet chips or chopped nuts)
red food coloring (optional, for brighter color)
For the Cream Cheese Frosting
3ozcream cheese, cold
2tbspunsalted butter, softened
1–2tbspmilk
1tspvanilla extract
1½cupspowdered sugar
decorating sugar or sprinkles (optional)
Method
Make the Beet Puree
Preheat oven to 350°F. Grease a 9-inch square baking pan or line the bottom with parchment paper
Drain the canned beets, reserving the liquid. Place the beets in a food processor with about ¼ cup of the reserved beet juice. Process on high until completely smooth, scraping the sides of the bowl as needed
Make the Brownie Batter
In a large bowl, beat together the eggs, egg yolk, and canola oil until smooth
Add the beet puree, reserved beet juice, granulated sugar, brown sugar, and vanilla extract. If you want brighter red brownies add a few drops of red food coloring now. Beat until just combined
In a medium bowl, stir together the flour, cocoa powder, baking powder, and salt. Add the dry ingredients to the wet ingredients and beat until just incorporated — the batter should still have some lumps
Stir in the white chocolate chips
Bake
Scrape the batter into the prepared baking pan and spread evenly. Bake for 20–25 minutes until a toothpick inserted into the center comes out clean
Cool in the pan for about 15 minutes. Run a sharp knife all the way around the edge to release the brownie. Place a cutting board on top and quickly flip the pan over. Peel off the parchment paper
Flip the brownie right-side up onto a cooling rack and leave to cool completely before frosting
Make the Frosting and Finish
In a medium bowl, beat together the cold cream cheese, softened butter, vanilla extract, and 1 tablespoon of milk until just combined
Beat in the powdered sugar ¼ cup at a time until smooth. Add the second tablespoon of milk if you prefer a thinner, more spreadable consistency
When the brownie is completely cool, spread the frosting evenly across the top. Sprinkle with decorating sugar or sprinkles if desired
Cut into 20 pieces using a sharp knife or pizza cutter. These brownies taste even better cold — refrigerate for at least 30 minutes before serving if possible
Notes
These brownies genuinely taste better cold than warm — refrigerate before serving for the best texture and flavor. White chocolate chips can melt during baking and leave holes or streaks on the surface; swap for semi-sweet chips, dark chocolate chips, or chopped nuts if you prefer a cleaner look. For a brighter red color add red food coloring to the wet ingredients before mixing. Store covered in the refrigerator for up to 5 days
Aah, Chex Party Mix. How I love you so. In my mind, it’s not a holiday celebration without the Chex mix. Since the Super Bowl is akin to a holiday to many people, I decided to put a (mildly spicy) spin on a beloved classic in its honor. Admittedly, I couldn’t care less about football and usually don’t watch the Super Bowl, but I am quite an appreciator of snacks, so the day’s not all bad in my book. If you’re looking for a fun party snack, look no further!
I started with the original Chex mix recipe and made edits from there. I replaced the Worcestershire sauce with Buffalo wing sauce and the standard seasonings with ranch dressing mix and celery salt. I kept the ratio of Chex cereals the same, but as long as it comes out to 9 cups, any blend of your choice should be fine. That also goes for the other mix-ins (dry-roasted peanuts, pretzel thins, and corn chips). If you don’t like one ingredient, you can always try a substitution as long as you maintain the overall volume of ingredients.
The ranch flavor isn’t entirely noticeable, but the flavor is good just the same. I am not at all a fan of hot things, but I was able to eat some of this, and Josh seemed to like it. Even if you’re a wimp like me when it comes to spicy foods, you should be ok, but if you reeeeeeally don’t want to use the wing sauce, you could go back to the usual Worcestershire. Alternatively, if you’re one of those crazy people who claims even ghost peppers aren’t really that hot, feel free to substitute the liquid fire hot sauce of your choice.
While most Chex mix recipes now tell you to do this in the microwave, I’ve always preferred the oven method. I like to get the ingredients a little toasted, and I don’t think you can really achieve that in the microwave. You can, of course, try it that way by following the instructions in the link above, but I make no guarantees about how it will come out. If you do experiment with the microwave, let me know how it goes!
Why You Will Love This Buffalo Chex Mix
Perfectly spicy but not overwhelming — even spice-sensitive snackers can enjoy it Oven baked — gets toasted and crispy in a way the microwave never achieves Completely customizable — swap mix-ins based on what you have One bowl snack — no plates, no forks, no mess Make ahead friendly — stays fresh for days in an airtight container Crowd size — makes 12 generous servings perfect for parties
Ingredients for Buffalo Chex Mix Recipe
For the snack mix:
3 cups rice Chex
3 cups corn Chex
3 cups wheat Chex
1 cup dry-roasted peanuts
1 cup pretzel thins
1 cup corn chips (think Fritos, not Tostitos)
6 Tbsp. unsalted butter
2 Tbsp. Buffalo wing sauce or hot sauce (I used Sweet Baby Ray’s)
1 packet ranch dressing mix
½ tsp. celery salt
Ingredient Notes:
Chex ratio: As long as your total Chex cereal equals 9 cups you can use any combination of rice, corn, and wheat Chex you prefer.
Mix-ins: The peanuts, pretzels, and corn chips are flexible too. Keep the total volume the same and substitute anything you like or have on hand.
Heat level: 2 tablespoons of wing sauce gives mild to medium heat. Increase to 3 tablespoons for more heat. Decrease to 1 tablespoon or replace with Worcestershire sauce for a non-spicy version.
Ranch flavor: The ranch seasoning adds a subtle background flavor that complements the buffalo sauce beautifully without overpowering it.
I’m a sucker for some punchy 80’s rock, and this bakeventure is no exception. I tend to stick with favorites such as Van Halen and Aerosmith, but basically any band whose lead singer can get more volume into his long, flowing locks than I can (I’m looking at you, Sebastian Bach) is going to be a good candidate.
Equipment You Will Need
Large mixing bowl
Large roasting pan or high sided baking dish
Wooden spoon or silicone spatula
Measuring cups and spoons
Airtight container for storage
How to Make Buffalo Chex Mix — Step by Step
Step:1 Preheat your oven to 250°F.
In a large mixing bowl, stir together the Chex, peanuts, pretzels, and corn chips.
Step 2 — Cut the butter into tablespoons and put them in a roasting pan or other high-sided baking dish. Melt the butter in the oven (takes about 5 minutes). Stir in the wing sauce until well-combined. Then, stir in the ranch dressing mix and celery salt.
Step 3 — Pour approximately ⅓ of the Chex mix into the roasting pan and stir it until everything is well-coated in the sauce. Repeat the process twice with the remaining mix.
Step:4 Bake the Chex mix for an hour, stirring every 15 minutes. Try to keep all the ingredients evenly coated in the sauce throughout the baking time. If it starts to look like it’s about to burn before the hour is up, take it out early.
Important Note : At this point, DO NOT put it in your mouth because you will burn your tongue (I may or may not be speaking from a wealth of personal experience with homemade Chex mix…). Leave it to cool completely in the pan, then serve or store it in an airtight container.
Common Mistakes and How to Fix Them Problem: Chex mix is soggy not crunchy Cause: Not baked long enough or not cooled completely before eating. Fix: Bake the full 60 minutes and cool completely in the pan. If still soft after cooling return to 250°F oven for 10 more minutes.
Problem: Some pieces are burnt and some are under seasoned Cause: Mix was not stirred every 15 minutes during baking. Fix: Set a timer every 15 minutes without fail. Stir thoroughly reaching the bottom of the pan each time.
Problem: Not enough buffalo flavor Cause: Only 2 tablespoons of wing sauce gives mild heat. Fix: Increase wing sauce to 3 or 4 tablespoons next time. You can also add a few dashes of hot sauce along with the wing sauce.
Problem: Mix tastes bland Cause: Ranch seasoning flavor is subtle in this recipe. Fix: Add an extra half packet of ranch seasoning or add a teaspoon of garlic powder to amplify the savory flavors.
How to Store Buffalo Chex Mix
Room temperature: Airtight container → Up to 1 week Best quality → First 3 days
Refrigerator: Not recommended → Changes texture and makes it soft
Freezer: Airtight freezer bag → Up to 6 weeks Thaw at room temp → 30 minutes before serving
Make ahead: Best made → 1 day before serving Flavors develop and → Intensify overnight
Frequently Asked Questions Q: Can I make Buffalo Chex Mix in the microwave?
Yes but the results are noticeably different. The oven method toasts the ingredients and creates a crunchier texture that the microwave cannot replicate. If you use the microwave follow the original Chex package instructions and substitute the buffalo ranch sauce for the standard seasonings. Q: How spicy is this Buffalo Chex Mix recipe? With 2 tablespoons of wing sauce this recipe is mild to medium heat. Most people who are sensitive to spicy food can still enjoy it comfortably. Adjust the amount of wing sauce up or down based on your heat preference Q: Can I use a different hot sauce instead of buffalo wing sauce? Yes. Any hot sauce works in this recipe. Frank’s RedHot is a popular choice. For more heat use a ghost pepper or habanero sauce. For less heat use a mild wing sauce or reduce the amount used. Q: What is the best Chex cereal combination for this recipe? Equal parts rice, corn, and wheat Chex is the classic combination. Rice Chex stays crunchiest, corn Chex has the most neutral flavor, and wheat Chex adds a slightly nutty depth. You can use any combination as long as the total equals 9 cups.
Q: Can I add other mix-ins to Buffalo Chex Mix? Absolutely. Bagel chips, cashews, sunflower seeds, oyster crackers, or Goldfish crackers all work well. Keep the total volume of mix-ins at around 3 cups and maintain the 9 cups of Chex cereal for the right sauce to mix ratio.
Oven-toasted Chex mix with buffalo wing sauce and ranch seasoning — perfectly crispy, mildly spicy, and completely addictive. The ultimate game day party snack.
In a large mixing bowl, stir together the rice Chex, corn Chex, wheat Chex, peanuts, pretzel thins, and corn chips until combined
Cut the butter into tablespoons and place in a large roasting pan or high-sided baking dish. Melt in the oven, about 5 minutes
Remove the pan from the oven. Stir the buffalo wing sauce into the melted butter until well combined, then stir in the ranch dressing mix and celery salt
Pour about one third of the Chex mix into the roasting pan and stir until everything is well coated. Repeat twice with the remaining mix until all ingredients are evenly coated in the sauce
Bake
Bake at 250°F for 60 minutes, stirring every 15 minutes. Make sure to reach the bottom of the pan each time you stir to keep all pieces evenly coated. If the mix looks like it is about to burn before the hour is up, remove it early
Remove from the oven and leave to cool completely in the pan before serving — do not eat straight from the oven or you will burn your tongue. Once fully cooled, serve immediately or transfer to an airtight container
Notes
Total Chex cereal must equal 9 cups — use any combination of rice, corn, and wheat you prefer. For more heat increase the wing sauce to 3–4 tablespoons. For a non-spicy version replace the wing sauce with Worcestershire sauce. Do not skip the oven method — the microwave cannot achieve the same toasted crunch. Cool completely before eating; the mix crisps up further as it cools. Store in an airtight container at room temperature for up to 1 week. For best flavor make it one day ahead — the buffalo ranch taste intensifies overnight
Pecan Lace Sandwich Cookies / Easy Recipe / Pro Tips / Mastery Guide
Christmas really snuck up on my this year. Thanksgiving happened, and then BAM! Everyone was posting pictures on Facebook of their Christmas trees while I still had all my fall decorations up. I am now a little bit more prepared for the upcoming festivities, but the preparations have definitely kept me on my toes.
I am also a card carrying procrastinator, so naturally I left myself just two days to get all of my cookie baking and decorating done (and now about one hour to finish this entire post). All told, I made 6 varieties of cookies and one set of mini rum cakes for the people on my cookie list. These pecan lace cookies were a new addition this year, and I think they may be sticking around.
I remember these cookies from the grocery store down the street from where I grew up. The bakery’s policy was to give one cookie per day for free to each kid who asked, and this one was always my favorite. Sadly, they weren’t well labeled, so I never knew what they were called. When I saw the contestants make brandy snaps on The Great Holiday Baking Show, I got super excited because the cookies looked a lot like what I remembered from the grocery store. The internet helped me to figure out that the ones I was thinking of are actually called pecan lace cookies, but that they are pretty much the same cookie that you use for brandy snaps.
I followed this recipe pretty closely, but added in the same spice mixture I use in gingerbread cookies to give it some kick. I wanted to create the flavor of gingerbread cookies dipped in eggnog, so I used the ingredients from this blog post for the eggnog ganache, but cooked them the way I usually make ganache instead of following the directions. Next time I make these, I will increase the nutmeg in the ganache because I couldn’t really taste it (feel free to weigh in in the comments if you make it as is and think it’s just fine).
But that’s enough of my chatter. Let’s get right down to it. You will need the following ingredients:
For the cookies:
⅔ cup cake flour
1 cup pecans, finely chopped
1½ tsp. ground ginger
½ tsp. ground nutmeg
⅛ tsp. ground cloves
a pinch of salt
cup (1 stick) unsalted butter
½ cup light corn syrup
⅔ cup brown sugar
For the eggnog ganache:
16 oz. white chocolate chips (or roughly chopped white chocolate from a block)
5 oz. heavy cream
½ tsp. nutmeg
1½ tsp. dark rum (optional)
For baking ambiance:
While I did have all sorts of different Christmas music playing throughout my many hours of baking, I kept coming back to Cee Lo’s Magic Moment by Cee Lo Green. Say what you will about him, but the man makes a mean Christmas album. I suggest checking it out if you haven’t already.
If your pecans didn’t come pre-chopped, do so now. You will want them fairly fine so that you don’t have giant chunks of pecan in your cookies.
In a medium bowl, whisk together the cake flour, pecans, ginger, nutmeg, and allspice. Set this aside.
In a medium saucepan, combine the butter, corn syrup, brown sugar, and salt. Heat the ingredients over medium heat, stirring occasionally, until the butter is melted and the sugar is fully dissolved (this should take about 7 minutes).
When the mixture is nice and syrupy, remove it from the heat and fold in the dry ingredients.
Transfer the goopy mess to a medium bowl, cover it with plastic wrap, and refrigerate it until firm (at least 2 hours).
When your “dough” is ready, preheat your oven to 350°F and line large cookie sheets with parchment paper.
Form the dough into teaspoon-sized balls and arrange 6 of them on each cookie sheet. DO NOT be tempted to put more than 6 on a sheet, or they will come out looking like this:
To reiterate, 6 on a cookie sheet.
Bake the cookies until they turn golden brown, approximately 9-10 minutes. You may want to turn your cookie sheets halfway through baking so they brown evenly.
Remove the entire sheet of parchment paper from the cookie sheet with the cookies still on it and leave it on a cooling rack. These actually cool rather quickly because they’re so thin, so you don’t have to worry too much about running out of space. I found that mine were completely cooled and hardened by the time I’d made two more batches. Still, you should let them sit overnight before you slather them in ganache if you can stand it.
Speaking of ganache, you should probably make that once your cookies are hardened and ready for decorating. 😉 To do so, start by pouring the chocolate chips in a heat proof bowl or glass measuring cup. In a small saucepan, whisk the nutmeg into the heavy cream. Heat the cream on medium-low heat until it comes just to a boil. Remove it from the heat once you start to see the bubbles.
Pour the hot cream over the chocolate and let it sit for 5 minutes.
After your 5 minutes are up, whisk the chocolate and cream until it’s completely smooth. If you find that you have lumps that just will not go away, you can heat the mixture in the microwave for 10 seconds at a time, whisking well after each set, until it does your bidding. When the ganache is smooth, whisk in the rum (if using).
Let the ganache sit until it is thick and tacky. This is a good time to pair cookies based on size and shape if you haven’t done that already.
When all of your components are ready, spread a layer of ganache on the underside of one cookie from each pair. Top with the remaining cookies to make sandwiches.
Alternatively, you can dip the cookies halfway into the ganache. However, if you do this, you probably want to serve them as soon as the ganache has hardened, as I found that mine went soft overnight. To avoid this, you could also try freezing them.
Serve the cookies once the ganache is hardened, or store them in an airtight container.
Pumpkin Spice Rugelach – Easy Home Making- Pro Tips To Mastery In Baking – Home Baking
Happy Hanukkah to all who celebrate! In case you’re jonesing for some cookies that are holiday-appropriate but still a little out of the ordinary, I’ve concocted this recipe for Pumpkin Spice Rugelach. I feel like fall came and went in an instant, and I’m still not ready to let go of pumpkin spice just yet. Since these cookies are distinctly not for Christmas, I felt it was reasonable to hold off on the eggnog, gingerbread, and peppermint awhile longer and hang onto pumpkin spice for just one more bakeventure.
I adapted this recipe from the rugelach recipe in Joy of Cooking. While the pumpkin spice was a pleasant addition, I think in the future I might try following Dorie Greenspan’s suggestions, such as working with cold fats instead of softening them and adding some other flavoring elements into the dough. Using cold butter and cream cheese will help to make the dough puff up just like it does for pie crust and puff pastry. I might also try an egg wash next time to give the rugelach that classic bakery sheen and make it easier for the cinnamon sugar to stick.
If you want a shortcut version (which isn’t quite going to be right, but will probably be passable), you could use store-bought pie crusts and add some extra spice and nuts to make sure it has enough oomf. I’ll also take this moment to remind you to sprinkle the cinnamon sugar on top before you bake the cookies. This is something I forgot to do, and mine suffered a bit from it.
I found the pumpkin butter at Trader Joe’s, and I believe you should still be able to find some there (if not, my apologies). If not, there are some options online. Alternatively, you can make your own or substitute thickened, canned pumpkin pie filling for a similar effect. Just remember not to slop too much on there or it will leak out and burn, leaving you with a cookie sheet of charred sadness.
Ingredients For Pumpkin Spice Rugelach
For the cookies:
2¼ cups all-purpose flour
1 tsp. pumpkin pie spice (substitute cinnamon if preferred)
1 cup (2 sticks) unsalted butter, softened
6 oz. pumpkin spice cream cheese, softened
⅓ cup granulated sugar
1 tsp. ground cinnamon
¾ cup pumpkin butter
½ cup ground pecans or walnuts
For baking ambiance:
I actually had 2 other bakeventures going on at the same time as this one, and Kenny Loggins presided over them all. If you’re in the mood for the soundtrack to the ’80s, Kenny’s got you covered. Once you’re done making cookies, kick back and watch some ’80s movies for good measure. (You know I did.)
Step:1 Whisk together the flour and pumpkin pie spice in a medium bowl.
Step:2 Using a stand mixer or other electric mixer (or a wooden spoon), beat together the butter and cream cheese until combined.
Add in the spiced flour and beat the mixture until it just begins to form a dough (mine is probably a little overmixed in this picture).
Step:3 Divide the dough into three equal portions and form each into a 6″ disc.
Important Note: The discerning reader will notice that I only have two discs. That’s because I halved the recipe since I was making two other types of cookies at the same time and didn’t want to overload my cookie receptacles.
Step:4 Wrap each disc in plastic wrap and refrigerate the dough for at least an hour or up to 1 day.
In a small bowl, stir together the cinnamon and sugar until uniform. Set this aside until you’re ready to assemble your cookies.
Step:5 When your dough is nice and hard, place one disc on a lightly floured surface and roll it out into a (roughly) 14″-diameter circle.
Trim off the rough outer edge and either save it to re-roll or throw it out.
Step:6 Carefully spread ¼ cup of the pumpkin butter in a thin layer over the dough, leaving a ¼” border around the edge.
Sprinkle 2 teaspoons of the cinnamon sugar on top of the pumpkin butter. Sprinkle 2½ tablespoons of the ground nuts on top of that.
Step:7 Using a pizza cutter, pie crust cutter, or sharp knife, cut the dough into 8 or 16 wedges (depending on how big you want your cookies to be). I did 8 slices since I was using less dough.
One at a time, roll each slice up, starting from the outer edge and working your way to the tip. Transfer the cookies to a cookie sheet, tip down, and refrigerate them while you repeat the process with the remaining dough discs.
Step:8 Bake the cookies for about 25 minutes, or until the bottoms just start to brown.
Leave them to cool for 5 minutes on the cookie sheets, then transfer them to cooling racks to cool completely.
Cinnamon Tart Recipe — Silky Brown Sugar Custard Tart (Easy & Foolproof)
If you have ever wanted a dessert that tastes like pure cinnamon in every single bite, this cinnamon tart recipe is exactly what you have been looking for. No pumpkin, no vanilla, no distractions — just a silky smooth brown sugar custard filling with deep, warm cinnamon flavor baked inside a buttery, crispy tart shell.
After years of failed attempts — including one disastrous cinnamon quiche nobody asked for — I finally cracked the perfect texture using egg yolks and chai-infused milk. The result is a melt-in-your-mouth custard tart that looks impressive but is completely beginner-friendly.
Why You Will Love This Cinnamon Tart
Pure cinnamon flavor — no competing spices or fillings
Egg yolks only — do not use whole eggs. The whites create a rubbery, quiche-like texture. Yolks are what give this tart its signature silky consistency.
Milk substitute — if you prefer, replace milk with strongly brewed chai tea for an even deeper spice flavor.
Crust tip — store-bought crust works perfectly here. No shame in it.
Piping bag with star tip (optional, for decoration)
How to Make Cinnamon Tart — Step by Step
Step 1 — Prepare and Blind Bake the Crust
Preheat your oven to 425°F. Roll out your pie crust and fit it into a greased and floured 9-inch tart pan. Trim the edges flush with the pan. Prick the bottom all over with a fork.
Important: Do not patch any tears in the crust. Tears create openings for your custard filling to leak through.
Line the crust with aluminum foil and fill it with dry beans or a 9-inch cake pan as a weight. Bake for 15 minutes, then remove the foil and weights and bake for another 5 minutes until the crust is lightly golden.
Reduce oven temperature to 350°F.
Step 2 — Make the Chai Infused Milk
While the crust bakes, combine milk and the tea bag in a small saucepan. Heat over medium until it just begins to simmer. Remove from heat and steep for 5 minutes.
Remove the tea bag, squeezing it gently to keep all the flavor. Set the infused milk aside.
Step 3 — Make the Custard Filling
Fill a large frying pan with 1 inch of water and bring it to a gentle simmer. This is your double boiler setup.
Place a heat-proof bowl over the simmering water. Add the cubed butter and sugar. Stir until the butter is completely melted.
Whisk in the 8 egg yolks one at a time, then whisk in the infused milk.
Continue whisking the mixture constantly over the simmering water until it thickens to the consistency of heavy cream. You will know it is ready when the custard coats the side of the bowl when you swirl it.
Remove the bowl from the heat and whisk in the ground cinnamon until no clumps remain and the color is completely uniform.
Step 4 — Bake the Tart
Pour the hot custard filling into the pre-baked crust. Place the tart pan on a cookie sheet to catch any drips.
Bake at 350°F for 15 to 20 minutes, until the center of the filling is set and does not jiggle when you gently shake the pan.
Step 5 — Cool Completely Before Cutting
This step is non-negotiable. Place the tart on a wire rack and allow it to cool to complete room temperature before slicing. Cutting into a warm custard tart will cause the filling to run. Patience here is the difference between a beautiful tart and a soggy mess.
Once cooled, carefully remove the outer ring of the tart pan. If your pan was well greased, you can slide a thin spatula under the base and transfer it to a serving plate.
Step 6 — Make the Cinnamon Whipped Cream (Optional but Recommended)
Refrigerate your mixing bowl and beaters for at least 15 minutes before whipping.
Pour cold heavy cream into the chilled bowl and beat on medium speed until it begins to hold its shape. With the mixer on low, add the powdered sugar and cinnamon. Increase to high speed and beat until stiff peaks form.
Pipe or spread the whipped cream over the cooled tart before serving.
Pro Tips for a Perfect Cinnamon Tart
Use only egg yolks — this is the single most important tip. Whole eggs will ruin the texture.
Do not rush the custard — constant whisking over the double boiler prevents scrambled eggs in your filling.
Cool the tart completely — minimum 1 hour at room temperature, or refrigerate for 30 minutes.
Blind bake your crust properly — skipping this step results in a soggy bottom.
Patch-free crust — if your crust tears, start over or use a new store-bought crust. A patched crust will leak.
Common Mistakes and How to Fix Them
Problem: My filling came out like a quiche Cause: Whole eggs were used instead of yolks only. Fix: Always separate your eggs carefully and use yolks only.
Problem: My custard has lumps Cause: The heat was too high or the mixture was not whisked constantly. Fix: Keep the water at a gentle simmer, never a rolling boil. Whisk constantly.
Problem: My filling leaked out of the crust Cause: The crust had a tear or crack that was not caught before filling. Fix: Inspect your crust carefully after blind baking. Never patch — if it tears, replace it.
Problem: My tart filling is runny after cooling Cause: It was underbaked or cut while still warm. Fix: Bake until the center does not jiggle. Cool completely before slicing.
How to Store Cinnamon Tart
Refrigerator: Cover loosely and store for up to 2 days
Room temperature: Safe for up to 4 hours after baking
Freezer: Not recommended — custard filling changes texture when frozen
Whipped cream: Add fresh whipped cream only when serving, not before storing
Frequently Asked Questions
Q: Can I make this cinnamon tart the day before? Yes, this tart is actually better the next day. Bake it the night before, cool completely, then refrigerate overnight. Add whipped cream just before serving.
Q: Can I use a store-bought pie crust for this tart? Absolutely. Store-bought crust works perfectly and saves significant time. This recipe was tested with store-bought crust and the results were delicious.
Q: Why do I need 8 egg yolks? The high egg yolk count is what creates the silky, luxurious custard texture. Using fewer yolks or whole eggs results in a rubbery, quiche-like filling rather than a smooth custard.
Q: Can I use a different tea flavor? Yes. Any spiced tea works well here. Try cardamom tea, masala chai, or even a strong Earl Grey for a different flavor twist.
Q: What is the difference between a tart and a pie? A tart uses a straight-sided, shallow pan with a removable bottom, giving it a more refined shape. A pie uses a deep, sloped pan. This recipe works in either, but a tart pan gives the best presentation.
Q: Can I make this recipe as a full-sized pie? Yes, but you will need to scale up the ingredients. A full 9-inch deep pie would require approximately 12 egg yolks and increased quantities of all other ingredients.
Tried this cinnamon tart recipe? Leave a star rating and comment below — it helps other bakers find this recipe and means the world to this little baking blog!
Buffalo Bagel Chips/ How to make ” Buffalo Bagel Chip” / Best Snacks While Watching Football Match
Sorry for the delay today! Life got in the way a bit this week, so I hadn’t had the usual time to devote to writing. Fear not, though. Today I bring you Buffalo Bagel Chips! (Or at least the directions to make your own, I wasn’t planning on hand-delivering bagel chips to all my readers, though you are all lovely.) This week’s post was originally supposed to be about cinnamon pie, but that was a 2-day disaster, so bagel chips it is. Buffalo sauce (and spicy food in general) really isn’t my thing, but Josh loves it so much that he eats it on his sandwich everyday for lunch. Since I like him so much, I decided to make a snack just for him. If you, like me, don’t like Buffalo sauce, you could try this with watered down barbecue sauce or balsamic dressing. I intend to try those myself sometime, so I’ll update this post as necessary when I do.
I’m still not sure if the ranch dressing powder added any significant flavor to the chips, but Josh claims that they seemed less spicy than those I made without it, so if you want to tone down the heat a little, I’d recommend adding it. You could also try dipping them in regular liquid ranch dressing, just like real Buffalo wings. They’d also go well with a classic spinach dip, spreadable cheese, Chex party mix, etc. The possibilities are endless. If you come up with a new use for these, share it in the comments!
You will need the following ingredients:
For the bagel chips:
2 plain bagels (feel free to change it up if you’re feeling creative)
1 bottle Buffalo wing sauce
1 packet ranch dressing powder (optional)
For baking ambiance:
This bakeventure took less active cooking time than it would have to go through my cd collection (yes, cd collection) to pick something to listen to, so I just turned on the radio. Let the djs agonize over the music choices this time so you’re free to get stuff done while you’re waiting for spicy, crunchy deliciousness.
Preheat your oven to 250°F. Line your cookie sheets with aluminum foil.
Slice the bagels into ⅛” thick discs. Admittedly, mine turned out a bit more wedge-shaped than disc-shaped, so do your best to keep them uniform, but don’t go too crazy.
For the next step, you have two options: you can either (a) pour the wing sauce into a bowl and dip the bagel discs in the sauce individually or (b) put the bagel discs into a resealable plastic bag, pour the wing sauce in, and shake it up until the bagel pieces are fully coated. I tried both ways and ended up liking option (b) better, but to each his own.
Arrange the bagel chips on your cookie sheets without overlapping. Sprinkle the ranch dressing powder over them if you choose to use it.
Bake the chips for 20 minutes, then carefully flip them with tongs or a spatula. They will be pretty fragile at this point, so be careful not to tear them. Bake them for another 20-25 minutes, until they look dry and are starting to harden.
Leave them to cool on the cookie sheets for 15 minutes, or until they are cool enough to handle, then peel them off and serve or store in an airtight container. If you’re feeling fancy, you can even try using them in your holiday Chex party mix (you’d better believe you’ll be seeing a post on that soon).
This past weekend saw a dear friend grow another year awesomer. In an effort to pay tribute to our shared interests and history, I decided I wanted to bake something with potatoes this week. (Because nothing says friendship like potatoes. :-P) Since this friend is also a great lover of chocolate, brownies seemed to be a natural choice.
It turns out that potatoes and chocolate go great together in baked goods like cake and brownies. The potatoes add a nice amount of moisture, making for soft and fudgy brownies (I have yet to try cake, but I am optimistic on this front). Fear not! If you don’t tell people, they’ll never be able to tell these brownies have potatoes in them. Can you still make delicious, fudgy brownies without mashed potatoes? Absolutely! Will you have as interesting of a conversation piece to bring to parties? I’ll let you be the judge of that.
You will need the following ingredients:
For the brownies:
3/4 cup cold, mashed potatoes (approximately 3 small or 2 medium potatoes)
2 eggs and 1 egg yolk (for a tutorial on how to separate eggs, see here)
1/2 cup canola oil
1/2 cup granulated sugar
1/2 cup brown sugar
1 tsp. vanilla extract
1/2 cup all-purpose flour
1/3 cup cocoa powder
1/2 tsp. baking powder
1/8 tsp. salt
6 oz. mini chocolate chips (optional)
For the ganache:
1/4 cup heavy cream
4 oz. dark chocolate
For baking ambiance:
Your favorite musical soundtrack. I listened to the Original Broadway Cast Recording from Pippin because of its special sentimental significance for the aforementioned friend and me. This was our first school musical- she was on stage and I was in the pit. It was a great experience, and I remember it fondly. It’s also good background for when you’ve got magic to do.
Peel and chop your potatoes and cover them with approximately 1″ of water in a medium saucepan. The size of your potato chunks is relatively unimportant, as you can just boil them longer if they are bigger.
When the potatoes are tender, drain and mash them. Do not add any of the usual ingredients you would use for mashed potatoes (milk, butter, etc). Set them aside to cool.
Preheat your oven to 350°F.
Put the eggs and oil in a medium mixing bowl and lightly beat them until they are mostly homogeneous, but not frothy.
Add in the white and brown sugar, mashed potatoes, and vanilla extract. Beat on low speed until the ingredients are just combined. There will still be some small clumps of potato, but be sure to break up and larger blobs.
In a separate bowl, whisk together the flour, cocoa powder, baking powder, and salt. Add the dry ingredients to the wet ingredients and stir until the mixture is combined (again, there will be some small lumps).
Stir in the chocolate chips. Pour the batter into a prepared 9″ square baking pan (I lined the bottom of mine with a square of parchment paper to make it easier to remove them).
Bake your brownies for 20 minutes. Stick a toothpick in the center; if it comes out clean or slightly crumby (but not wet) they are done. If not, continue to bake, checking ever 3-5 minutes. You do not want to over-bake these because they will become tough.
Let the brownies cool in the pan for 5 minutes. Run a knife around the edge of the pan to separate it. Place a cutting board or plate that is larger than the baking pan on top of the pan. Quickly invert the pan onto the cutting board, being careful to hold the edges down so you don’t have a tragic brownie accident. Remove the pan from the brownie.
Peel off the parchment paper if you used it. You can leave it upside down like this if you want, or you can flip it again onto another flat surface.
If you’re flipping again, be careful, because you can lose your brownie this way. I would put a piece of waxed paper on top of the brownie, then put a cooling rack on top of that upside down. I will admit that I thought I could do it with just the waxed paper, and I was sorely mistaken. My brownie cracked in half and ended up all over the counter. I picked it up and shoved the two halves together, and it worked out ok.
Fortunately, we’re going to cover this in ganache, so you can hide your mistakes if they do happen. While your brownie is cooling (hopefully in one piece), chop your dark chocolate (if you’re not into dark chocolate, you can substitute milk or semi-sweet, or possibly white). Put it in a glass bowl or measuring cup. Put the heavy cream in a small saucepan and bring just to a boil over medium-low heat. When you see the edges start to bubble, remove the cream from the heat immediately. I would have liked to take mine off a few seconds sooner than you see here, but I had to get a photo for you.
Pour the hot cream over the chopped chocolate and let it sit for 2 minutes. Gently whisk the cream and chocolate together, starting from the middle and working your way outward, until your ganache is smooth and creamy. Let it cool for 5 minutes, doing your best not to eat it all right now.
Spread the ganache over the brownie with a butter knife or rubber spatula, making it as smooth as you have patience for.
Sprinkle the top with sprinkles, chopped nuts, or more mini chocolate chips if you still somehow believe there is not enough chocolate here. Let the brownie cool for another 20 minutes before you cut it.
Slice into squares or use cookie cutters to make shapes. If you want to use cookie cutters, be forewarned that it is difficult to get these out of the cutter without messing up the top. I used a toothpick to carefully push it down around the edges, but if you come up with a better solution, let me know.
Now enjoy the gooey, fudgey fruits of your labor!
Download the PDF recipe here: Benbaker0078@gmail.com
Summer Peach Cookies / Easy Home Making Tips / Pro Mastery Guide In Baking /
Sometime in the past two weeks, the idea popped into my head to do a “Christmas in July” feature, since I’m running out of holidays and special occasions now that we’ve mostly finished running the summer birthday gauntlet and all the summer holidays but Labor Day have passed. Since cookies are probably the most popular baked good of the winter holiday season, I decided to make for you some holiday favorites, but with summery twists.
This week’s cookie started out as a pumpkin spice cookie with chai frosting. Delicious as it was, I decided to swap peach for the pumpkin, substitute some new spices for the original spice blend, and swap the chai tea bag for a peach one. The result is fragrant, spicy, and summery. I got 44 cookies out of this recipe, and while I was skeptical that I would be able to get rid of them all, it seems my worries were unfounded. The group that normally finishes 4-6 servings in a day of the baked goods I send in to work with my husband went through 11 of these in the first two hours. They’re just that good.
You will need the following ingredients:
For the cookies:
2½ cups all-purpose flour
2 tsp. cinnamon
1 tsp. ground ginger
½ tsp. cardamom
½ tsp. salt
1 tsp. baking powder
1 tsp. baking soda
½ cup butter (1 stick), softened
1½ cups granulated sugar
1 cup peach purée (use one 16-oz can of peach slices in syrup)
I decided on some Deep Purple for this one. I’ve had “Space Truckin’” stuck in my head for a week, so I thought this might help. Now it’s been replaced with “Strange Kind of Woman,” so I’ll let you be the judge of this plan’s efficiency.
Without further ado, let’s make some peach cookies! [Yes, there was a terrible pun that was going to go here, but it was flimsy even for me.]
Drain your can of peach slices as well as possible and put them in a food processor or blender. Process on high until they are the consistency of baby food (this only took me about a minute). You can do this with fresh peaches, but you will need to skin them and pre-boil them, which was too much fuss for me.
Line a strainer with a coffee filter or cheesecloth and put it over a bowl or glass measuring cup. Pour the peach puree into the strainer and put the whole thing in the fridge to drain off some of the excess liquid. Allow this to sit at least 4 hours, but preferably overnight.
Preheat your oven to 350°F.
In a medium bowl, whisk together the flour, cinnamon, ginger, cardamom, salt, baking powder, and baking soda.
In a large mixing bowl, cream together the softened stick of butter and sugar until it looks fluffy (I used a handheld electric mixer, but as long as your butter is soft enough, you can do this with a wooden spoon easily enough).
Stir in the egg, peach puree, and vanilla extract until the mixture is smooth, if slightly grainy looking.
Add half of the dry ingredients into the wet ingredients and stir them together until the dry part is fully-incorporated. Add the remaining dry ingredients and stir them in until it looks like cookie dough.
This dough is a bit wet for cookie dough, so you can refrigerate it for half an hour to make it easier to work with (I chose not to go this route for time reasons). Scoop the cookie dough into 1 tablespoon balls and arrange them on a cookie sheet. A cookie scoop is really useful here to make sure your dough balls are uniform, but you can also do this using two spoons are your bare hands. You probably should leave more room than I did, but this is something I staunchly refuse to do (for no good reason at all).
Bake the cookies for 15-20 minutes, just until the edges begin to brown. The tops will look a little wet, but have faith. They seem to continue to cook a little once they come out of the oven.
Let the cookies cool for 5 minutes on the cookie sheets, then remove them to cool completely on a cooling rack.
To make the frosting, melt the remaining tablespoon of butter in a small saucepan over low heat. Add the 1/4 cup of milk and the peach tea bag to the saucepan and bring just to a simmer. Remove the saucepan from the heat and allow the tea bag to steep for 5-7 minutes, stirring occasionally (if you’re using a black tea bag, steep for 2 minutes less, as it can become bitter).
Remove, strain, and discard the tea bag. Stir in the powdered sugar and vanilla extract until you have a smooth frosting.
Spread a dollop of frosting on each cookie and let the frosting set. I left the cookies on the cooling rack so that any dripping frosting would fall down onto the cookies below, or onto the paper towel underneath that I had (for once) remembered to place there strategically.
Now sit back and enjoy the fruits of your labor!
You can find the printable PDF of this recipe here:
Over the past few months, I’ve developed the habit of cooking a large batch of something-or-other over the weekend, dividing it into portions, and taking one portion to work with me each day for lunch. It gives me an extra 5-10 minutes to sleep in each morning, and anything that gives me more time to sleep is a winner in my book. Since I promised you quiche a few weeks ago, I thought miniaturizing them to fit into my lazy lunch prep scheme would be a fun and useful new experiment.
These mini quiches are great because you can cook them right in the container you plan to carry them in, then just slap on a lid once they’ve cooled. I used four of these 1-cup Anchor glass food storage containers and four of these six-ounce Anchor glass custard cups. I personally prefer the 1-cup containers because the lids are sturdier and have a better seal, but the custard cups are shaped more like mini pie plates, so they are easier to fit your crusts into. The Pyrex version of the same containers would also work well. Of course you don’t have to go out and buy new containers if you don’t want to; you can make these in a jumbo muffin tin and wrap them individually if you prefer.
You will need the following ingredients:
For the quiche:
Savory pie crust (see here for instructions to make this, or just use storebought)
1 1/2 cups smoked gouda cheese, grated
1 1/2 cups assorted roasted root vegetables or other filling of choice
4 eggs
16 oz. cottage cheese
1/4 tsp. dried rosemary
1/4 tsp. ground sage
1/8 tsp. black pepper
1/8 tsp. salt
For baking ambiance:
Your favorite mix tape/cd (or playlist, as the kids are calling them these days). I firmly believe in the value of making a mix because it not only gives you an awesome soundtrack for your life, but also serves as a bit of a time capsule. I can listen to mix cds I made in high school and be instantly transported back in time. It’s also sort of a fun puzzle to fit together a dissimilar (or in some cases very similar) group of songs you really like. For more philosophizing on the science of mix tapes, make sure you see or read High Fidelity if you haven’t already.
Now that I’ve (hopefully) inspired you to create a new mix, let’s mix up some quiche!
If you are making your own crust, get that started now so it has time to chill in the fridge.
Next, prepare your filling. I used a combination of fennel, turnips, potatoes, and red onion, but bacon, ham, spinach, or anything else that strikes your fancy will do too. This is a great way to use up leftovers that are monopolizing precious fridge space. Just be sure to cook your filling first and remove as much moisture as possible.
When you have all of your ingredients ready, roll out your crust to approximately 1/8″ thick (slightly thinner than you would for a full-sized pie) and cut it into circles. I used the lid of a 2-quart saucepan like a cookie cutter, and it worked perfectly. If you don’t have anything quite the right size, you can use a knife and estimate. If it doesn’t come out right, just reroll it and try again.
Carefully fit your crust circles into your baking dishes, trimming off any excess which reaches above the edge of the container (you want to be able to fit the lid on it, after all). Mine are straight-sided, so I had to gently fold them and press the excess against the side. Just do the best you can. Keep these in the freezer while you are mixing your egg filling.
Crack your eggs into a medium bowl and beat them until they are slightly frothy. Stir in the cottage cheese, sage, rosemary, parsley, salt, and pepper until well-combined. You can vary the herbs and seasonings depending on which filling and cheese combination you choose.
Now take your crusts out of the freezer and sprinkle a layer of cheese on the bottom of each one. I used smoked gouda and it came out great, but cheddar or any other melt cheese would be good too.
Next, sprinkle a layer of your filling on top of the cheese. Each shell should be approximately 2/3 full (sorry, no picture). Pour some of the egg mixture into each shell until it is 1/8″ below the top edge of the crust, making sure that each quiche has some of the cottage cheese curds in it (they will sink to the bottom). If you have cheese left over, you can sprinkle a little on top of each quiche if you so desire.
The two quiches in the back are crustless because I wanted to try a low-carb version, and because I got tired of rolling and re-rolling pie crust.
Carefully transfer all of your mini quiches to cookie sheets and bake for 40-50 minutes. Start checking them every 5 minutes after 35 minutes. They may still be wet on top, but should no longer be jiggly.
To test, stick a toothpick into the center of your quiche. If it comes out clean, it’s done. Allow them to cool completely before covering and refrigerating them.
Now look forward to enjoying cheesy, eggy goodness every day this week!
Download the PDF recipe here: Benbaker0078@gmail.com
This past weekend, American Pharoah became the twelfth horse to win the Triple Crown, and the first to do so in 38 years. It also happened to be the first year since I started attending the Belmont Stakes in 2007 that I wasn’t able to make it. This is something that my dad and I do together, so I was disappointed to say the least. In an effort to take some part in the race, I decided to invent a cupcake to commemorate the event. Yes, I know I already did red rose cupcakes for the Kentucky Derby, but who doesn’t want more pretty red rose cupcakes anyway?
This cupcake is based off of the official drink of the Belmont Stakes, the Belmont Jewel. My recipe doesn’t contain any alcohol, but you could easily add some to the filling and/or frosting if you were jonesing for a kick of bourbon. A candied lemon slice on top would really complete the picture, and it might even impress Florian if you ever make it on Cupcake Wars (it may not be a horse’s head made out of marzipan, but it’ll do in a pinch). 😛
You will need the following ingredients:
For the cake:
2 1/3 cups all-purpose flour
1 Tbsp. baking powder
3/4 tsp. salt
1 1/4 cup granulated sugar
1/4 cup powdered lemonade mix
1/2 cup (1 stick) unsalted butter, softened
2 eggs
1 cup milk
1/2 tsp. lemon extract
For the filling:
5 egg yolks
1 cup granulated sugar
2 lemons, zested and juiced (this should amount to about 1/3 cup lemon juice)
1/3 cup pomegranate juice
1 stick butter, cut into pats (1 Tbsp. or less each)
For the frosting:
1/2 cup pomegranate juice
1 cup vegetable shortening or butter (I used the shortening, but next time I would definitely choose butter)
To fit with the Belmont Stakes theme, I recommend listening to “New York, New York” while preheating your oven (this is the song performed during the post parade for the race). After that, I went with Van Halen. Really any album will do, though I stuck to the David Lee Roth era this time (Diver Down, Van Halen, Women and Children First, etc).
Aaaaaaaaaaaaand, we’re off!
Preheat your oven to 350°F.
Line your muffin tins with cupcake wrappers or prepare your cake pans (18 cupcakes or two 9″ cakes). I like to use parchment paper circles on the bottom so I don’t have to deal with the heartbreak that results from a cake which sticks on the bottom.
Combine the flour, baking powder, salt, sugar, and lemonade mix in the bowl of a stand mixer or other large bowl. Stir to combine. Add in the butter and mix at low speed until the mixture is crumbly and doesn’t have any large clumps.
Stir in the milk and eggs for 1 minute, then beat on medium speed for 2 more minutes.
Divide the batter between the cupcake wrappers or cake pans. I used an ice cream scoop, and it was really helpful. It delivers the same amount of batter every time, and it has a handy rotating arm on the inside to help scrape the batter off the spoon part.
Bake for 25 minutes, or until the edges start to brown and a toothpick inserted in the center comes out clean. Allow your cakes/cupcakes to cool for 5 minutes in the pans, then remove them to a cooling rack to cool completely for a few hours.
While your cakes are baking, prepare your filling. First, whisk together the egg yolks and sugar in the top part of a double boiler (for a tutorial on separating eggs, see here).
Zest and juice your lemons. You should have roughly 1/3 cup of lemon juice. Bring your total liquid up to 2/3 cup with pomegranate juice. Add the zest and juice mixture to the eggs and sugar, whisking to fully incorporate all ingredients.
Put 1″ of water in the bottom of the double boiler and bring to a boil. Reduce it to a simmer and put the top part on. While you should whisk your curd constantly while it cooks, it won’t be the end of the world if you have to step away temporarily.
Cook the mixture until it begins to thicken and coats the back of a wooden spoon.
Remove your pomegranate lemon curd from the heat and stir in the butter one pat at a time, allowing each pat to fully melt before adding the next.
Pour the curd into a glass bowl and cover with plastic wrap, pressing the plastic down to the surface of the curd. Refrigerate for at least 4 hours.
Once your cupcakes have cooled, prepare your frosting. Start by reducing your pomegranate juice. Pour it into a small saucepan and bring it to a boil over high heat. Reduce the heat to medium and simmer the juice until it is at most half its original volume (you can check by pouring it into a glass measuring cup, or by marking the levels on a toothpick and checking periodically). Allow the juice to cool completely.
While your pomegranate juice is cooling, combine the vegetable shortening or butter and milk in the bowl of a stand mixer or other large bowl (you will want some kind of electric mixer for this). Beat on low speed until you are past the danger of spattering, then on medium speed until the shortening is creamy and the milk is fully incorporated.
Add the remaining ingredients, including the pomegranate juice, and stir to combine. Beat on medium speed until the frosting is smooth. If necessary, add a little more milk to make it thin enough to beat and use. Mine started out almost like bread dough, so I had to add almost another tablespoon of milk.
Now divide and tint your frosting appropriately. I added almost half a tube of red gel food coloring and a drop of black to achieve the color you see here.
I piped the roses with a Wilton 2D tip, which I felt created better petals and a smoother flower than any of the star tips did. These would also look nice in yellow or pink with some colored decorating sugar sprinkled on top, or some candied citrus fruit on top.
Enjoy!
Download the printable PDF @ Benbaker0078@gmail.com
Unless you live under a rock, you’re probably aware by now that our country made a historic advance in equality last week. I was in the mood to celebrate, so I decided to make some rainbow cinnamon rolls. The rolls themselves, while delicious, are fairly run of the mill. It’s the fun explosion of rainbow on top that tickles my whimsy. Hopefully your cones are similarly stimulated (as are your taste buds).
You will need the following ingredients:
For the rolls:
1 Tbsp. granulated sugar
4 Tbsp. (1/2 stick) unsalted butter, melted
1/4 cup room-temperature water
1 packet active dry yeast (I used fast-acting, but you can use the normal kind)
1/2 packet instant vanilla pudding mix
1 cup warm milk
1 room-temperature egg
4 cups bread flour
1/2 tsp. salt
For the filling:
8 Tbsp. (1 stick) butter, melted
1 cup granulated sugar
4 tsp. ground cinnamon
For the icing:
4 oz. cream cheese, softened
4 oz. unsalted butter, softened
1/2 tsp. vanilla extract
1 Tbsp. milk
2 cups powdered sugar
food coloring (optional)
For baking ambiance:
I wanted to listen to Golden Earring, but apparently I don’t have any of their albums on cd, and I didn’t feel like bringing my computer into the kitchen today. Instead, I listened to Queen (after all, it just makes sense for the task at hand). I recommend something that hits your musical sweet spot while you make these deliciously-sweet pastries.
Now that you’ve gathered your ingredients, it’s time to make rainbows spring forth from your kitchen!
In a stand mixer bowl or other large bowl, dissolve 1 tablespoon of sugar in the water. Stir in the melted butter and sprinkle the yeast over the top. Cover and set this aside.
In a small bowl or measuring cup, whisk together the warm milk, pudding mix, and egg until the mixture is smooth.
By now, the yeast should have formed a foam on the top of the liquid.
Stir in the pudding mixture until well-combined. Add the salt and flour and mix, with a dough hook if using a stand mixer or with a wooden spoon (or your hands), until the dough forms a ball.
Remove the dough from the bowl momentarily, then grease the bowl (I use non-stick cooking spray, but vegetable or olive oil will work too). Put the dough ball back in the bowl, flipping it once to coat both sides, and cover the bowl with a kitchen towel or plastic wrap. Let the dough rise in a warm place until roughly doubled in size, about an hour.
Flour your work surface (I use a silicone mat whenever I want to roll something out). Punch the dough down and turn it out onto your floured surface.
Roll it into an 11″ by 17″ rectangle. It may take a little finessing to make the corners square enough, but it doesn’t have to be perfect.
Stir together the brown sugar and cinnamon, being sure to break up any large clumps. Brush the 8 ounces of melted butter all over the top of the dough.
Sprinkle the brown sugar and cinnamon as evenly as possible across the dough. If you have butter leaking off the dough, put the sugar there first to stop the flow.
Grease a 9″ by 13″ baking pan (it should have sides at least 2″ tall). Starting from the long side, roll the dough rectangle into a log. It doesn’t have to be perfectly tight.
Now slice the log into 16 rolls (I started in the middle and kept cut each piece in half until I had 16 total). Place the rolls in the prepared pan and cover with a towel or plastic wrap. Let them rise until doubled in size, about 45 minutes.
Preheat your oven to 350°F. Bake the cinnamon rolls for 15-20 minutes, or until the tops start to brown.
While your cinnamon rolls are cooling, prepare your icing. Stir together the butter, cream cheese, powdered sugar, vanilla extract, and milk in a small bowl until it is smooth. If you have no interest in rainbow cinnamon rolls (this is probably for those under-rock dwellers), you can spread this on the rolls as-is when they have cooled for about 20 minutes.
If you are looking forward to an explosion of rainbow, divide the icing between six resealable plastic bags (seven if you can figure out how to distinguish indigo from purple and blue with food coloring). Put 3 drops of food coloring in each bag to make your rainbow colors. For mixed colors like orange, either try to put 1 1/2 drops of each color you need, or decide which color you would like to be dominant and use two drops of that and 1 drop of your secondary color (i.e., to make red-orange, use two drops red and one drop yellow). Knead the bags with your hands until the colors are uniform.
Cut 1/4″ off the corner of the red bag and squeeze the icing in diagonal stripes across your cinnamon rolls. Repeat with the rest of the colors until you have none left and there is a glorious rainbow of deliciousness daring you to eat it.
Download the printable PDF recipe here: Benbaker0078@gmail.com
Once again, we had a holiday weekend to celebrate with themed baked goods. Independence Day also happens to be my grandmother-in-law’s birthday, so I had the perfect excuse to make a cute pie and give it away to someone who would appreciate it.
Once I had the idea to make this pie, I did a quick Google Images search to see how other people did it. It bugged me a little that, while they were quite cute, most of them didn’t have the right number of stripes or stars. I decided to make a Betsy Ross flag so it would be easier to fit my stars in and still make a mostly accurate pie (as accurate as a flag made out of pie can be, that is).
One difficulty I ran into was that the blueberry and cherry fillings I made, which were supposed to make the blue and red parts of the flag, both turned out purple when cooked. I should have known this, as I’ve made blueberry and cherry pies before, but I didn’t account for it beforehand. I remedied this by adding sliced fresh cherries on top of the cherry filling to make the red stripes look more red (I used the red parts of Rainier cherries). If you’re more into looks than taste (or if you prefer tart cherry filling), you might want to try this with tart cherries instead of sweet ones because they tend to be a lighter red. Either way, what this pie promises in looks, it definitely delivers in taste.
24 oz. dark, sweet cherries, pitted (I used frozen, but fresh are excellent), plus extra for decorating
3/4 cup granulated sugar
3 Tbsp. cornstarch
For the blueberry filling:
8 oz. blueberries (again, I used frozen)
1/4 cup granulated sugar
1/4 cup brown sugar
2 Tbsp. cornstarch
2 tsp. lemon juice
For baking ambiance:
I have to admit that I was in such a rush while making this pie that I just played what was already in my stereo, which happened to be the same Queen album from last week (of course this is an excellent album, so by all means listen to it if you feel like it). If I’d had more time, I would suggest some John Philip Sousa. Not only is it patriotic, it’s just fun and upbeat.
Now that we’ve navigated the tricky waters of baking music selection, let’s make some pie!
If you’re making your own pie crust, try to prepare it the day before so it has some time to chill in the fridge. If this isn’t possible, be sure to make it at least an hour in advance. Dough that isn’t cold enough can end up tough once it’s baked. Split your dough into two discs, with one slightly larger than the other, and wrap them separately or put each into its own sandwich bag.
Next, heat the blueberries in a small saucepan, covered, over low heat, stirring occasionally to prevent them from sticking. While the blueberries are cooking, stir together the granulated sugar, brown sugar, and cornstarch in a small bowl until well-combined, being sure to break up any clumps of brown sugar (if your brown sugar is a solid rock of sweetness, see here for ways to soften it).
When the blueberries have released enough juice to cover themselves, remove the saucepan from the heat.
Stir in the sugar and cornstarch mixture and the lemon juice, then return the saucepan to the heat.
Cook uncovered, stirring regularly, until it thickens. I fully admit that I don’t stir the fruit all that frequently during this stage, and it always turns out fine. When you scrape a wooden spoon across the bottom of the pan, the filling shouldn’t immediately fill in the gap.
Let the filling cool in the saucepan while you prepare the cherry filling, then pour and scrape it into a container for refrigerating. Put it in the fridge and chill it until it is completely cooled.
Next, repeat the above process with the cherries. Stir together the sugar and cornstarch in a small bowl while heating the cherries, covered, over low heat.
After the cherries have released enough juice to cover themselves, remove them from the heat and stir in the sugar/cornstarch mixture.
Return the cherries to the heat and cook, stirring regularly, until they are thickened like the blueberries (they may end up a little thinner).
Let it cool in the saucepan for awhile (15 minutes or so), then refrigerate it until it is completely cooled.
When your crust and fillings have chilled all the way, preheat your oven to 375°F. Roll out the larger disc of pie crust on a well-floured surface (as I’ve mentioned before, my go-to is a silicone baking mat).
Carefully wrap the crust around your rolling pin. [In the spirit of full-disclosure, I am horrible at this whole crust rolling process and always rely on my husband to do it for me. He has rolling pin skills in his genes passed down on his mother’s side.]
Roll the crust back out into the pie plate, doing your best to center it as much as possible.
Mine was a little off-center, but it still worked out ok.
Trim off the excess crust, leaving 1/2″ hanging off. Fold the edges of the crust under (between the crust and the pie plate) and flute the edges or press them gently with the floured tines of a fork. Now comes the tricky part. Pour the blueberry filling into one quadrant of the pie crust. Use a spatula to hold it in place and pour the cherry filling around it. My husband also helped me with this part, holding two spatulas on the edges to keep the blueberry in place.
As you can see, keeping the fillings separate isn’t a life and death matter because they’re both the same color anyway.
Now, roll out the smaller crust disc approximately 1/8″ thick. Cut six strips slightly less than 3/4″ wide. Arrange them on the pie according to the diagram below (yes, I actually sketched this out and did the math before I started).
Using the remaining crust, cut 13 five-pointed stars using a paring knife or fondant cutter. I found it easiest to cut squares out of the leftover strips and then cut the stars from that. Arrange the stars in a circle over the blueberry filling. Sprinkle the top of the pie with coarse decorating sugar if you’d like a little extra sweetness/pie bling.
Put the pie on top of a cookie sheet or pizza pan (in case the filling leaks) and bake it for 50 minutes, or until the crust is slightly browned. You might also want to cover the edges for the first 30 minutes of baking to prevent over-browning (a pie shield or aluminum foil will do the trick). If you do this, remember to take the covering off so the crust has some time to brown.
Let the pie cool for at least an hour (preferably overnight). While you’re waiting, pit and slice the remaining cherries. Once the pie is cooled, place the cherries onto the red strips of the pie to help differentiate the colors of the different fillings.
Now share and enjoy the patriotic fruits of your labor. Happy Independence Day!
You can download the printable PDF here: @ benbaker0078@gmail.com
We’ve made it to the third and final week of our Christmas Cookies in July series! I was hoping to get more varieties in, but 3 is a good start. For the third entry in the series, I decided to make watermelon smile cookies. After all, what is more summery than watermelon?
When I decided to make these cookies, the first thing I did was google “watermelon cookies.” Surprise surprise, there are a lot of variations out there. I settled on this recipe from Taste of Home to base my cookies on. I felt it made more sense to flavor them with watermelon instead of almond extract, and before I even saw the recipe, I knew I wanted to use chocolate-covered sunflower seeds for the watermelon seeds. The watermelon flavoring I used tastes more like a watermelon lollipop than it does actual watermelon, but I still found it pleasant. If you’re not into that flavor, you can use 1/2 teaspoon of vanilla or almond extract in its place, or surprise your cookie receptacles taste testers with a completely different and unexpected flavoring (lemon, root beer, grape, the possibilities are endless).
You will need the following ingredients (the canisters in the back are flour and sugar):
For the cookies:
2 cups all-purpose flour
1/4 tsp. baking powder
1/8 tsp. salt
3/4 cup (1 1/2 sticks) butter, softened (here’s a tutorial on softening butter for those who forgot to plan ahead)
3/4 cup granulated sugar
1 large egg
1/8 tsp. watermelon flavoring (the link takes you to an assortment of flavors, but I was able to find this in a two-pack in Michael’s for not too much money)
red and green food coloring
brown or black chocolate-covered sunflower seeds (optional)
For baking ambiance:
I was also making Spanish rice for dinner while working on these cookies, so I decided to go with Santana since I was clearly in a Latin mood. Old Santana, new Santana, ’90s Santana, it’s all good. It probably also helps that my dad liked to blast Abraxas from the PA system when we had outdoor parties, so I can’t think summer and not think Santana.
Without further ado, let’s bake some watermelon smiles!
Whisk together the flour, baking powder, and salt in a medium bowl.
In the bowl of a stand mixer or other large mixing bowl, cream together the butter and sugar.
Add in the egg and watermelon flavoring and beat the mixture until it is well-combined.
Working in batches (I used two), slowly mix in the dry ingredients until they are fully-incorporated. Be sure to scrape the bottom and sides of the bowl so you don’t miss anything.
Reserve 1/3 cup and 2/3 cup of the dough in separate bowls. In the remaining dough, make a well with your finger in the center and squeeze 10 drops of red food coloring into it.
Knead the dough with your hands until the color is even throughout the dough. Do the same with the 1/3 cup of dough you put into another bowl, using 4 drops of green food coloring instead.
Form the plain dough into a small rectangle (this makes it easier to roll it into a rectangle) and wrap it in plastic wrap. Do the same with the green dough. Form the red dough into a 3 1/2″-long log and wrap it in plastic wrap as well. Refrigerate all of your dough packages for 2 hours.
When your dough is nice and firm, remove the plain dough from the plastic wrap. Roll it out into a, 8 1/2″ by 3 1/2″ rectangle on a well-floured surface. Be very gentle, as this dough is a little brittle. If you have it, you can use powdered sugar instead of flour to keep your dough from sticking because it keeps your dough from gaining too much flour, which can make it taste gross. That said, in this instance, flour versus powdered sugar won’t make that much of a difference because these are such small pieces of cookie dough.
Now take the red dough roll out of its plastic wrap, reshaping it into a cylinder if necessary, and place it on the short end of the plain dough. Very carefully roll the plain dough around the red dough until it is completely covered (to me, it looks like a deranged pig in a blanket). Roll the green dough out into a 10″ by 3 1/2″ rectangle and and roll the log inside it.
Wrap the whole long in plastic wrap and refrigerate it overnight. If you don’t have the time to wait, you can freeze it for 1-2 hours instead (this is what I did and it worked fine).
Preheat your oven to 350°F. When your multi-colored dough chub is nice and hard, unwrap it, cut off and discard the rough ends, and cut it into 3/16″ thick slices (mine might have gotten a little thick). Arrange them on greased or foil-lined baking sheets. Gently press the sunflower seeds into the red part of the cookies to make your watermelon seeds.
Bake the cookies for 9-11 minutes, or until the they have hardened a bit and are no longer shiny. You don’t want them to brown because that defeats the whole purpose of watermelon cookies.
Immediately slice the cookies in half with a sharp knife. Let them sit for 5 minutes on the cookie sheets, then remove them to cooling racks to cool completely. Enjoy!
You can download the PDF recipe here: Benbaker0078@gmail.com
I Wanna Bake’s “Christmas Cookies in July” series continues this week with some delightful root beer float meringue cookies. I adapted the recipe from Joy of Cooking’s meringue kisses recipe to better fit my summer theme, and these did not disappoint. The cookies dissolve slowly on your tongue, leaving you with the fizzy, yet creamy, feeling of a root beer float before all the ice cream has melted.
It seems I have succeeded where Willy Wonka failed (dessert). Granted, these are cookies, not gum, and root beer floats, not blueberry pie, but I’m going to declare myself the winner here anyway. Hopefully when you try them you’ll agree with me.
You will need the following ingredients For Root Beer Float Meringue Cookies
For the cookies:
3 large egg whites
1/4 tsp. cream of tartar
1/8 tsp. salt
1 1/4 cups granulated sugar
1/8 tsp. root beer flavoring (this made fairly strong cookies, so you might want to decrease the amount of flavoring you use)
*The original recipe called for 3/4 cup of sugar, but I found I needed to add more to make mine come together. My egg whites might have been larger than usual, so be sure to add the sugar gradually in case you don’t need the full 1 1/4 cup.
For baking ambiance:
In sticking with the Willy Wonka theme, I suggest listening to the soundtrack to Willy Wonka and the Chocolate Factory. It’ll inspire your confectionery adventure and have you dancing in the kitchen (at least that’s what it does for me). You can find the whole thing fairly easily on Youtube.
Pop an everlasting gobstopper in your mouth and preheat your oven to 225°F.
In the bowl of a stand mixer or other large bowl, combine the egg whites, cream of tartar, and salt. Beat them on low speed until the egg whites are frothy.
Increase the mixer’s speed to high and beat until the egg whites hold soft peaks. Unfortunately, I couldn’t get a good picture of this stage. The egg whites will barely hold their shape while being mixed and will look like a very fine, thick foam (if that makes any sense).
While still beating, add in the sugar 1/4 cup at a time. Reduce the speed of your mixer to low and stir in the root beer flavoring until it is fully-incorporated. It’s brown, so it’s easy to see when it’s mixed in. You may need to scrape your beater and the sides of the bowl to make sure it’s all fully mixed in. Now increase the speed to high and beat the meringue until it is glossy and holds very stiff peaks (it needs to be able to hold the shapes you pipe). The consistency is similar to marshmallow fluff.
Load the meringue into a piping bag or large resealable plastic bag fitted with a large, open star piping tip (or just snip a 1/2″ opening in the corner of the bag). Pipe the meringue into 1 1/4″ stars onto the cookie sheets. They can be fairly close together because they won’t grow much.
Bake the meringue cookies for 45 minutes. The original recipe said to rotate the cookie sheets halfway through the baking time, but mine cracked and this may be why. If you are worried about cracked cookies, just leave them to bake for 45 minutes undisturbed. When the time is up, DO NOT OPEN THE OVEN! Turn off the heat and let the cookies cool completely, at least half an hour. If they cool too quickly, they will crack.
The cracks aren’t too serious, but they are cracks all the same.
Once the cookies have cooled, peel them off the parchment paper or remove them from the cookie sheets with a thin spatula and enjoy their fizzy, melty sensat
Root Beer Float Meringue CookiesSummary: Light, airy meringue cookies flavored with root beer extract — they dissolve slowly on your tongue leaving you with the fizzy, creamy feeling of a root beer float. A fun summer twist on a classic Christmas cookie
Preheat oven to 225°F. Line cookie sheets with parchment paper
In the bowl of a stand mixer, combine the egg whites, cream of tartar, and salt. Beat on low speed until the egg whites are frothy
Increase speed to high and beat until the egg whites hold soft peaks — they will barely hold their shape and look like a very fine thick foam
With the mixer still running on high, add the sugar ¼ cup at a time. Add gradually and stop when the meringue comes together — you may not need the full 1¼ cups depending on the size of your egg whites
Reduce speed to low and stir in the root beer flavoring until fully incorporated, scraping the sides of the bowl and beater as needed. Increase speed back to high and beat until the meringue is glossy and holds very stiff peaks — the consistency should resemble marshmallow fluff
Pipe and Bake
Load the meringue into a piping bag fitted with a large open star tip, or snip a ½ inch opening in the corner of a large zip-lock bag. Pipe into 1¼ inch stars onto the prepared cookie sheets. They can be placed fairly close together as they will not spread much
Bake for 45 minutes undisturbed. Do not rotate the pans during baking — rotating may cause cracking
When the time is up, do NOT open the oven. Turn off the heat and leave the cookies inside to cool completely for at least 30 minutes. Opening the oven too soon causes rapid temperature change which will crack the cookies
Once fully cooled, peel cookies off the parchment paper or remove with a thin spatula
Notes
Root beer flavoring is strong — ⅛ tsp makes a fairly bold flavor. Start with less if you prefer something more subtle. Add sugar gradually rather than all at once; depending on the size of your egg whites you may need less than the full 1¼ cups. Never open the oven while the cookies are cooling — this is the most common cause of cracking. Store in an airtight container at room temperature. Keep away from humidity as meringue cookies will become sticky and soft

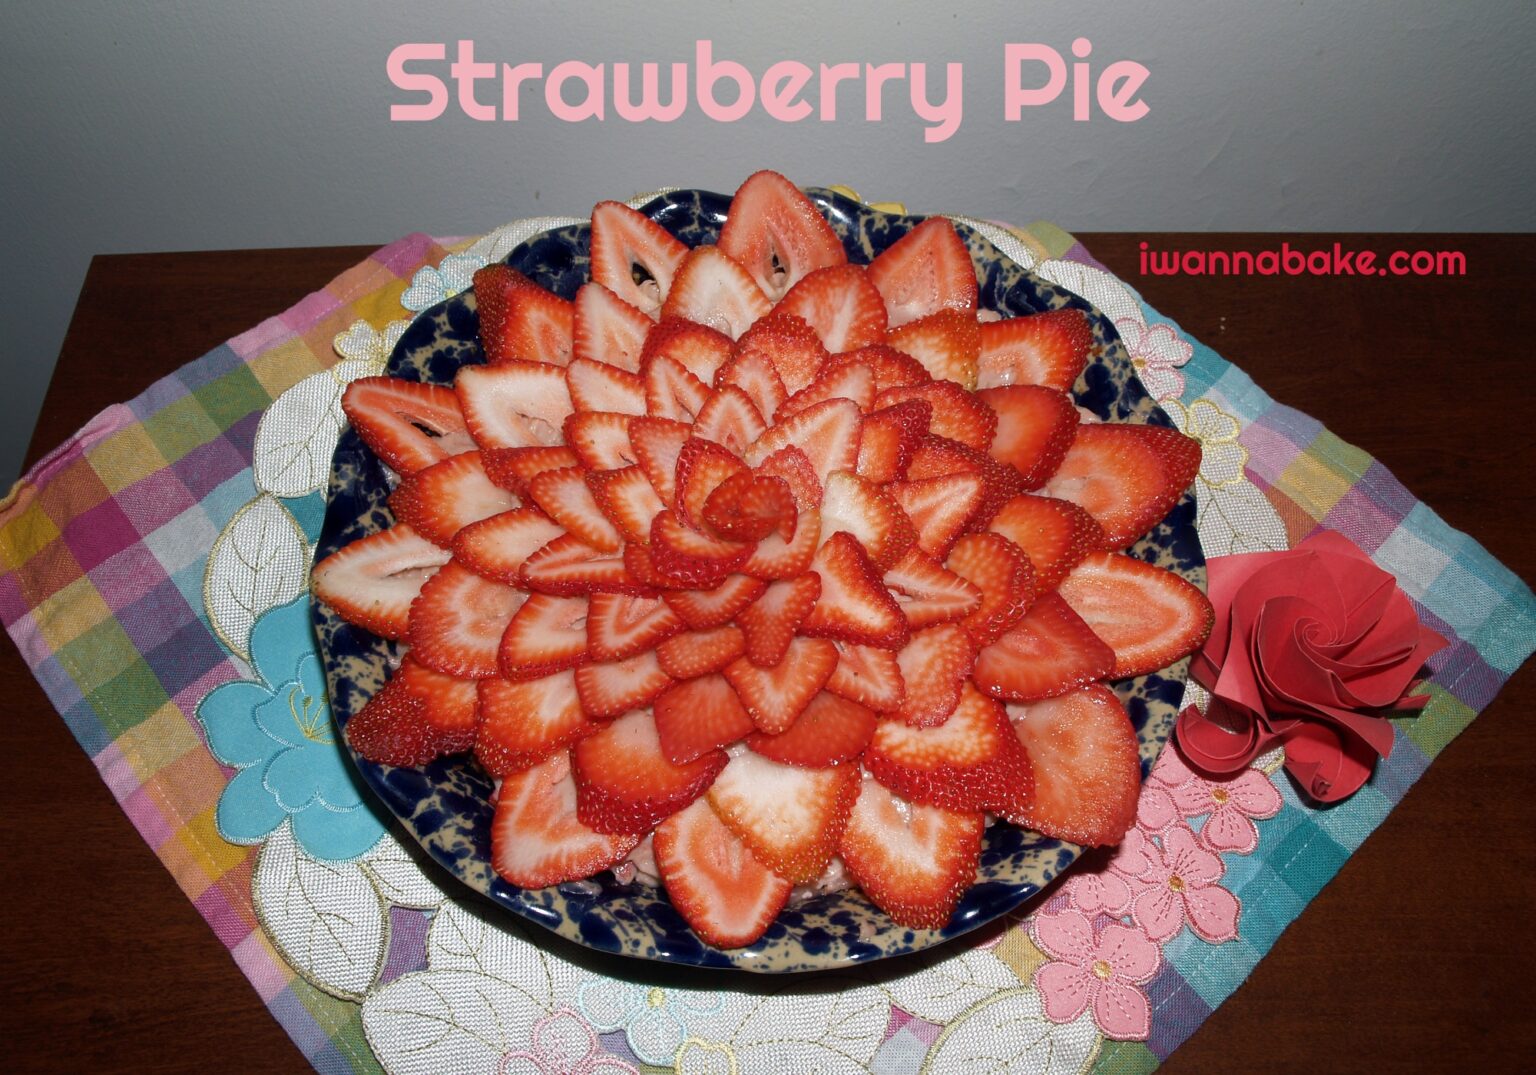
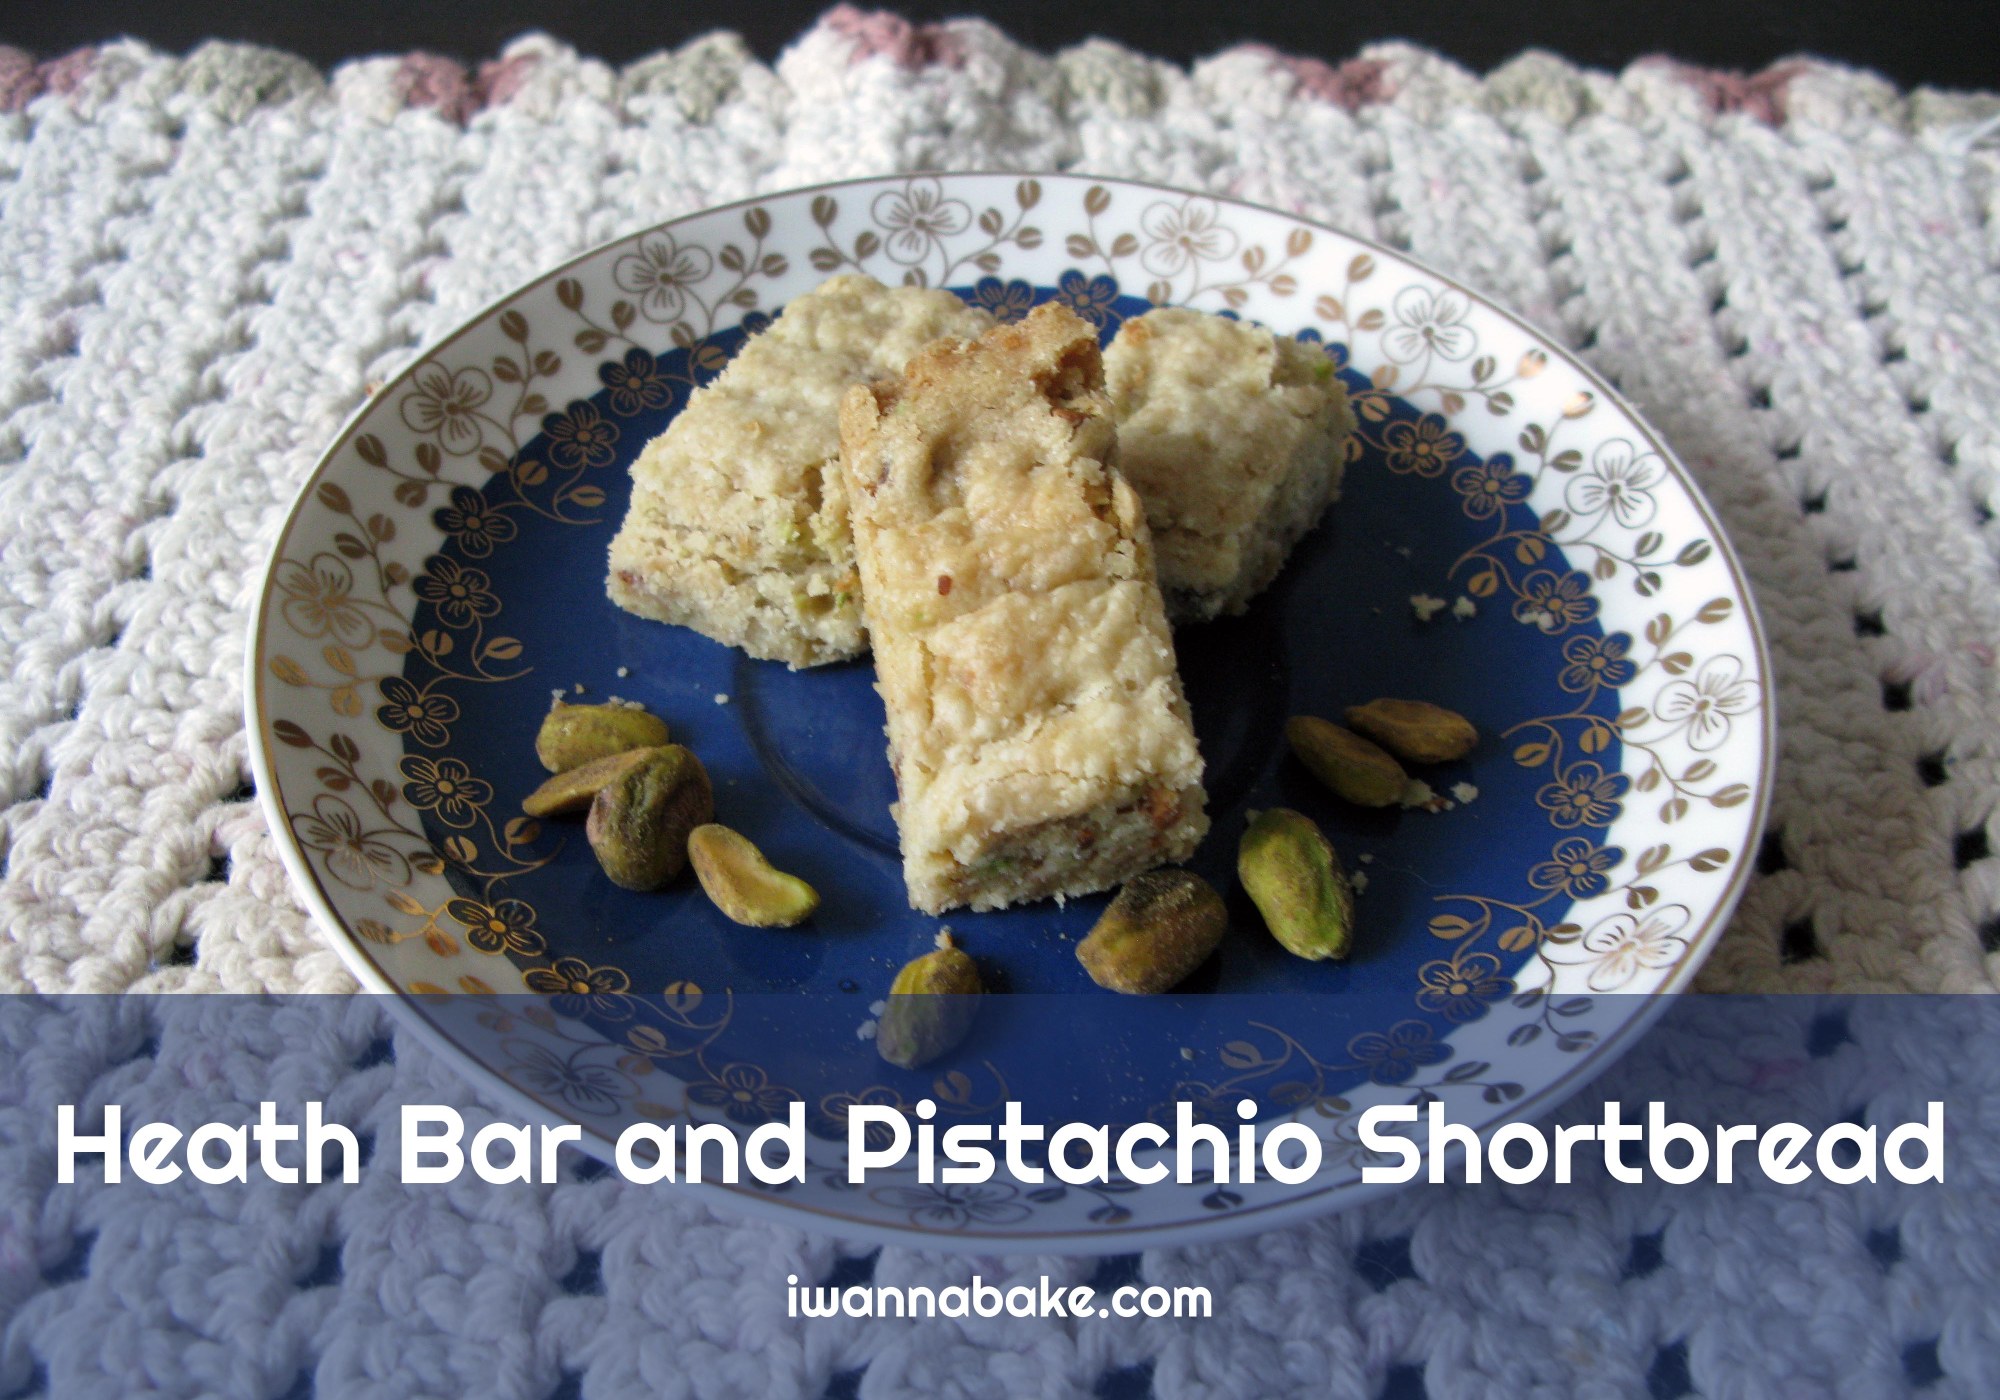
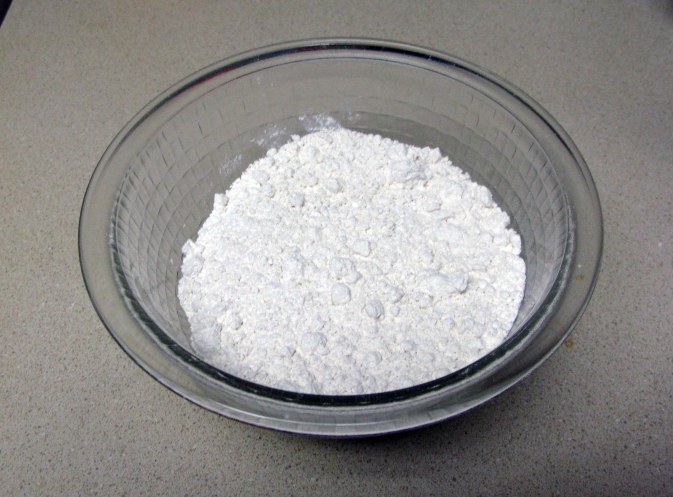
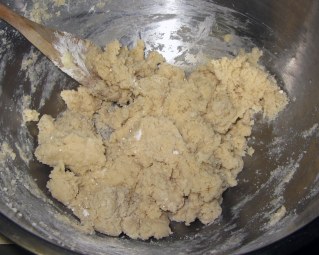
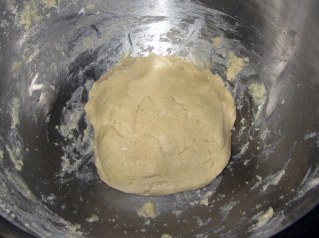
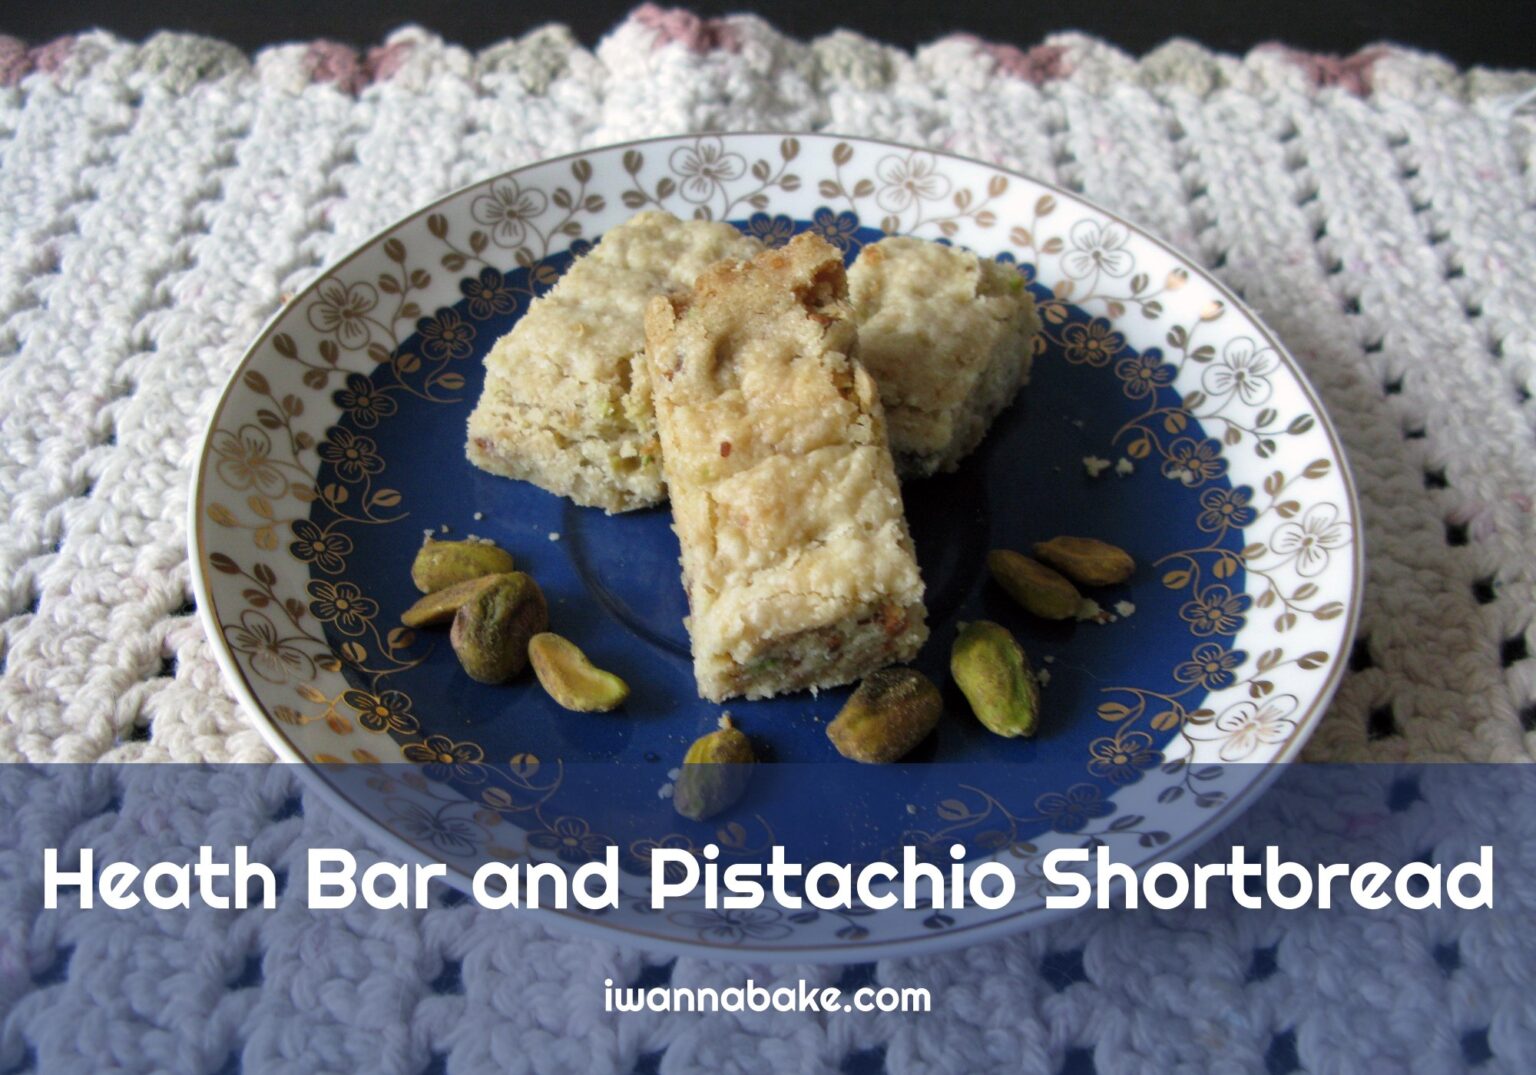

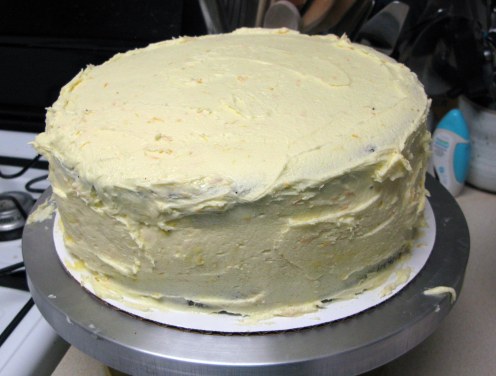
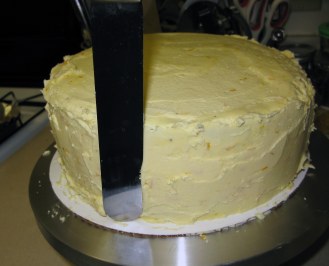
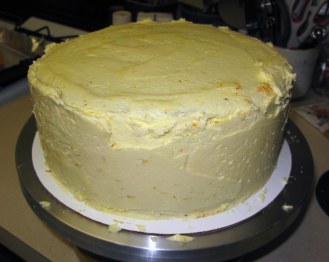
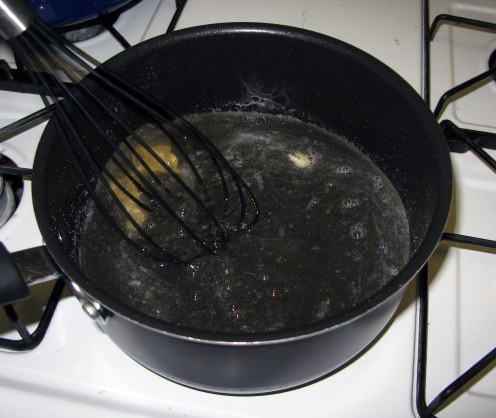
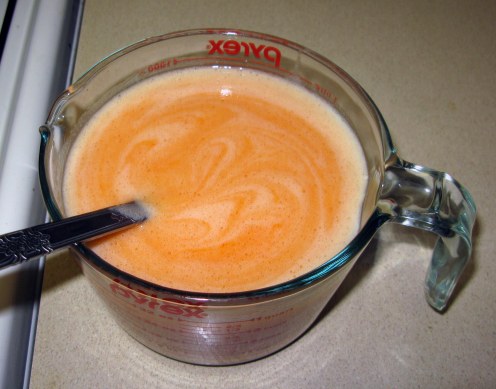
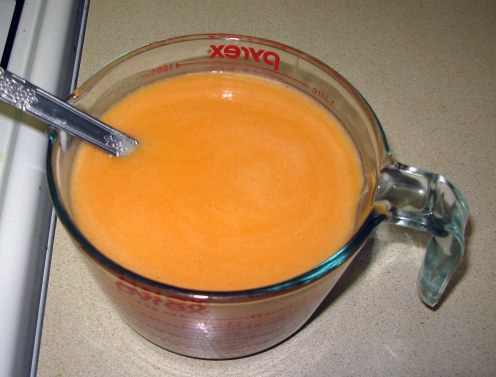
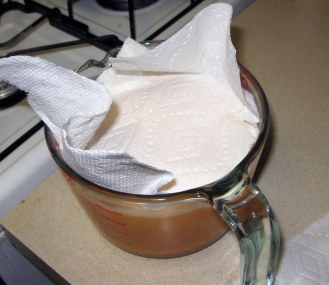
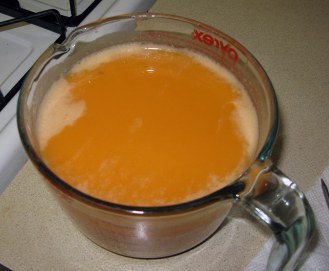
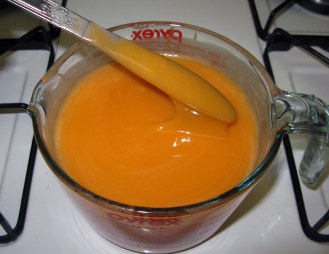
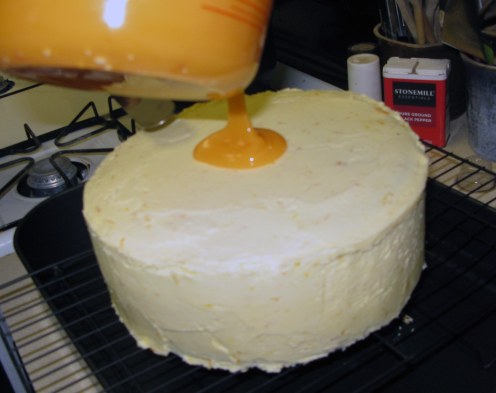
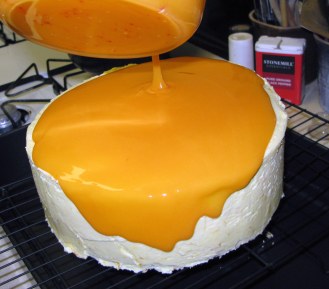
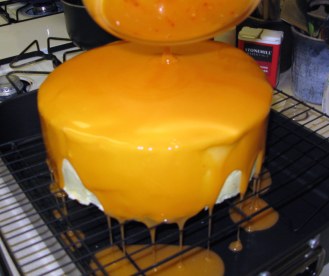
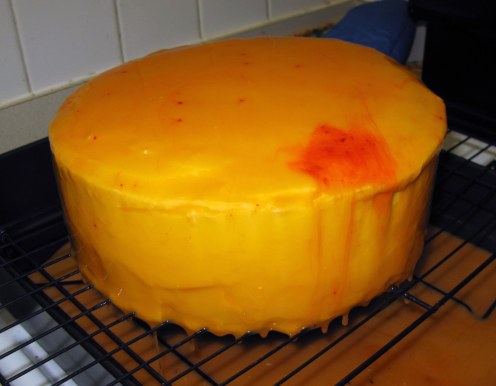
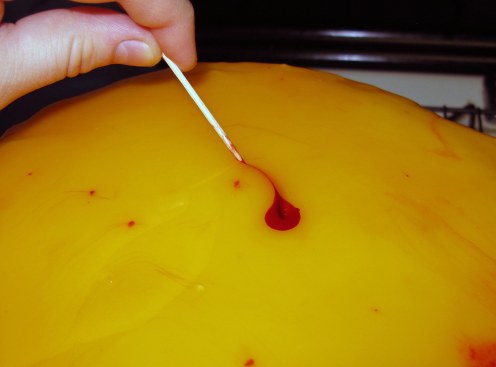
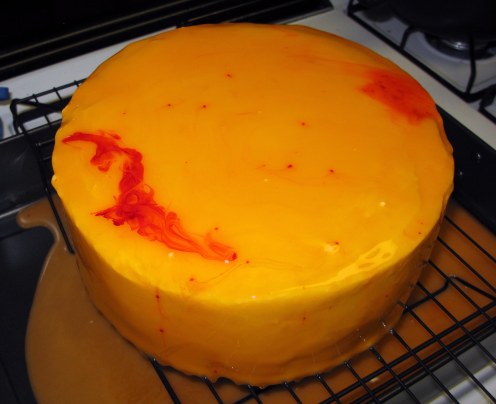
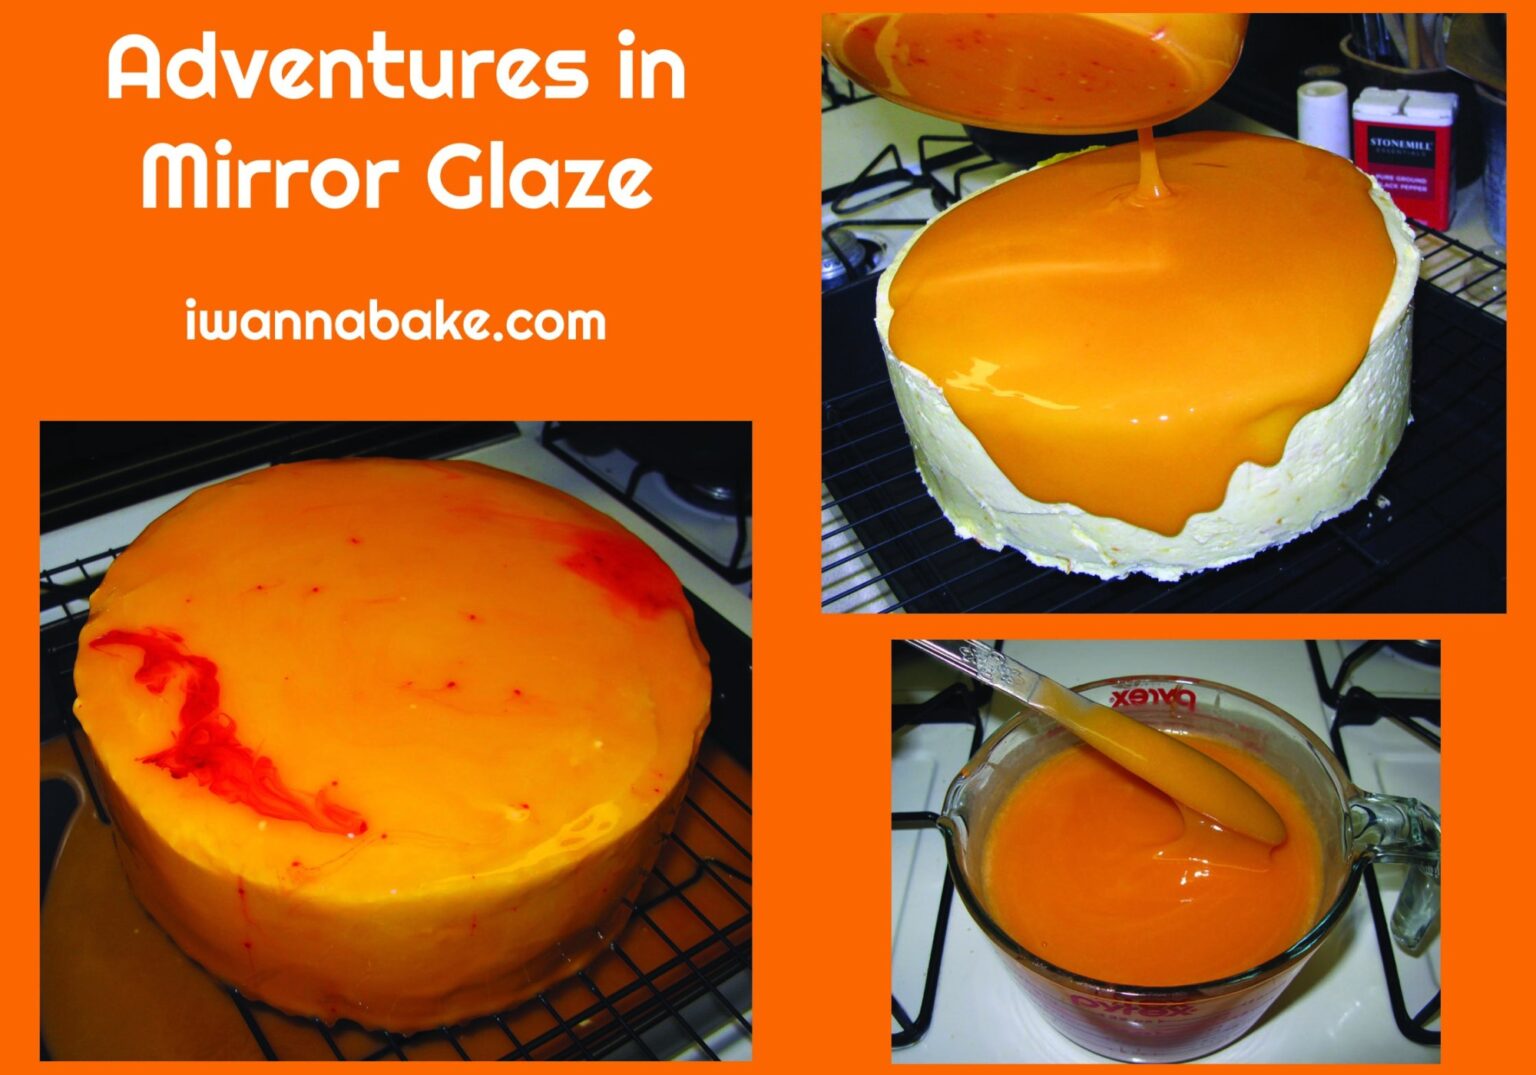

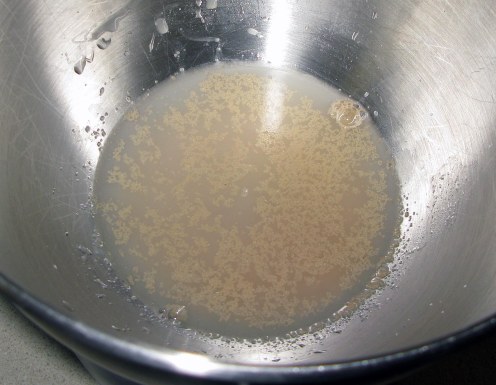
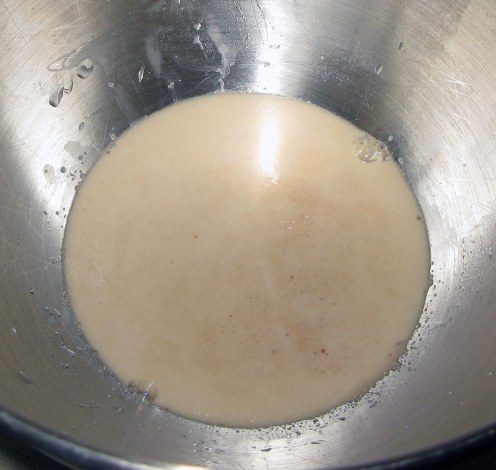
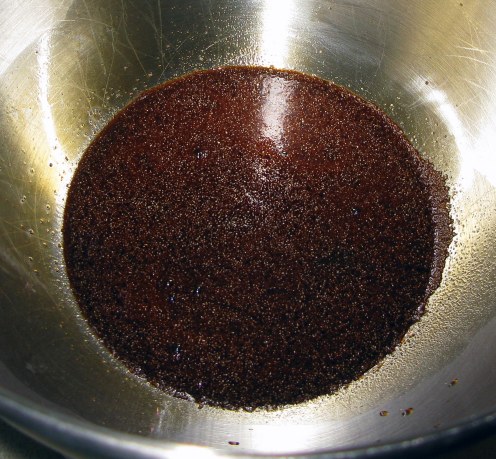
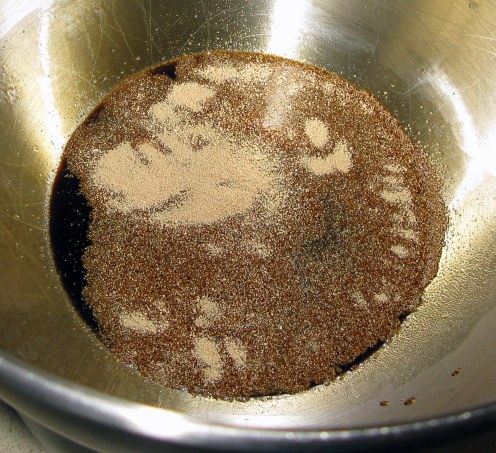
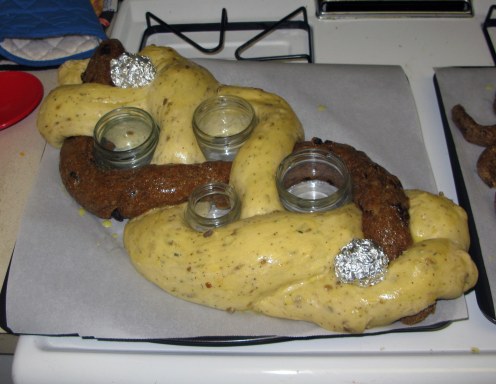
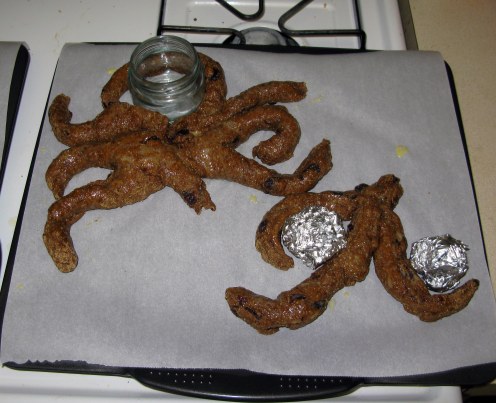
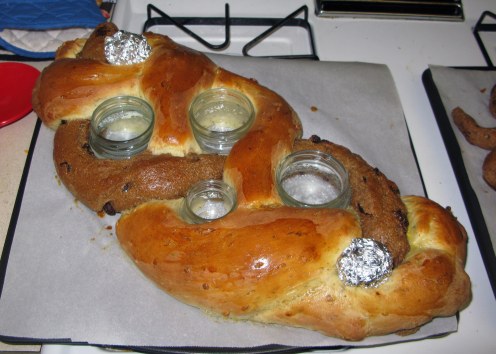
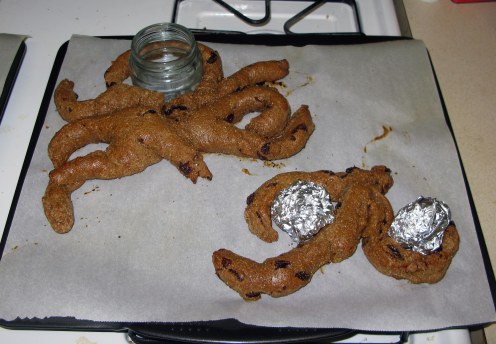
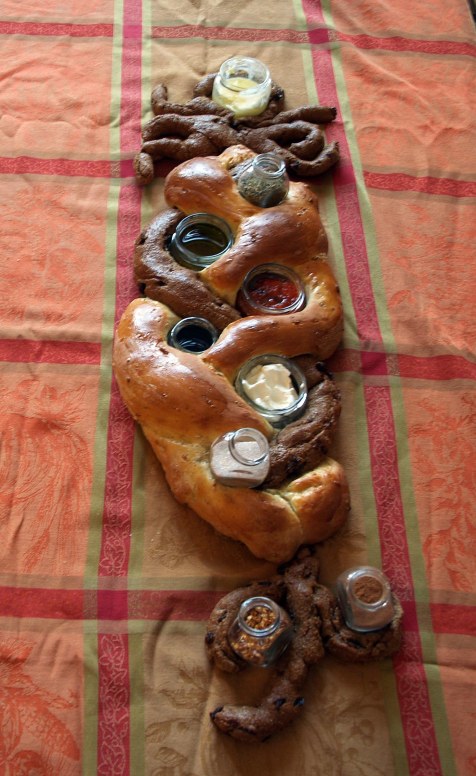
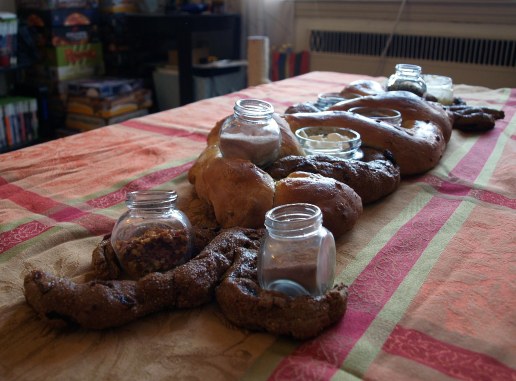
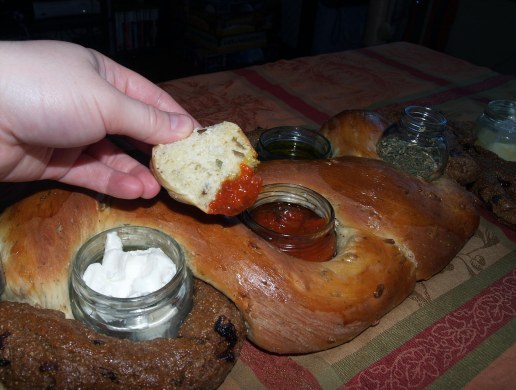
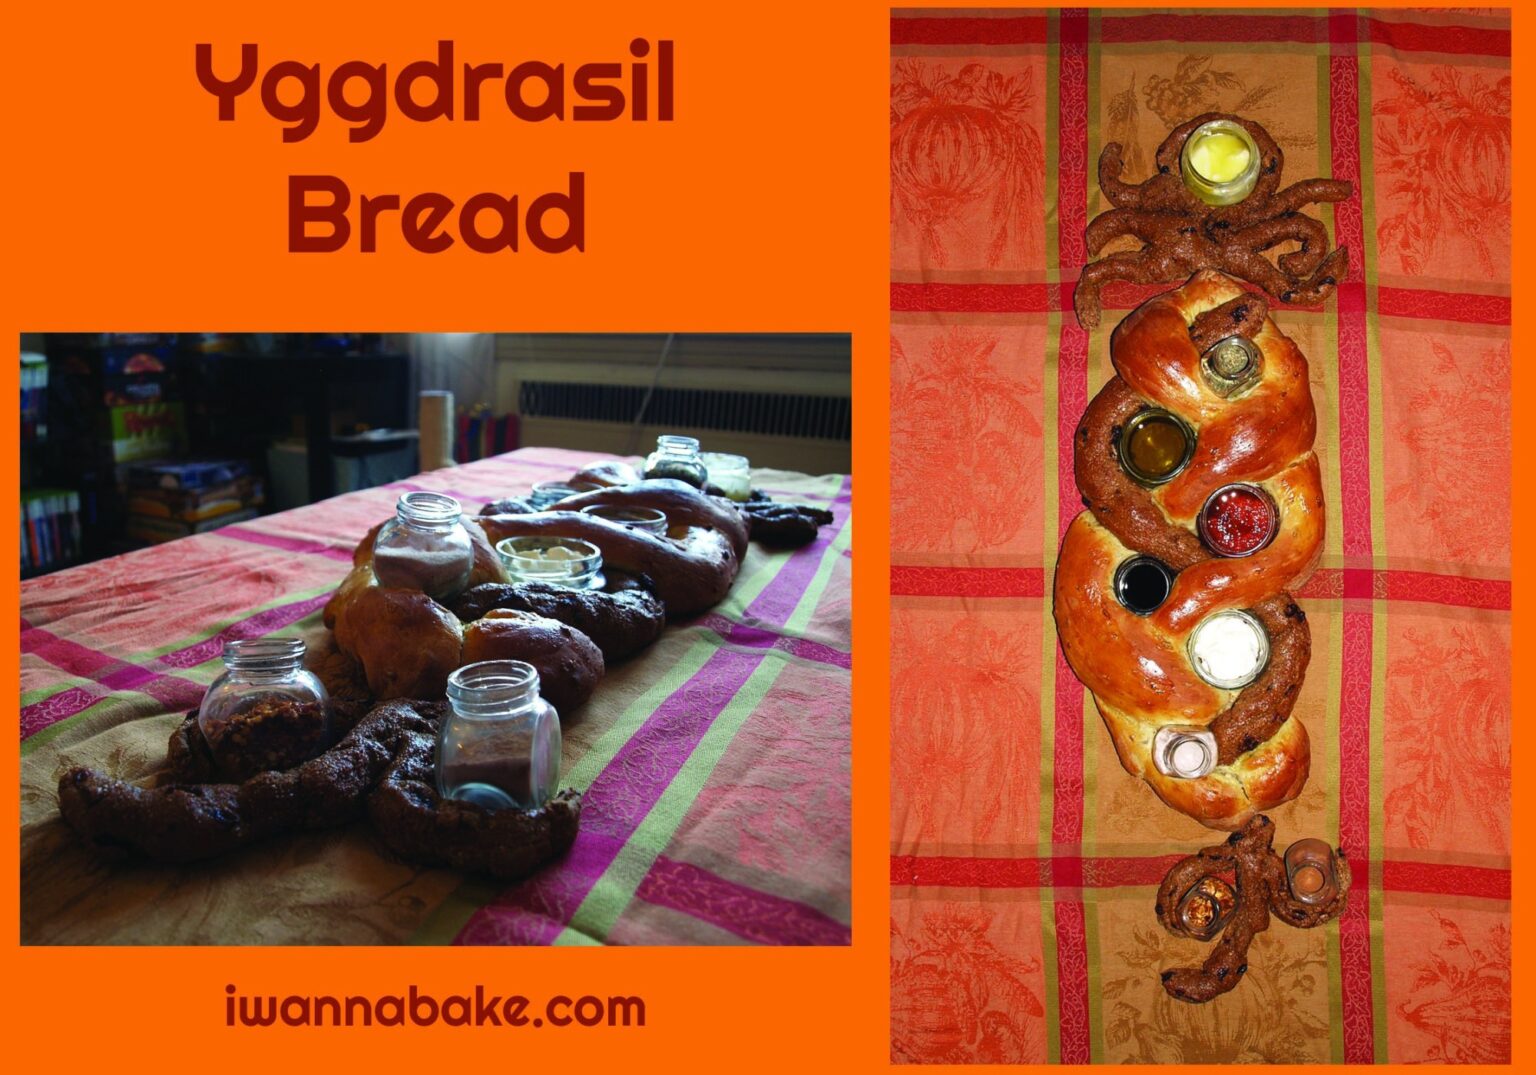

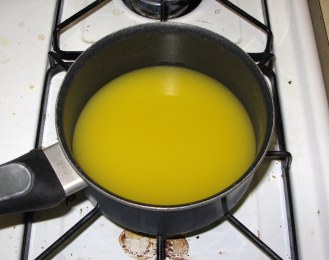
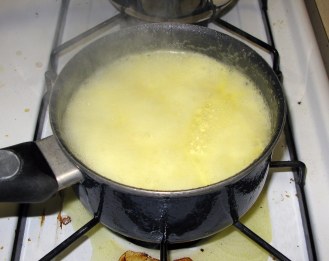


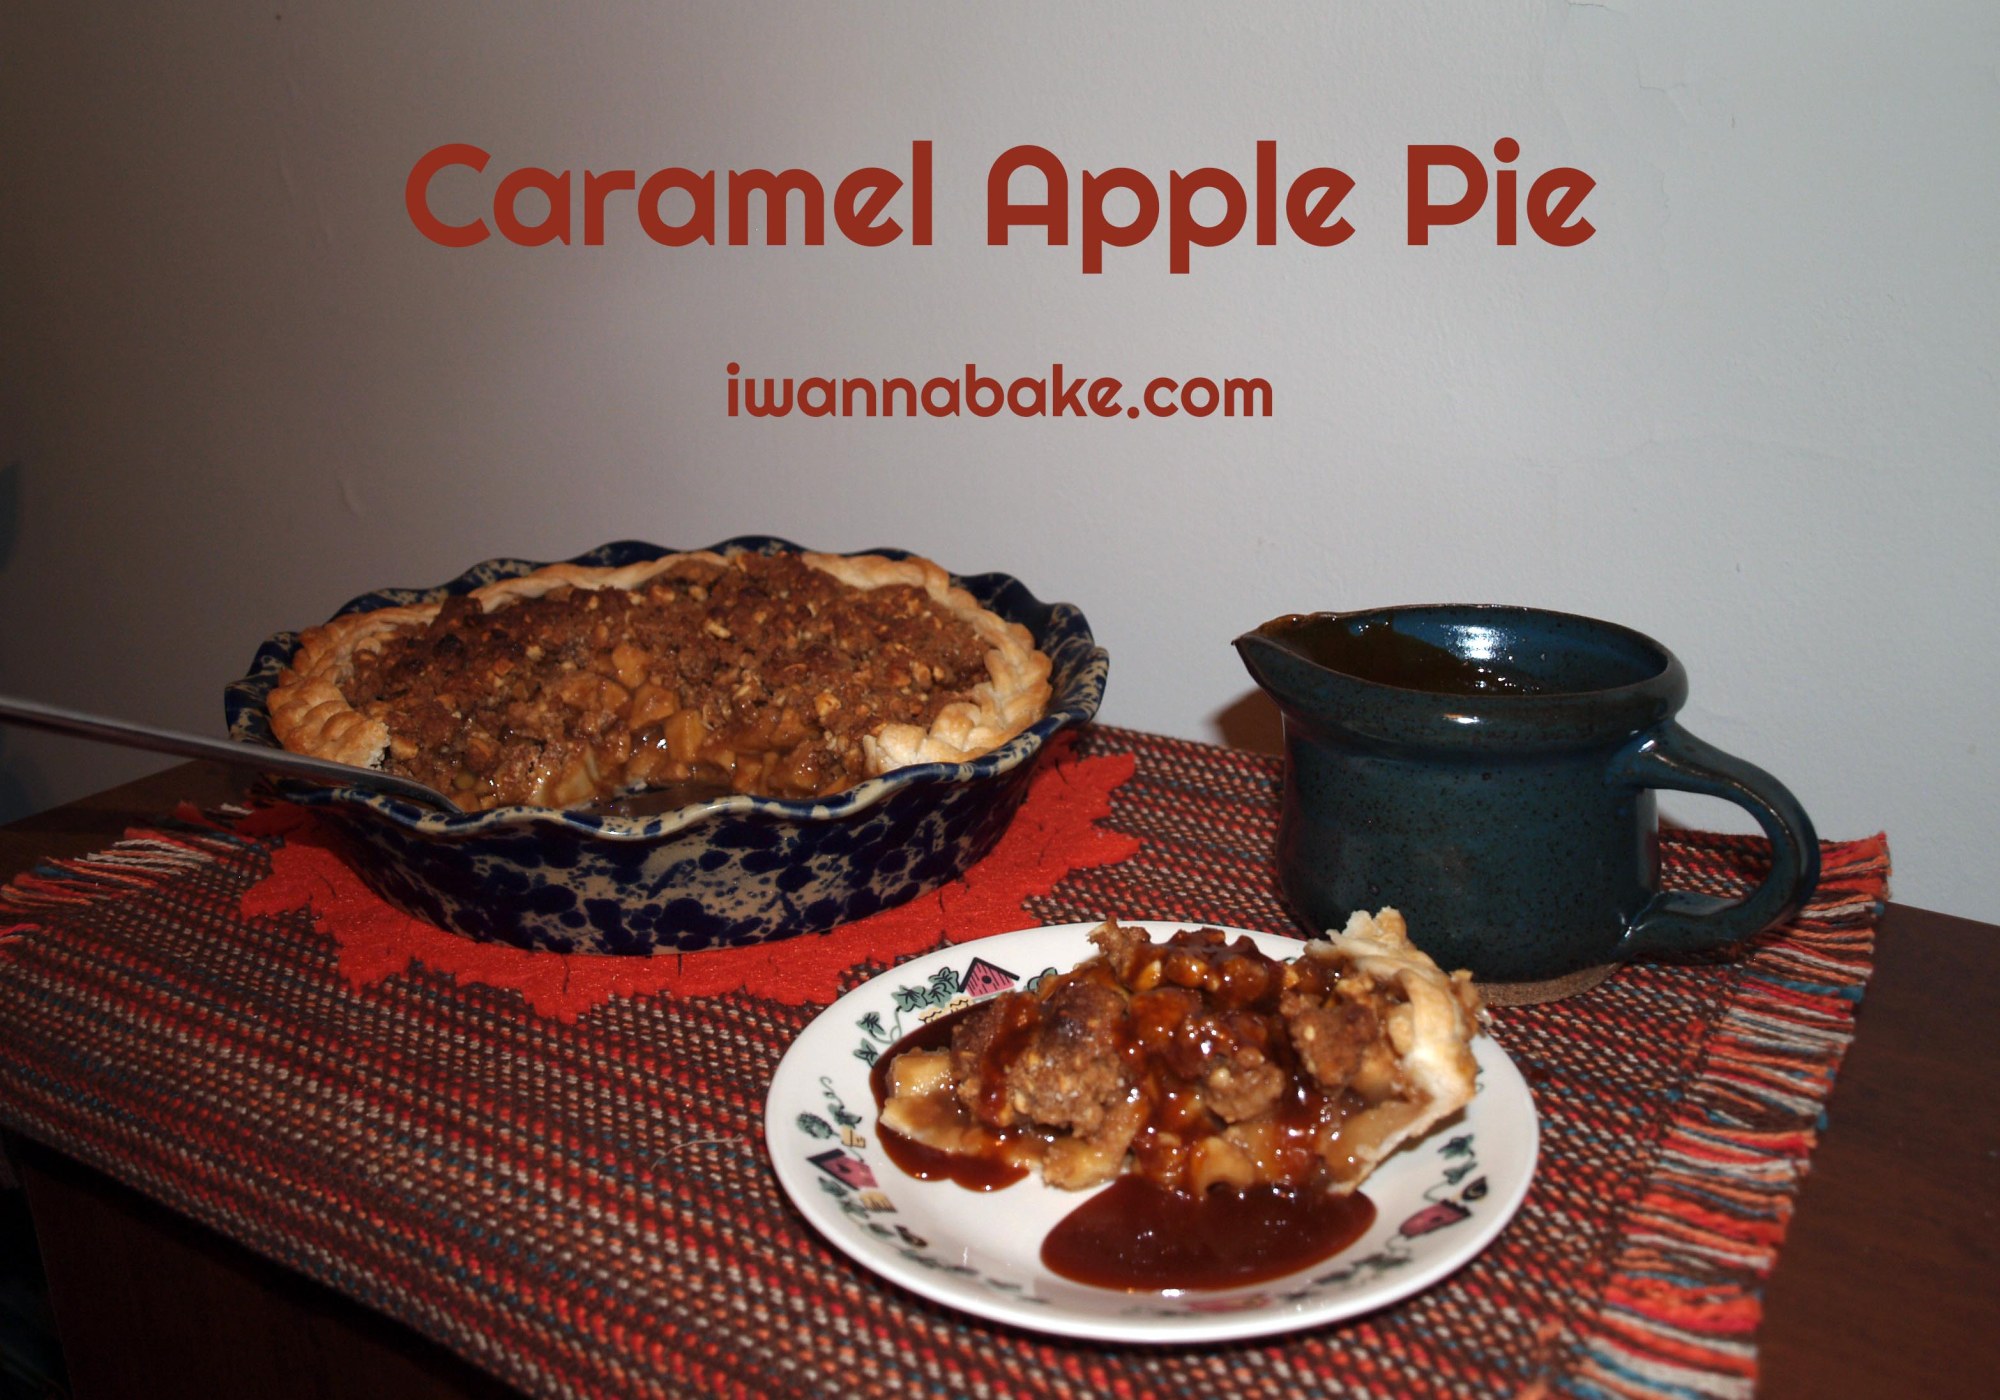

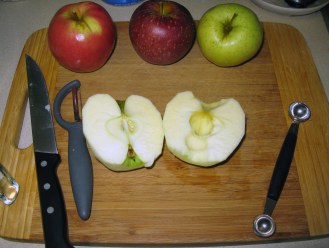
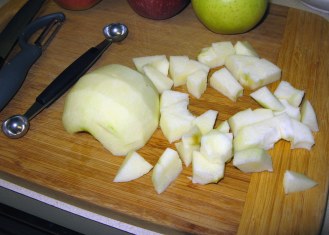
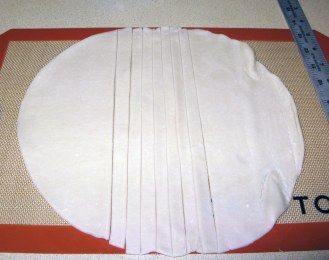
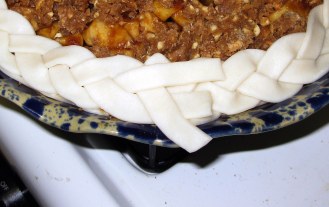
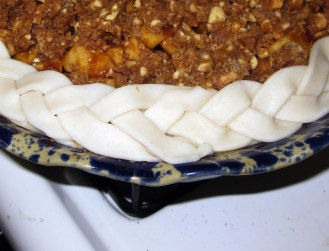
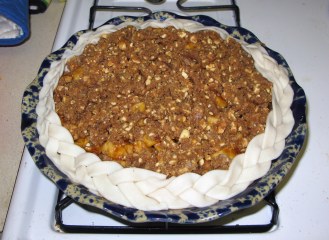
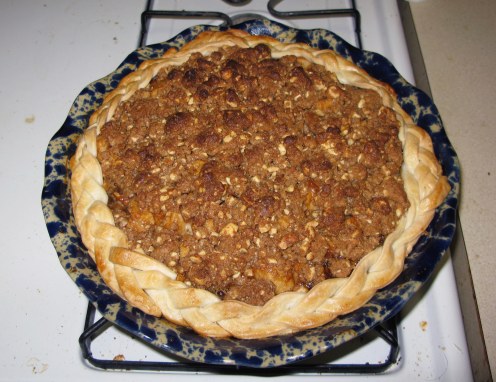

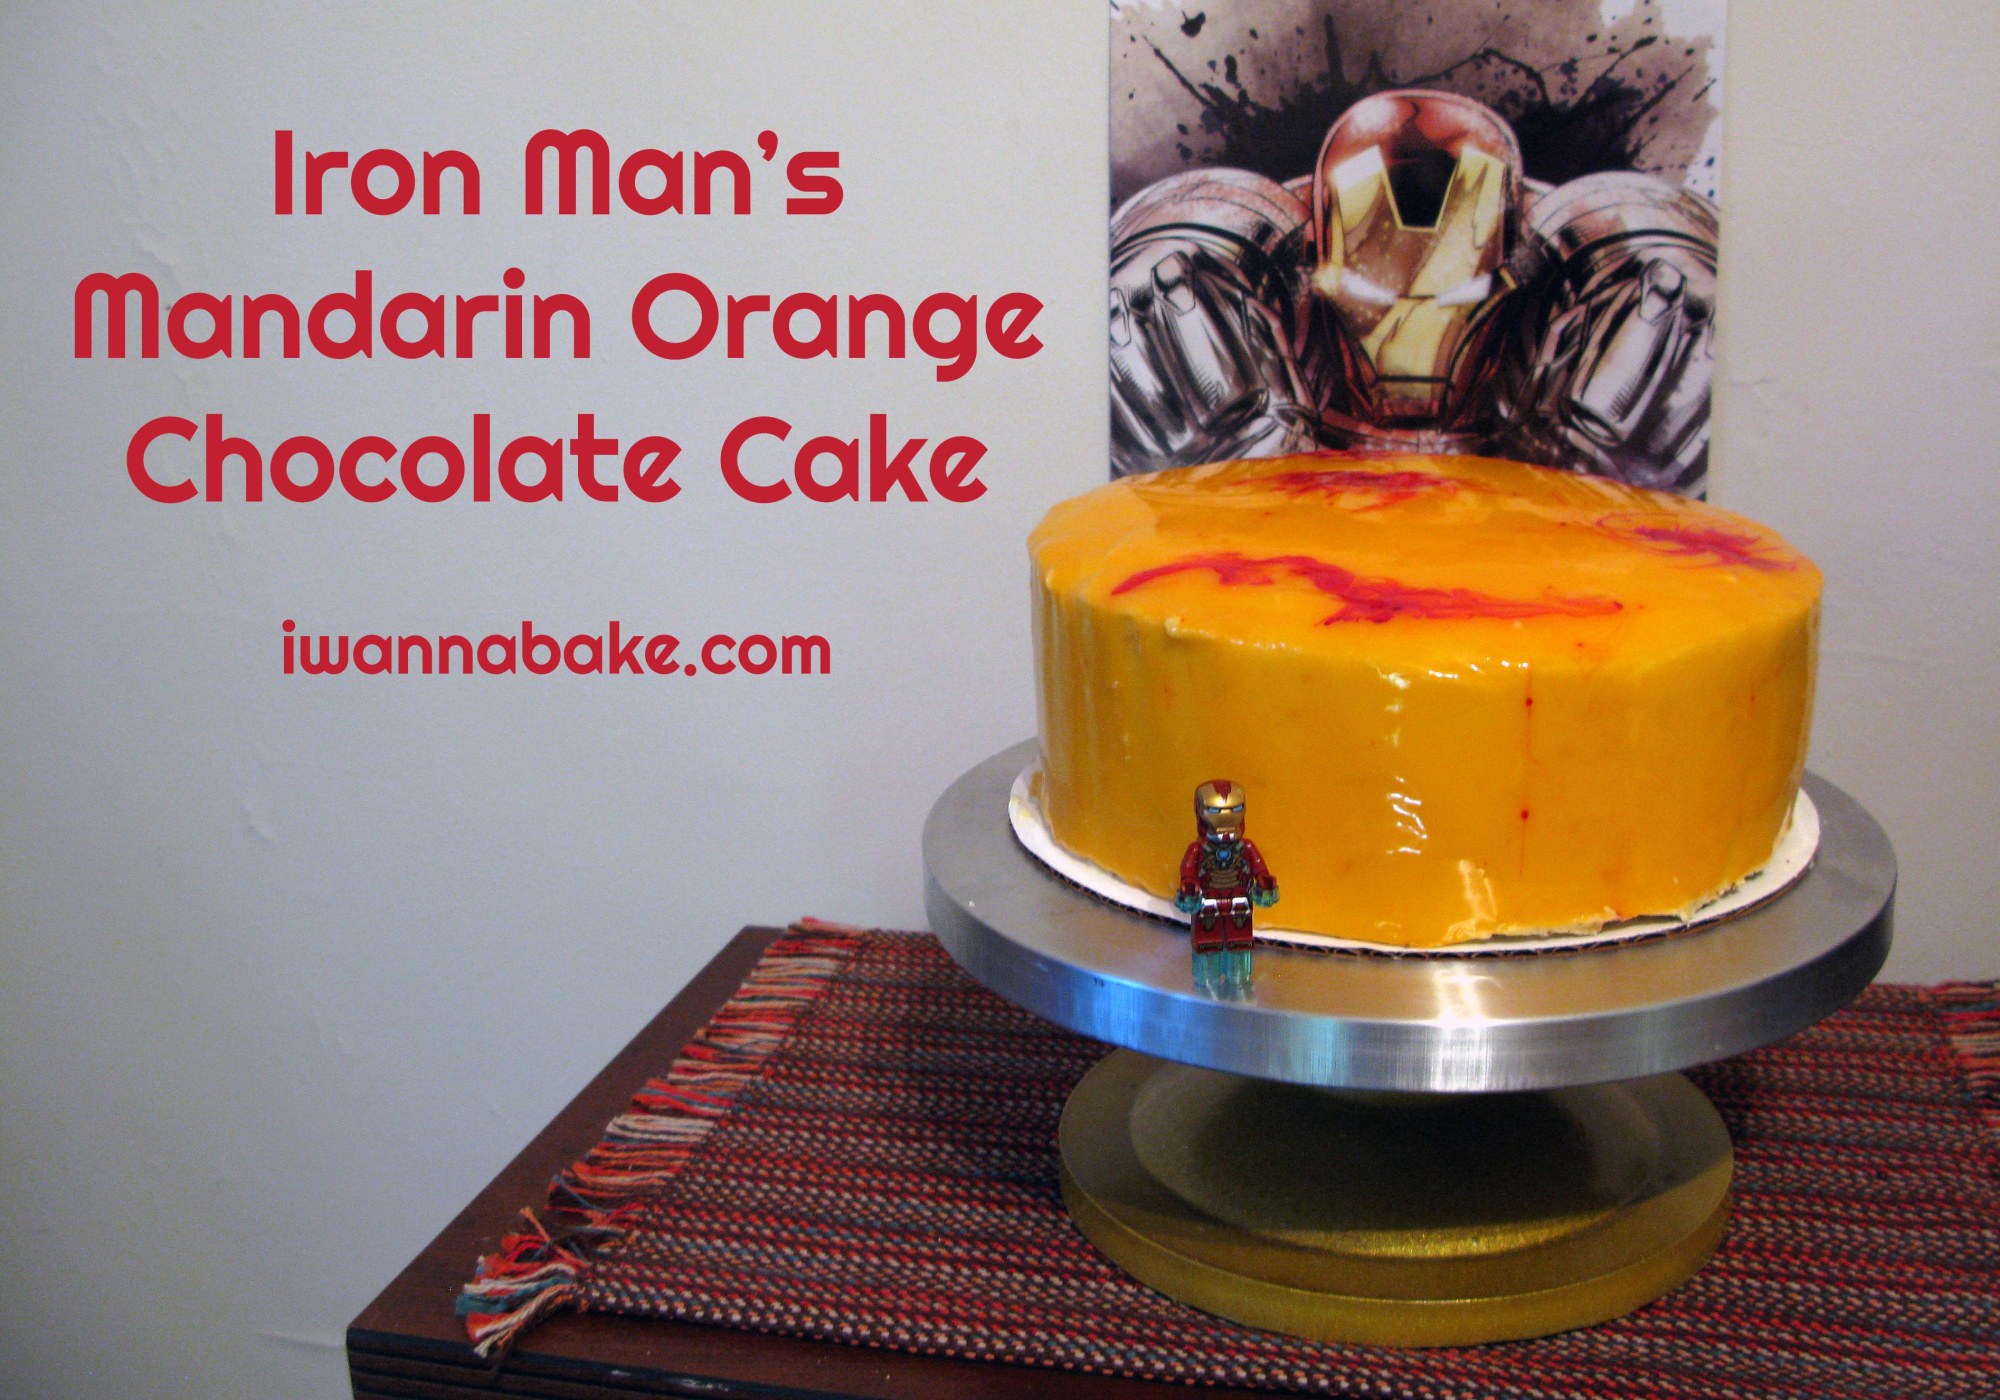

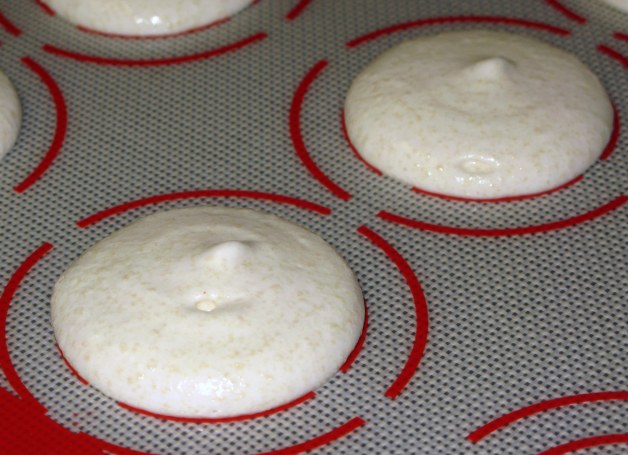
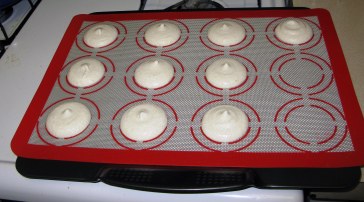
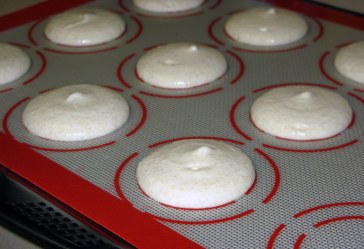
 Just kidding, I still consider myself a novice. I will keep trying and, hopefully, improve my technique with practice. If you’ve mastered the macaron, I’d love to hear the secrets of your witchcraft!