Tag: Captain America’s Shield Cookies

  • Captain America’s Shield Cookies

    Captain America’s Shield Cookies

    Captain America’s Shield Cookies !
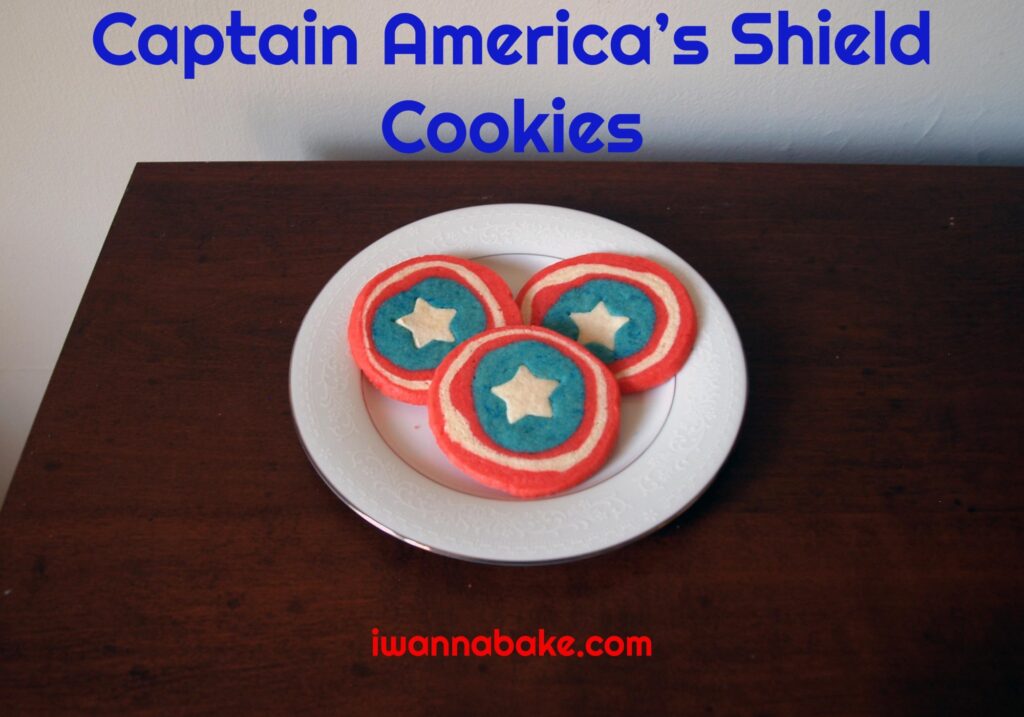
    Happy Independence Day in advance! If you’re looking for a fun and tasty holiday dessert with some added nerd cred, look no further! I bring you slice and bake cookies that look like Captain America’s shield! (So many exclamation points! Excitement! Yea!) After all, who better to grace your holiday dessert table than America’s most patriotic fictional character?

    Ok, I’m admittedly not that much of a Captain America fan, but I can still appreciate the craftsmanship of a shield made octional) Earth.  I appreciate it so much, that I decided it was time to make a (substantially less resilient) version out of cookie dough.  The process used is very similar to that for making my Watermelon Slice Cookies (also a great choice for a summer gathering).  In fact, I used the same recipe from Taste of Home for the dough, substituting vanilla extract for the almond extract because I just like it better.

    This cookie is a bit more involved than the watermelon cookie because it has more layers. Since I didn’t have a template to work with, I measured each layer relative to the others to achieve the right look (this will become clearer when you see the pictures below). If I were to make these again, I’d probably trim the overlapping edges of each layer of dough so that each concentric ring is more uniform. Where the layers overlap, there tends to be a bit of a bulge. The cookies are still pretty impressive, but they’d look a bit more professional with just the one simple, additional step.

    Using plastic wrap to store and roll out the dough pieces definitely makes this whole process easier. If you form your dough pieces into rectangles as wide as the intended length of your dough roll, then neatly wrap them in plastic wrap before chilling, you’ll be able to lengthen them with a rolling pin while still wrapped up. No need for flour, no worries about changing the width. It also helps to be able to roll each layer together for measurement purposes before sticking them together more permanently. Seriously, try it. You’ll thank me later.

    These cookies do take quite a bit of waiting time, so plan ahead if you need them for a specific date. As with many baked goods, none of the individual steps are very difficult, as long as you are careful. Keeping the dough cold at all times will help maintain its shape, and making sure that your dough pieces are of uniform thickness will ensure that the rings of your shields are regular (as you can see from the pictures, I was a little lazy in this area, and my finished product paid the price in lopsidedness). Just take your time, pay attention to each step, and you’ll have enviously patriotic and nerdy cookies before you know it!

    You will need the following ingredients For Captain America’s Shield Cookies

    For the cookies:

    • 2 cups all-purpose flour
    • ¼ tsp. baking powder
    • ⅛ tsp. salt
    • ¾ cup (1½ sticks) butter, softened (here’s a tutorial on softening butter for those who forgot to plan ahead)
    • ¾ cup granulated sugar
    • 1 large egg
    • ½ tsp. vanilla extract
    • red and blue food coloring

    For baking ambiance:

    I’m really not sure what got the idea in my head, but I had a serious urge to listen to the Eurythmics for this bakeventure.  Their ’80s synth is delightful and catchy.  Admittedly, they have nothing to do with Captain America or cookies, but that didn’t stop me, and it shouldn’t stop you either.

    Let’s get baking!

    Whisk together the flour, baking powder, and salt in a medium bowl.

    In the bowl of a stand mixer or other large mixing bowl, cream together the butter and sugar.

    Add in the egg and vanilla extract and beat the mixture until it is well-combined.

    Working in batches (I used two), slowly mix in the dry ingredients until they are fully-incorporated. Be sure to scrape the bottom and sides of the bowl so you don’t miss anything.

    Reserve ½ cup of the dough, then split the remaining dough in half. Place each piece of dough in a separate bowl. In one of the larger pieces of dough, make a well with your finger in the center and squeeze 15 drops of red food coloring into it.

    Knead the dough with your hands until the color is even throughout the dough. Do the same with the ½ cup of dough you put into another bowl, using 10 drops of blue food coloring instead. Leave the third piece of dough plain.

    Form the blue dough into a 3½”-long log and wrap it in plastic wrap.

    Break the red dough and the plain dough into two slightly unequal balls of dough each (the red ones remind me of the ripped out heart from Indiana Jones and the Temple of Doom).

    Flatten each piece of dough into a rectangle that is approximately 3½” wide and wrap them separately in plastic wrap. Don’t skip this step, because it will make the formation process much easier down the road.

    Refrigerate all of your dough packages for 2 hours.  When your dough is nice and firm, very carefully, wrap the smaller red rectangle around the blue cylinder (they should both still be in the plastic wrap at this point).  If it shows any sign of cracking, let it sit at room temperature for a few minutes to soften slightly.  If the rectangle doesn’t quite wrap all the way around, roll it a little bit longer.  Leaving the dough in the plastic wrap at this point both helps to keep the width uniform and makes flouring your dough and rolling pin unnecessary.

    Leaving the red dough wrapped around the blue dough, repeat the step above with the larger rectangle of white dough, then again with the remaining red rectangle. It will look a bit bizarre with all of the layers wrapped in plastic wrap, but you’re really doing this to make the measuring easier. When unrolled, each rectangle should look like the picture below.

    Finally, it’s time to put this roll together! Unwrap the smaller red rectangle first, but leave it sitting on its plastic wrap. Unwrap the blue log and place it on one of the short ends of the red dough. Using the plastic wrap to control the process, carefully roll the red dough around the blue long until its ends join. Gently squeeze/press the red ends together to seal them.

    Repeat the process with the white dough, then again with the remaining piece of red dough.

    Wrap the whole long in plastic wrap and refrigerate it overnight. If you don’t have the time to wait, you can freeze it for 1-2 hours instead (I did this with the watermelon cookies and it worked fine). I created a makeshift tube out of a paper towel tube to help preserve the shake of the log while it chilled, and it worked great. To do this, cut a paper towel tube in half, then split one half lengthwise so that you have two boat-shaped pieces of cardboard. Wrap each piece of cardboard around the dough log so that the edges overlap, then tape them to hold them in place.

    When the roll is nice and firm, preheat your oven to 350°F. It’s best to do the prep work as far away from the hot oven as possible, as it’s easier to work with the dough when it’s colder. Unwrap the dough log, cut off and discard the rough ends, and cut it into 3/16″ thick slices (mine were a bit uneven, and they still turned out ok, so don’t stress out too much about making them perfect). Arrange them on greased or foil-lined baking sheets.

    Roll out the remaining plain dough rectangle to the same thickness as your cookie slices. Using a small, star-shaped cookie cutter, cut out as many stars as you have cookies (I had 16).

    Using the same cookie cutter, cut a blue star out of the center of each cookie. Bake the blue stars separately or discard them.

    Very carefully, insert a white star into the star-shaped hold in each cookie. Press gently around the edges of the cut to seal the pieces together.

    Bake the cookies for 9-11 minutes, or until the they have hardened a bit and are no longer shiny. You don’t want them to brown because it will ruin your carefully-designed color pattern.

    Let the cookies sit for 5 minutes on the cookie sheets, then remove them to cooling racks to cool completely. Serve immediately, or store them in an airtight container.

    Enjoy!

    Captain America’s Shield Cookies

    Captain America’s Shield Cookies

    Slice and bake cookies with concentric red, white, and blue rings and a white star center — just like Captain America's shield. A fun and impressive patriotic treat perfect for the 4th of July or any Marvel fan gathering
    Prep Time 1 hour
    Cook Time 11 minutes
    Total Time 9 hours 11 minutes
    Servings: 16
    Course: Breakfast, Dessert, Snack
    Cuisine: American

    Ingredients
      

    • 2 cups all-purpose flour
    • ¼ tsp baking powder
    • tsp salt
    • ¾ cup unsalted butter, softened (1½ sticks)
    • ¾ cup granulated sugar
    • 1 large egg
    • ½ tsp vanilla extract
    • red gel food coloring
    • blue gel food coloring

    Method
     

    Make the Dough
    1. In a medium bowl whisk together the flour, baking powder, and salt. Set aside
    2. In a large mixing bowl or stand mixer, cream together the butter and sugar until light and fluffy. Add the egg and vanilla extract and beat until well combined
    3. Mix in the dry ingredients in two batches until fully incorporated, scraping the sides and bottom of the bowl as you go
    Divide and Color
    1. Reserve ½ cup of dough and set aside. Divide the remaining dough in half — you will have two larger pieces and one small piece
    2. Color one large piece red by making a well in the center, adding about 15 drops of red food coloring, and kneading until the color is completely even throughout
    3. Color the reserved ½ cup piece blue using about 10 drops of blue food coloring and kneading until uniform. Leave the remaining large piece plain white
    4. Form the blue dough into a log approximately 3½ inches long and wrap tightly in plastic wrap
    5. Divide the red dough into two slightly unequal pieces and the white dough into two slightly unequal pieces. Flatten each piece into a rectangle approximately 3½ inches wide. Wrap each piece separately in plastic wrap
    6. Refrigerate all dough pieces for 2 hours until firm
    Build the Log
    1. Working with everything still in plastic wrap where possible, carefully wrap the smaller red rectangle around the blue log. If the dough cracks let it sit at room temperature for a few minutes to soften slightly. Roll the rectangle a little longer if it does not quite wrap all the way around. Press the ends together gently to seal
    2. Wrap the larger white rectangle around the red-wrapped blue log in the same way, then wrap the remaining red rectangle around that. Keep the dough as cold as possible throughout
    3. Unwrap each layer as you go to permanently attach it — roll each rectangle around the previous layer, using the plastic wrap to guide the process and keep the width uniform. Press the seams together firmly to seal after each layer
    4. Wrap the completed log tightly in plastic wrap. For best results, slide it into a paper towel tube cut lengthwise to help maintain a round shape while chilling. Refrigerate overnight or freeze for 1–2 hours until very firm
    Cut, Star, and Bake
    1. Preheat oven to 350°F. Work as far from the hot oven as possible to keep the dough cold. Unwrap the log, trim and discard the rough ends, and cut into slices approximately 3/16 inch thick. Arrange on greased or foil-lined baking sheets
    2. Roll out the remaining plain white dough rectangle to the same thickness as the cookie slices. Cut out as many small stars as you have cookies using a star-shaped cookie cutter
    3. Using the same cutter, cut a star shape out of the center of each cookie slice. Bake the removed blue stars separately or discard
    4. Carefully press a white star into the star-shaped hole in each cookie. Press gently around the edges to seal the pieces together
    5. Bake for 9–11 minutes until the cookies have hardened slightly and are no longer shiny on top. Do not let them brown — browning will ruin the color pattern
    6. Cool on the baking sheets for 5 minutes then transfer to a wire rack to cool completely. Store in an airtight container

    Notes

    Keep the dough cold at every stage — warm dough loses its shape and the rings will blur together. Wrapping dough pieces in plastic wrap before rolling them around each other keeps the width uniform and eliminates the need for flour. For cleaner concentric rings, trim the overlapping edges of each layer before attaching the next one. These cookies take significant chilling time so plan at least one day ahead. Gel food coloring gives more vibrant red and blue than liquid coloring