Tag: and answers to common questions

  • Crusty Cranberry Nut No-Knead Bread

    Crusty Cranberry Nut No-Knead Bread

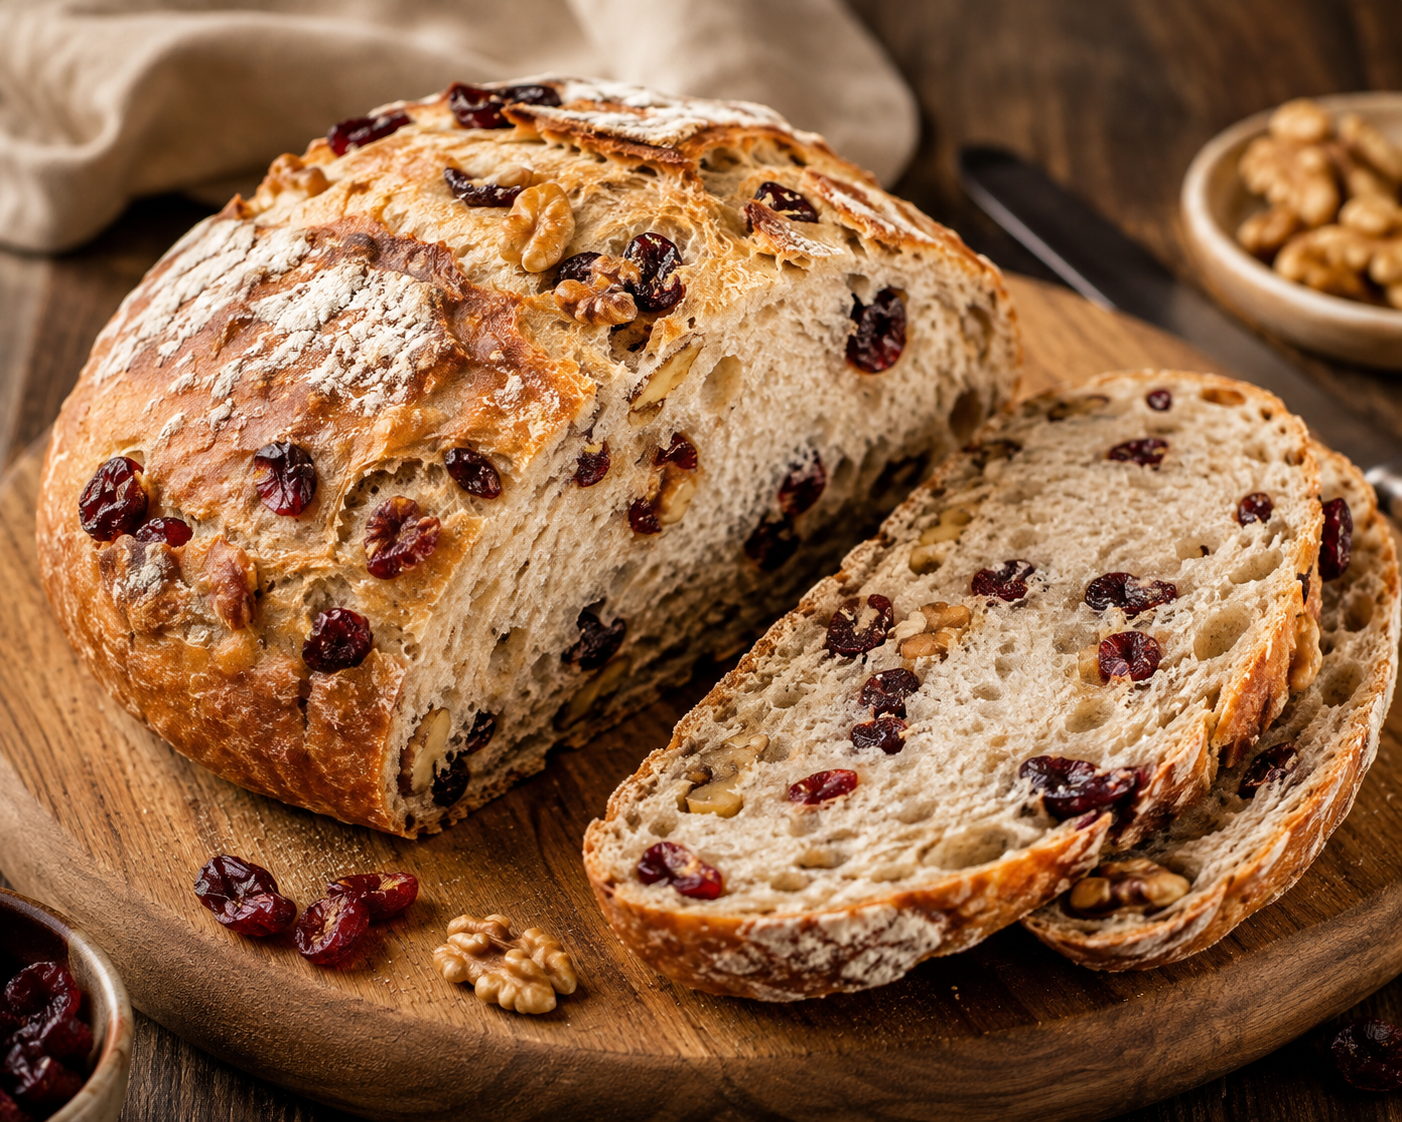
    no-knead cranberry walnut bread

    No-Knead Cranberry Walnut Bread

    There is nothing quite like pulling a loaf of crusty, golden bread out of the oven, and this no-knead cranberry walnut bread makes it almost impossible to get wrong. The crust shatters when you slice into it, the crumb is soft and chewy, and every bite is dotted with tart cranberries and toasted walnuts. Best of all, you don’t need a stand mixer, kneading skills, or hours of active work — just a bowl, a spoon, and a little patience while the dough rises overnight.
    This recipe is built on the classic no-knead bread method that home bakers have relied on for years, adapted here with dried cranberries and walnuts for a loaf that feels perfect for fall and winter baking, holiday breakfasts, or simply upgrading your everyday sandwich bread. If you’ve been searching for a no-knead cranberry walnut bread recipe that actually works on the first try, this is the one to bookmark.

    Why This Recipe Works

    ⦁ The long, slow rise (12–18 hours) does the work that kneading normally would, developing gluten with almost no effort from you.
    ⦁ A hot Dutch oven traps steam around the dough, giving the loaf a bakery-style crust without any special equipment.
    ⦁ Toasting the walnuts before mixing them in deepens their flavor so they don’t taste flat against the tart cranberries.
    ⦁ The dough comes together in one bowl in about 10 minutes, so the hands-on time is genuinely minimal.

    Ingredients You’ll Need

    This recipe makes one round loaf, about 12 slices. Exact measurements are listed in the recipe card below, but here’s what you’ll be working with:
    3 cups (375 g) all-purpose flour
    ⦁ 1 3/4 teaspoons fine salt
    ⦁ 1/2 teaspoon instant yeast
    1 1/2 cups (355 ml) cool water
    ⦁ 3/4 cup (85 g) dried cranberries
    ⦁ 3/4 cup (85 g) walnuts, roughly chopped and lightly toasted
    ⦁ Extra flour or cornmeal, for dusting

    Ingredient Substitutions

    This bread is forgiving. Use the table below if you need to swap an ingredient based on what’s in your pantry.

    IngredientPossible SubstituteNotes
    Dried cranberriesRaisins, dried cherries, or dried blueberriesUse any dried fruit of similar size; no need to soak
    WalnutsPecans or omit entirelyToast nuts first for the best flavor
    All-purpose flourBread flourBread flour gives a slightly chewier crumb; use the same amount
    Instant yeastActive dry yeastUse the same amount, but dissolve in the water for 5 minutes first
    Dutch ovenHeavy oven-safe pot with a lidAny tightly-lidded, oven-safe pot works; a cast-iron pot browns best

    How to Make No-Knead Cranberry Walnut Bread

    Below is the quick overview of the method. Full ingredient amounts and printable instructions are in the recipe card near the bottom of this article.

    Mix the dough

    1. Mix the dough
      Stir together flour, salt, and yeast, then add cool water and mix just until no dry flour remains. Fold in the cranberries and walnuts. The dough should look shaggy and wet, not smooth — that’s normal for no-knead bread.

    Let it rise, low and slow

    Cover the bowl and leave it at room temperature for 12 to 18 hours. This is the step that replaces kneading. You’ll know it’s ready when the surface is bubbly, the dough has roughly doubled, and it looks loose and webby.

    Shape and proof

    Fold the dough into a rough ball on a floured surface, let it rest briefly, then shape it into a tight round. A second rise of 1 to 2 hours gives the loaf its final structure before baking.

    Bake in a hot Dutch oven

    Baking covered for the first 30 minutes traps steam and creates that crackly, crisp crust. Removing the lid for the final 15 to 20 minutes lets the crust turn deep golden brown.

    What the Dough Should Look Like

    After mixing, the dough will be sticky, rough, and almost batter-like in places — resist the urge to add more flour. After the long rise, it should have visibly doubled, feel airy when you lift the bowl, and hold together in stretchy strands when you pull a spoon through it. If it still looks tight and smooth after 18 hours, your kitchen is likely too cold, and it needs more time.

    Expert Tips for the Best Crust and Crumb

    ⦁ Use a kitchen scale for the flour if you have one — measuring by volume is the most common source of a dense loaf.
    ⦁ Let the Dutch oven preheat fully for the full 30 minutes; a pot that isn’t hot enough won’t give you that crackling crust.
    ⦁ Score the dough confidently in one quick motion right before it goes into the pot, so the loaf expands evenly as it bakes.
    ⦁ Cool the bread completely before slicing — this can be the hardest tip to follow, but it protects the texture of the crumb.

    Common Mistakes to Avoid

    ⦁ Skipping the first long rise, which leaves the dough under-developed and the crumb dense.
    ⦁ Using a cold kitchen without adjusting the rise time, which slows fermentation significantly.
    ⦁ Adding raw walnuts straight from the bag — toasting them first makes a noticeable difference in flavor.
    ⦁ Slicing into a warm loaf, which can make the crumb gummy instead of tender.

    Variations to Try

    Orange-Cranberry Walnut Bread: add 1 tablespoon of orange zest to the dough for a bright, citrusy note.
    Cinnamon Cranberry Bread: add 1 teaspoon of ground cinnamon along with the flour.
    ⦁ Seeded Crust: brush the shaped loaf with water and roll it in oats or sesame seeds before baking.
    ⦁ Herbed Version: swap the cranberries and walnuts for rosemary and pecans for a savory take on the same base dough.

    Serving Suggestions

    This loaf is delicious on its own with a smear of salted butter, but it also holds up well as a base for sandwiches, especially with turkey, brie, or sharp cheddar. Toasted slices make an excellent match for soups and stews, and it’s a lovely addition to a holiday breadbasket alongside honey or fruit preserves.

    How to Store and Freeze

    Store the cooled loaf at room temperature, cut-side down on a cutting board or in a paper bag, for up to 3 days. Avoid storing it in plastic if you want to keep the crust crisp, since plastic traps moisture and softens it. For longer storage, slice the bread and freeze it in an airtight bag for up to 3 months; pull out individual slices and toast them straight from the freezer.

    Troubleshooting

    My dough didn’t rise much overnight.

    This is almost always a temperature issue. If your kitchen is below 68°F, the rise will take longer — give it a few extra hours rather than moving to the next step early.

    My crust turned out soft instead of crisp.

    This usually means the Dutch oven wasn’t fully preheated, or the lid was removed too early. Make sure the pot heats for the full 30 minutes and keep the lid on for the entire first half of baking.

    My loaf spread out flat instead of holding its shape.

    A flat loaf typically means the dough was under-proofed at the shaping stage or handled too gently when forming the round. Shape it firmly, with enough tension on the surface to hold its structure through the second rise.

    Frequently Asked Questions

    Can I use fresh or frozen cranberries instead of dried?

    Dried cranberries are best here because they hold their shape and won’t add extra moisture to the dough. Fresh or frozen cranberries release liquid as they bake and can make the crumb dense and gummy, so they are not recommended for this recipe.

    Do I really need a Dutch oven?

    A Dutch oven is what creates that shatter-crisp crust, because the lid traps steam around the dough as it bakes. If you don’t have one, any heavy, oven-safe pot with a tight-fitting lid will work in its place.

    Can I speed up the rise if I don’t have 12 to 18 hours?

    The long, slow rise is what builds flavor and structure in no-knead bread, so it isn’t a step to skip. If you’re short on time, you can shorten the rise to about 8 hours by increasing the yeast to 3/4 teaspoon, though the flavor will be slightly less developed.

    Why did my loaf turn out dense or flat?

    A dense loaf almost always means the first rise wasn’t long enough, or the dough was resting somewhere too cold. Look for a dough that has visibly doubled and is full of bubbles before you shape it; if it isn’t there yet, give it more time rather than moving on.

    Can I add orange zest or spices?

    Yes. A tablespoon of orange zest, a teaspoon of cinnamon, or a pinch of ground cardamom all pair beautifully with the cranberries and walnuts, and can be folded in at the same step as the fruit and nuts.

    Related Recipes on Iwannabake.com

    If you enjoyed this recipe, you may also like:
    ⦁ Classic No-Knead Bread Recipe for Beginners
    Small Batch Brownies for When You Don’t Want a Full Pan
    Banana Bread Without Eggs
    2 Banana Banana Bread
    ⦁ Why Did My Cookies Spread? Common Baking Problems Explained

  • Apple Cinnamon Rolls

    Apple Cinnamon Rolls

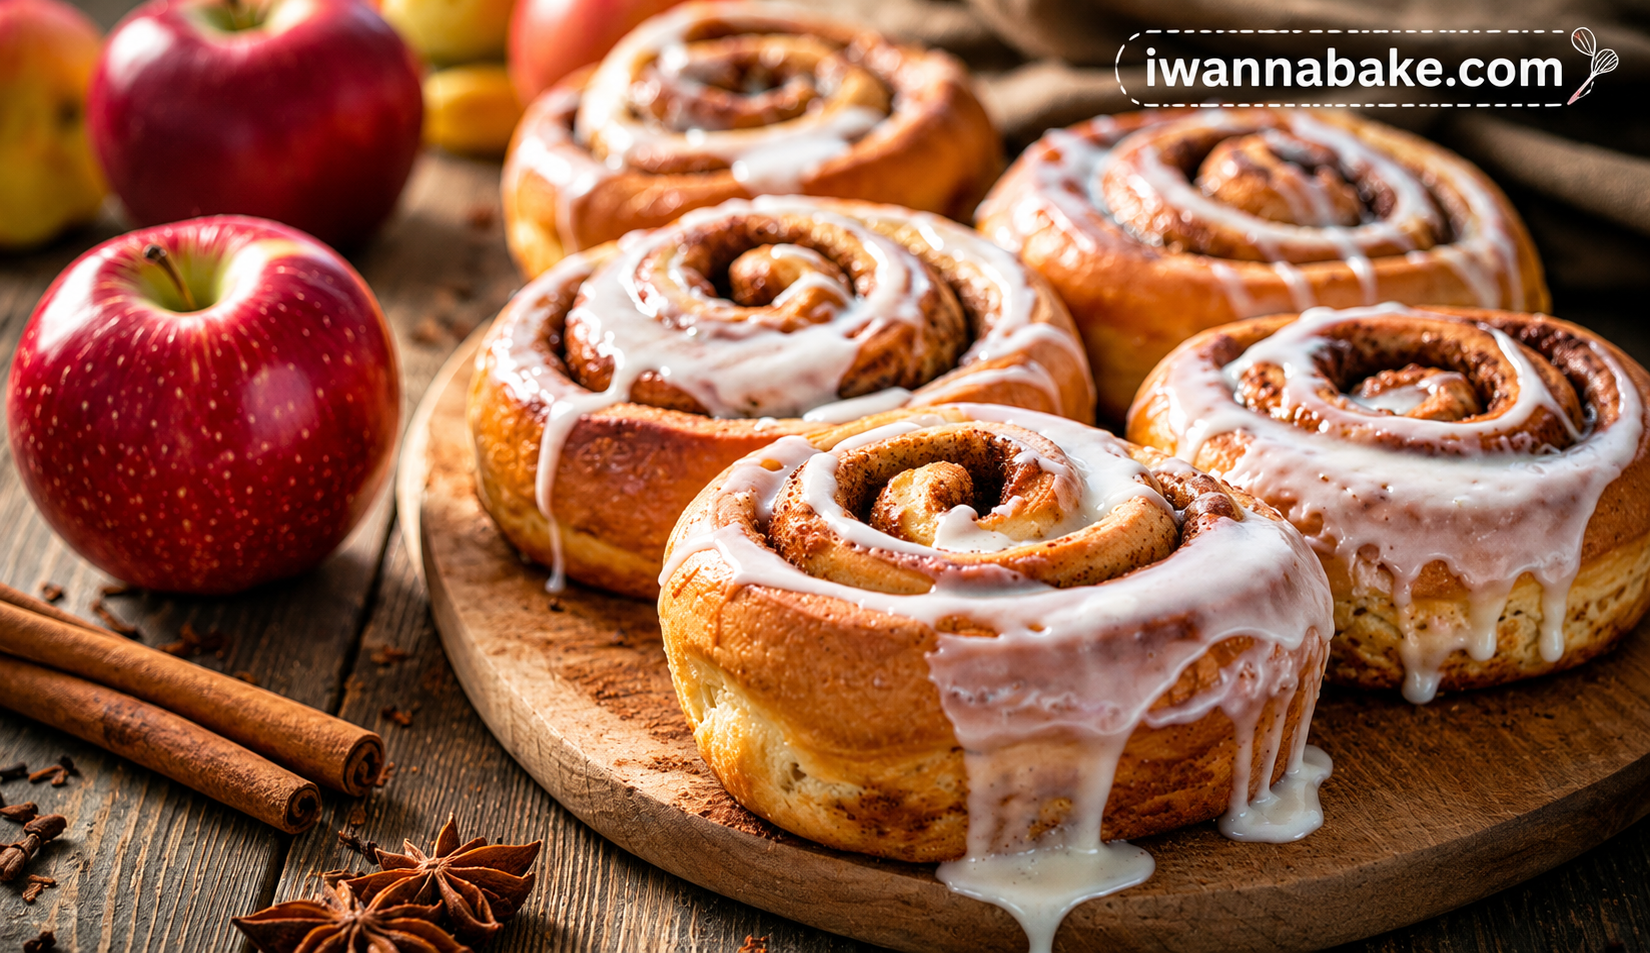
    small batch apple cinnamon rolls

    There’s something about the smell of cinnamon rolls baking that instantly makes a kitchen feel like fall, and adding real apple pieces to the mix only makes it better. These small batch apple cinnamon rolls give you soft, pillowy dough wrapped around a buttery cinnamon-apple filling, all finished with a simple cream cheese icing.
    Unlike most cinnamon roll recipes that fill an entire 9×13 pan,1 this one makes just 6 rolls. That means less dough to knead, less filling to prep, and no half-eaten pan of rolls sitting on your counter for a week. It’s the perfect weekend baking project for one or two people, or a smaller family breakfast.

    Why This Recipe Works

    Real apple flavor in every bite. Diced apples are cooked down slightly before rolling so they soften into the dough instead of staying raw and watery.
    ⦁ What You’ll NeedGenuinely small batch. Six rolls fit neatly into a small baking dish, so you’re not stuck with leftovers you don’t want.
    ⦁ Soft, enriched dough. A touch of milk and butter keeps the dough tender without needing a stand mixer.
    ⦁ No overnight wait. Many cinnamon roll recipes require refrigerating the dough overnight. This one is ready in about two hours, start to finish.

    What You’ll Need

    The full recipe card below has exact measurements, but here’s what each ingredient is doing:
    ⦁ All-purpose flour – gives the dough enough structure to hold its shape while staying soft once baked.
    ⦁ Instant yeast – speeds up the rise so you don’t need to wait for a sponge to activate separately.
    ⦁ Warm milk and melted butter – these enrich the dough and keep it tender rather than bread-like.
    ⦁ Apples – a firm, slightly tart variety like Granny Smith or Honeycrisp holds its shape best during baking.
    ⦁ Brown sugar and cinnamon – the classic filling base, with brown sugar adding moisture that granulated sugar can’t.
    ⦁ Cream cheese icing – a simple mix of cream cheese, powdered sugar, and milk that sets into a soft, tangy glaze rather than a hard sugar coating.

    Ingredient Substitutions

    IngredientSubstituteNotes
    Instant yeastActive dry yeastDissolve in warm milk for 5-10 minutes before using; rise time may be slightly longer
    Granny Smith applesHoneycrisp or Braeburn applesChoose a firm apple so it doesn’t turn mushy during baking
    Brown sugarGranulated sugar + 1 tsp molassesKeeps the filling moist and deeply flavored
    Cream cheese icingSimple powdered sugar glaze (powdered sugar + milk)Lighter, less tangy finish
    Whole milk2% milk or dairy-free milkDough will be slightly less rich but still soft

    Small Batch Apple Cinnamon Rolls

    Soft, buttery rolls filled with cinnamon-sugar and tender diced apples, topped with a tangy cream cheese icing. This small batch recipe makes just 6 rolls, perfect for a cozy weekend breakfast without a mountain of leftovers.
    Prep time: 30 minutes
    Rise time: 45 minutes
    Cook time: 22 minutes
    Total time: 1 hour 37 minutes
    Servings: 6 rolls
    Category: Breakfast, Dessert
    Cuisine: American

    Ingredients

    For the dough:
    ⦁ 2 cups all-purpose flour
    ⦁ 2 1/4 tsp instant yeast (1 packet)
    ⦁ 2 tbsp granulated sugar
    ⦁ 1/2 tsp salt
    ⦁ 1/2 cup warm whole milk (about 110°F)
    ⦁ 2 tbsp unsalted butter, melted
    ⦁ 1 large egg
    For the apple cinnamon filling:
    ⦁ 1 medium Granny Smith apple, peeled and finely diced
    ⦁ 2 tbsp unsalted butter, softened
    ⦁ 1/3 cup brown sugar, packed
    ⦁ 1 1/2 tsp ground cinnamon
    ⦁ 1/4 tsp ground nutmeg
    For the cream cheese icing:
    ⦁ 2 oz cream cheese, softened
    ⦁ 1/2 cup powdered sugar
    ⦁ 1-2 tbsp milk, as needed
    ⦁ 1/4 tsp vanilla extract

    Instructions

    1. Activate the dough. In a large bowl, whisk together the flour, instant yeast, sugar, and salt. Add the warm milk, melted butter, and egg. Stir with a spatula, then knead by hand on a floured surface for about 5 minutes until the dough is smooth and slightly tacky.
    2. Let it rise. Place the dough in a lightly oiled bowl, cover with a towel, and let rise in a warm spot for 30-35 minutes, until roughly doubled in size.
    3. Prepare the apple filling. While the dough rises, cook the diced apple with 1 tablespoon of butter in a small skillet over medium heat for 3-4 minutes, just until slightly softened. Remove from heat and let cool.
    4. Mix the cinnamon sugar. In a small bowl, combine the brown sugar, cinnamon, and nutmeg.
    5. Roll out the dough. Punch down the risen dough and roll it into a 9×12-inch rectangle on a floured surface.
    6. Fill and roll. Spread the softened butter evenly over the dough. Sprinkle the cinnamon sugar mixture on top, then scatter the cooked apple pieces evenly across the surface. Starting from a long edge, roll the dough tightly into a log.
    7. Slice. Using a sharp knife or unflavored dental floss, slice the log into 6 equal rolls.
    8. Second rise. Arrange the rolls cut-side up in a greased 8-inch baking dish. Cover and let rise for another 15-20 minutes while you preheat the oven to 350°F (175°C).
    9. Bake. Bake for 20-22 minutes, until the rolls are golden brown and the centers are set but still soft.
    10. Ice and serve. Let the rolls cool for 10 minutes. Meanwhile, whisk together the cream cheese, powdered sugar, milk, and vanilla until smooth. Drizzle over the warm rolls before serving.

    Recipe Notes

    ⦁ Pre-cooking the apples for a few minutes keeps them from releasing too much moisture into the dough while baking.
    ⦁ Dental floss makes cleaner slices than a knife, since it won’t squash the rolled dough.
    ⦁ The dough should feel tacky but not sticky to the touch. If it sticks heavily to your hands, add flour 1 tablespoon at a time while kneading.

    What the Dough Should Look Like

    After kneading, the dough should be smooth, elastic, and spring back slowly when poked. It should feel soft but hold its shape, not spread out flat on the counter. After the first rise, it should have visibly doubled and feel airy and light when pressed.

    Common Mistakes to Avoid

    ⦁ Milk that’s too hot. Milk above 120°F can kill the yeast, preventing the dough from rising. Aim for warm, not hot, similar to bathwater.
    ⦁ Skipping the apple pre-cook. Raw diced apple releases too much liquid during baking, making the rolls soggy in the center.
    ⦁ Rolling the dough too loosely. A loose roll leads to rolls that unravel and bake unevenly. Roll firmly but gently from the start.
    ⦁ Overbaking. Rolls continue to set as they cool. Pull them out when the tops are golden and the centers look just set.

    Variations to Try

    ⦁ Caramel apple rolls – drizzle warm caramel sauce over the icing for an extra layer of flavor.
    ⦁ Pecan apple rolls – sprinkle 2 tablespoons of chopped pecans over the filling before rolling for added crunch.
    ⦁ Maple icing – replace the vanilla extract with 1/2 teaspoon maple extract and a tablespoon of maple syrup for a fall-forward glaze.
    ⦁ Spiced version – add 1/4 teaspoon ground cloves or allspice to the cinnamon sugar for a deeper spice flavor.

    Storage and Freezing

    At room temperature: Store leftover rolls in an airtight container for up to 2 days. Warm briefly before serving for the best texture.
    In the fridge: Iced rolls will keep for up to 5 days in an airtight container in the refrigerator. Let them come to room temperature or microwave for 15-20 seconds before eating.
    In the freezer: Freeze the unbaked, sliced rolls (before the second rise) in a freezer-safe dish, tightly wrapped, for up to 2 months. Thaw overnight in the fridge, then let rise at room temperature for 45-60 minutes before baking as directed. Baked, unfrosted rolls can also be frozen for up to 2 months and reheated in the oven.

    Troubleshooting

    My rolls didn’t rise.
    This is usually caused by yeast that’s expired or milk that was too hot and killed the yeast. Check the expiration date on your yeast and make sure your milk feels warm, not hot, to the touch.
    My rolls are dense instead of fluffy.
    This often means the dough wasn’t kneaded long enough, or too much flour was added during kneading. The dough should stay soft and slightly tacky.
    The filling leaked out during baking.
    Make sure the apples are well-drained after cooking and that the dough log is rolled tightly before slicing.
    Can I make the dough ahead of time?
    Yes. After the first rise, shape and slice the rolls, place them in the baking dish, cover tightly, and refrigerate overnight. Let them sit at room temperature for 30-45 minutes before baking.
    What’s the best apple to use for cinnamon rolls?
    A firm, slightly tart apple like Granny Smith holds its shape well during baking. Honeycrisp is a good alternative if you prefer a sweeter filling.

    Frequently Asked Questions

    Can I double this recipe?
    Yes, this recipe doubles well. Use a 9×13-inch baking dish instead of an 8-inch dish to fit all 12 rolls with enough room to rise.
    Do I need a stand mixer?
    No. This dough comes together easily by hand with about 5 minutes of kneading.

    Can I make the dough ahead of time
    Yes. After the first rise, shape and slice the rolls, place them in the baking dish, cover tightly, and refrigerate overnight. Let them sit at room temperature for 30-45 minutes before baking.
    What’s the best apple to use for cinnamon rolls?
    A firm, slightly tart apple like Granny Smith holds its shape well during baking. Honeycrisp is a good alternative if you prefer a sweeter filling.

    You Might Also Like

    ⦁ Small Batch Cinnamon Rolls
    2 Banana Bread
    ⦁ Small Batch Muffins
    Banana Bread Without Eggs
    ⦁ Small Batch Chocolate Chip Cookies

    \

    Small batch apple cinnamon rolls topped with cream cheese icing in a baking dish
    benbaker0078

    Small Batch Apple Cinnamon Rolls

    Soft, buttery cinnamon rolls filled with real diced apples and cinnamon-sugar, topped with a tangy cream cheese icing. This small batch recipe makes just 6 rolls, so you get all the cozy fall flavor without a giant pan of leftovers.
    Prep Time 30 minutes
    Cook Time 22 minutes
    Total Time 1 hour 37 minutes
    Servings: 6 roll
    Course: Breakfast, Dessert
    Cuisine: American
    Calories: 310

    Ingredients
      

    Dough
    • 2 cups all-purpose flour
    • 2 1/4 tsp instant yeast (1 packet)
    • 2 tbsp granulated sugar
    • 1/2 tsp salt
    • 1/2 cup warm whole milk (about 110°F)
    • 2 tbsp unsalted butter, melte
    • 1 large egg
    Apple Cinnamon Filling
    • 1 medium Granny Smith apple, peeled and finely diced
    • 2 tbsp unsalted butter, softened
    • 1/3 cup brown sugar, packed
    • 1/2 tsp ground cinnamon
    • 1/4 tsp ground nutmeg
    Cream Cheese Icing
    • 2 oz cream cheese, softened
    • 1/2 cup powdered sugar
    • 1-2 tbsp milk, as needed
    • 1/4 tsp vanilla extract

    Equipment

    • Mixing bowl
    • Rolling Pin
    • 8-inch baking dish
    • Small skillet
    • Sharp knife or unflavored dental floss

    Method
     

    Make the Dough
    1. 1. In a large bowl, whisk together the flour, instant yeast, sugar, and salt
    2. 2. Add the warm milk, melted butter, and egg. Stir with a spatula, then knead by hand on a floured surface for about 5 minutes until the dough is smooth and slightly tacky.
    3. 3. Place the dough in a lightly oiled bowl, cover with a towel, and let rise in a warm spot for 30-35 minutes, until roughly doubled in size.
    Prepare the Filling
    1. 1. While the dough rises, cook the diced apple with 1 tablespoon of butter in a small skillet over medium heat for 3-4 minutes, just until slightly softened. Remove from heat and let cool.
    2. 2. In a small bowl, combine the brown sugar, cinnamon, and nutmeg.
    Assemble and Bake
    1. 1. Punch down the risen dough and roll it into a 9×12-inch rectangle on a floured surface.
    2. 2. Spread the softened butter evenly over the dough. Sprinkle the cinnamon sugar mixture on top, then scatter the cooked apple pieces evenly across the surface.
    3. 3. Starting from a long edge, roll the dough tightly into a log. Using a sharp knife or unflavored dental floss, slice the log into 6 equal rolls.
    4. 4. Arrange the rolls cut-side up in a greased 8-inch baking dish. Cover and let rise for another 15-20 minutes while you preheat the oven to 350°F (175°C).
    5. 5. Bake for 20-22 minutes, until the rolls are golden brown and the centers are set but still soft.
    Ice and Serve
    1. 1. Let the rolls cool for 10 minutes.
    2. 2. Meanwhile, whisk together the cream cheese, powdered sugar, milk, and vanilla until smooth.
    3. 3. Drizzle the icing over the warm rolls before serving.

    Notes

    ⦁ Pre-cooking the apples for a few minutes keeps them from releasing too much moisture into the dough while baking.
    ⦁ Dental floss makes cleaner slices than a knife, since it won’t squash the rolled dough.
    ⦁ The dough should feel tacky but not sticky. If it sticks heavily to your hands, add flour 1 tablespoon at a time while kneading.
    ⦁ For make-ahead rolls, refrigerate the sliced, unrisen rolls overnight, then let sit at room temperature for 30-45 minutes before baking.
  • CORTADO

    CORTADO

    Learn how to make Cortado step by step — ingredients, method, and answers to common questions, ready in 3 minutes.

    Cortado is one of those drinks that looks complicated behind a counter but is genuinely simple once you know the ratios. Here’s the step-by-step method we use.

    For CORTADO What You’ll Need

    • Coffee beans (dose) – 18 gr
      ⦁ Milk – 150 gr

    Prep time: 3 minutes Cup size: 6 OZ

    Step-by-Step Instructions

    • First, prepare double ristretto.
    • Then heat milk to 65-70 degrees with the minimum quantity foam, then pour in espresso.

    Tips for a Better Cortado

    • ⦁ Heating milk past 70°C starts to break down its natural sweetness and can scald it — a thermometer helps until you get a feel for it by ear.
    • ⦁ Use freshly ground coffee where possible; pre-ground coffee loses aroma fast and flattens the final cup.
    • ⦁ Warm your cup before pouring — a cold cup pulls heat out of the drink and dulls the flavor.

    Frequently Asked Questions

    • Can I make Cortado without an espresso machine?

    Yes — a moka pot or a strong stovetop brew can stand in for espresso, though the crema and body will be lighter than a true espresso shot.

    • What milk works best?

    Whole milk gives the richest texture and steams most reliably, but oat and barista-blend plant milks are good dairy-free alternatives.

    • How do I keep it from tasting bitter?

    Bitterness usually comes from over-extracted espresso or milk that’s been overheated — keep milk under 70°C and don’t over-pull your shot.

    Check Out My Latest Blogs For More Recipes

  • Iced Matcha Latte 3 Minutes Recipe

    Iced Matcha Latte 3 Minutes Recipe

    Learn how to make Iced MatchaLatte- 3 Minutes Recipe – step by step — ingredients, method, and answers to common questions, ready in 3 minutes.

    Iced Latte is a café favorite for warm days — cold, refreshing, and ready in minutes. Here’s how to build it properly, step by step.

    For Iced Matcha Latte 3 Minutes Recipe What Ingredients You’ll Need:

    • ⦁ Coffee beans (dose) – 18gr
      ⦁ Ice cube – 160 gr
      ⦁ Milk – 180 gr

    Prep time: 3 minutes Cup size: 8 OZ

    Step-by-Step Instructions:

    • Prepare a shot of espresso using the coffee beans listed above.
    • To use a plastic cup for cold drinks.
    • First need to put ice cubes in a glass.
    • Then pour milk in a glass with ice cube.
    • Then break to prepare of double espresso and then to pour in espresso in a glass.

    Tips for a Better Iced Latte:

    • ⦁ Always add the ice before the coffee or milk — pouring hot espresso over ice first melts it too fast and waters the drink down.
      ⦁ Use a plastic or heavy glass built for cold drinks; a thin ceramic cup can crack with sudden temperature change.
      ⦁ For the best texture, use standard ice cubes rather than crushed ice unless the recipe specifically calls for crushed.

    Frequently Asked Questions

    • Will the ice water down my Iced Latte?

    A little dilution is normal and expected — it’s part of the drink. To minimize it, use larger ice cubes, which melt slower than small ones.

    • Can I make this ahead of time?

    The espresso and any syrups can be made ahead and chilled, but assemble with fresh ice right before serving for the best texture.

    • Can I use a plant-based milk?

    Yes, oat milk in particular holds up well over ice and doesn’t split the way some other plant milks can.

    Check Out My Latest Blogs For Interesting – Easy Recipes

    Iced Latte

    Iced Latte is a café favorite for warm days — cold, refreshing, and ready in minutes.
    Prep Time3 minutes
    Course: Beverage
    Cuisine: Café

    Materials

    • 18 Gram Coffee beans (dose)
    • 160 Gram Ice Cube
    • 180 Gram Milk

    Instructions

    • Prepare a shot of espresso using the coffee beans listed above.
    • To use a plastic cup for cold drinks.
    • First need to put ice cubes in a glass.
    • Then pour milk in a glass with ice cube.
    • Then break to prepare of double espresso and then to pour in espresso in a glass.
  • Oreo Milkshake Recipe

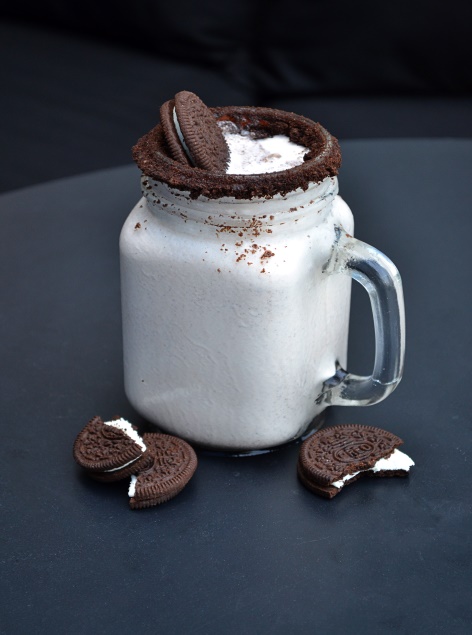
    Oreo Milkshake Recipe

    Learn how to make Oreo Milkshake step by step — ingredients, method, and answers to common questions, ready in 4 minutes.

    This Oreo Milkshake is thick, rich, and blended to order — the kind of drink that disappears fast. Here’s the exact method to get it smooth every time.

    For Oreo Milkshake What You’ll Need:

    • ⦁ Fresh Milk– 40ml
      ⦁ Vanilla Ice Cream – 4 scoop
      ⦁ Oreo Biscuit – 3pcs

    Prep time: 4 minutes Cup size: 12 OZ

    Step-by-Step Instructions:

    • In the blender, add 4scoop of vanilla ice cream, 3pcs of Oreo Biscuit and 3-4pcs cubes of ICE and 40 ml Fresh Milk.
    • Blend for 30sec until it become smooth.
    • Dip the jar upside down with nutella spread and crash oreo biscuit as per shown picture.Drizzle spiral the Nutella Spread on the jar.
    • Pour into the jar up to the top and add 1 pc of oreo biscuit as toppings.

    Tips for a Better Oreo Milkshake:

    • ⦁ Don’t over-blend — 30 seconds is usually enough. Blending too long melts the ice cream and thins the shake.
    • ⦁ Chill your glass beforehand if you can; it keeps the shake from losing its texture too quickly once poured.
    • ⦁ If your blender struggles, add the liquid ingredients first so the blades have something to grip before pulling in the ice.

    Frequently Asked Questions:

    • Can I make Oreo Milkshake without ice cream?

    You can substitute frozen banana or extra ice for some of the creaminess, but the texture and sweetness will change — ice cream is really doing the work here.

    • Can I make this dairy-free?

    Yes — swap in a dairy-free ice cream and plant-based milk; the flavor will shift slightly but the method stays the same.

    • My shake came out too thin — what happened?

    This usually means too much liquid relative to ice cream, or blending for too long. Add another scoop of ice cream and pulse briefly to thicken it back up.

    Learn how to make Oreo Milkshake step by step — ingredients, method, and answers to common questions, ready in 4 minutes.

    Oreo Milkshake

    This Oreo Milkshake is thick, rich, and blended to order — the kind of drink that disappears fast
    Prep Time 4 minutes
    Servings: 1 Cup
    Course: Beverage
    Cuisine: Café

    Ingredients
      

    • 40 ML Fresh Milk
    • 4 Scoop Vanilla Ice Cream
    • 3 Pcs Oreo Biscuit

    Method
     

    1. In the blender, add 4scoop of vanilla ice cream, 3pcs of Oreo Biscuit and 3-4pcs cubes of ICE and 40 ml Fresh Milk
    2. Blend for 30sec until it become smooth.
    3. Dip the jar upside down with nutella spread and crash oreo biscuit as per shown picture.Drizzle spiral the Nutella Spread on the jar.
    4. Pour into the jar up to the top and add 1 pc of oreo biscuit as toppings.
  • Mango Milkshake – Easy Recipe

    Mango Milkshake – Easy Recipe

    Learn how to make Mango Milkshake step by step — ingredients, method, and answers to common questions, ready in 4 minutes.

    Learn how to make Mango Milkshake step by step — ingredients, method, and answers to common questions, ready in 4 minutes.

    This Mango Milkshake is thick, rich, and blended to order — the kind of drink that disappears fast. Here’s the exact method to get it smooth every time.

    For Mango Milk Shake What You’ll Need:

    • ⦁ Ice cream 200 gr
      ⦁ Mango puree– 40 g
      ⦁ Mango sauce 100 gr
      ⦁ Fresh Milk 15g
      ⦁ Mango Fresh– 30gr ( Garnish)

    Prep time: 4 minutes Cup size: 12 OZ

    Step-by-Step Instructions:

    In the blender put the ice cream, mango puree, mango sauce and the fresh milk and blend for 30sec until it become smooth, with the mango sauce make a line inside and around to the cup and pour into the jar up to the top, and put the mango chuncks.

    Tips for a Better Mango Milkshake:

    • ⦁ Don’t over-blend — 30 seconds is usually enough. Blending too long melts the ice cream and thins the shake.
      ⦁ Chill your glass beforehand if you can; it keeps the shake from losing its texture too quickly once poured.
      ⦁ If your blender struggles, add the liquid ingredients first so the blades have something to grip before pulling in the ice.

    Frequently Asked Questions:

    • Can I make Mango Milkshake without ice cream?

    You can substitute frozen banana or extra ice for some of the creaminess, but the texture and sweetness will change — ice cream is really doing the work here.

    • Can I make this dairy-free?

    Yes — swap in a dairy-free ice cream and plant-based milk; the flavor will shift slightly but the method stays the same.

    • My shake came out too thin — what happened?

    This usually means too much liquid relative to ice cream, or blending for too long. Add another scoop of ice cream and pulse briefly to thicken it back up.

    Check Out My Latest Blogs For More Easy Recipes:

    Learn how to make Mango Milkshake step by step — ingredients, method, and answers to common questions, ready in 4 minutes.

    Mango Milkshake

    This Mango Milkshake is thick, rich, and blended to order — the kind of drink that disappears fast
    Prep Time 4 minutes
    Servings: 1 Cup ( 12OZ)
    Course: Beverage
    Cuisine: Café

    Ingredients
      

    • 200 Gram Ice cream
    • 40 Gram Mango Puree
    • 100 Gram Mango Sauce
    • 15 Gram Fresh Milk
    • 30 Gram Mango Fresh ( Garnish)

    Method
     

    1. In the blender put the ice cream, mango puree, mango sauce and the fresh milk and blend for 30sec until it become smooth, with the mango sauce make a line inside and around to the cup and pour into the jar up to the top, and put the mango chuncks.
  • Cappuccino-3 Minutes Recipe

    Cappuccino-3 Minutes Recipe

    There’s nothing like a well-made Cappuccino to start (or restart) your day. It only takes a few ingredients and a little technique to get café-quality results at home — here’s exactly how we make it.

    For Cappuccino-3 Minutes Recipe What You’ll Need:

    • ⦁ Coffee beans (dose) – 18 gr
      ⦁ Milk – 210 gr
      Prep time: 3 minutes Cup size: 8 OZ

    Step-by-Step Instructions:

    1 . Prepare a shot of espresso using the coffee beans listed above.
    2 . To heat milk to 65-70 degrees, then pour in espresso.

    Tips for a Better Cappuccino:

    • ⦁ Heating milk past 70°C starts to break down its natural sweetness and can scald it — a thermometer helps until you get a feel for it by ear.

      ⦁ Use freshly ground coffee where possible; pre-ground coffee loses aroma fast and flattens the final cup.

      ⦁ Warm your cup before pouring — a cold cup pulls heat out of the drink and dulls the flavor.

    Frequently Asked Questions:

    Can I make Cappuccino without an espresso machine?

    Yes — a moka pot or a strong stovetop brew can stand in for espresso, though the crema and body will be lighter than a true espresso shot.

    What milk works best?

    Whole milk gives the richest texture and steams most reliably, but oat and barista-blend plant milks are good dairy-free alternatives.

    How do I keep it from tasting bitter?

    Bitterness usually comes from over-extracted espresso or milk that’s been overheated — keep milk under 70°C and don’t over-pull your shot.

    Check Out My Latest Blogs For More Tips:

    Learn how to make Cappuccino step by step — ingredients, method, and answers to common questions, ready in 3 minutes.
    Ben 2

    Cappuccino

    There's nothing like a well-made Cappuccino to start (or restart) your day.
    Prep Time 3 minutes
    Servings: 1
    Cuisine: Café / Mocktail

    Ingredients
      

    • 18 Gram ⦁ Coffee beans (dose)

    • 210 Gram ⦁ Milk

    Method
     

    1. 1. Prepare a shot of espresso using the coffee beans listed above.
    2. 2. To heat milk to 65-70 degrees, then pour in espresso.